By: CS2103T-F11-2 Since: Feb 2020 Licence: MIT
- 1. Overview
- 2. Quick Start
- 3. Commands
- 3.1. View help:
help - 3.2. List all clients:
list-c---Ng Ming Liang - 3.3. Find clients by name:
find-c--- Yong Jie - 3.4. Add a new client profile:
add-c--- Toh Ker Wei - 3.5. Edit a client’s profile:
edit-c---Ng Ming Liang - 3.6. Delete a client:
delete-c--- Li Zi Ying - 3.7. View a client profile:
view-c--- Li Zi Ying - 3.8. Add a client’s exercise:
add-e--- YongJie - 3.9. Edit a client’s exercise:
edit-e--- YongJie - 3.10. Delete a client’s exercise:
delete-e--- Aaron Choo - 3.11. Schedule trainings for a client:
schedule---Ng Ming Liang - 3.12. Export a client’s exercises to CSV format:
export--- Aaron Choo - 3.13. Filter clients based on attribute:
filter-c--- Toh Ker Wei - 3.14. Display visualisations of training progress:
graph--- Li Zi Ying
- 3.1. View help:
- 4. FAQ
- 5. Command Summary
1. Overview
1.1. About FitBiz
FitBiz is a fitness business management tool tailor made for fitness coaches to manage their clients. From managing your client’s profile to planning your schedules, FitBiz will surely ease the pain and monotony of managing a small to medium client portfolio.
This program is primarily a desktop application and is very optimised for those who prefer to work with a Command Line Interface (CLI). If you can type fast, and have clients to train and manage, FitBiz is definitely for you!
1.2. About this User Guide
This User Guide explains how to use FitBiz, as well as provides an understanding of the features and commands and some common use cases of this application.
In this guide, we cover:
-
How to navigate the Graphical User Interface (GUI)
-
How to use the Command Line Interface (CLI)
-
Syntax of the commands available in FitBiz
-
Common use cases for each command
-
Common problems encountered by users
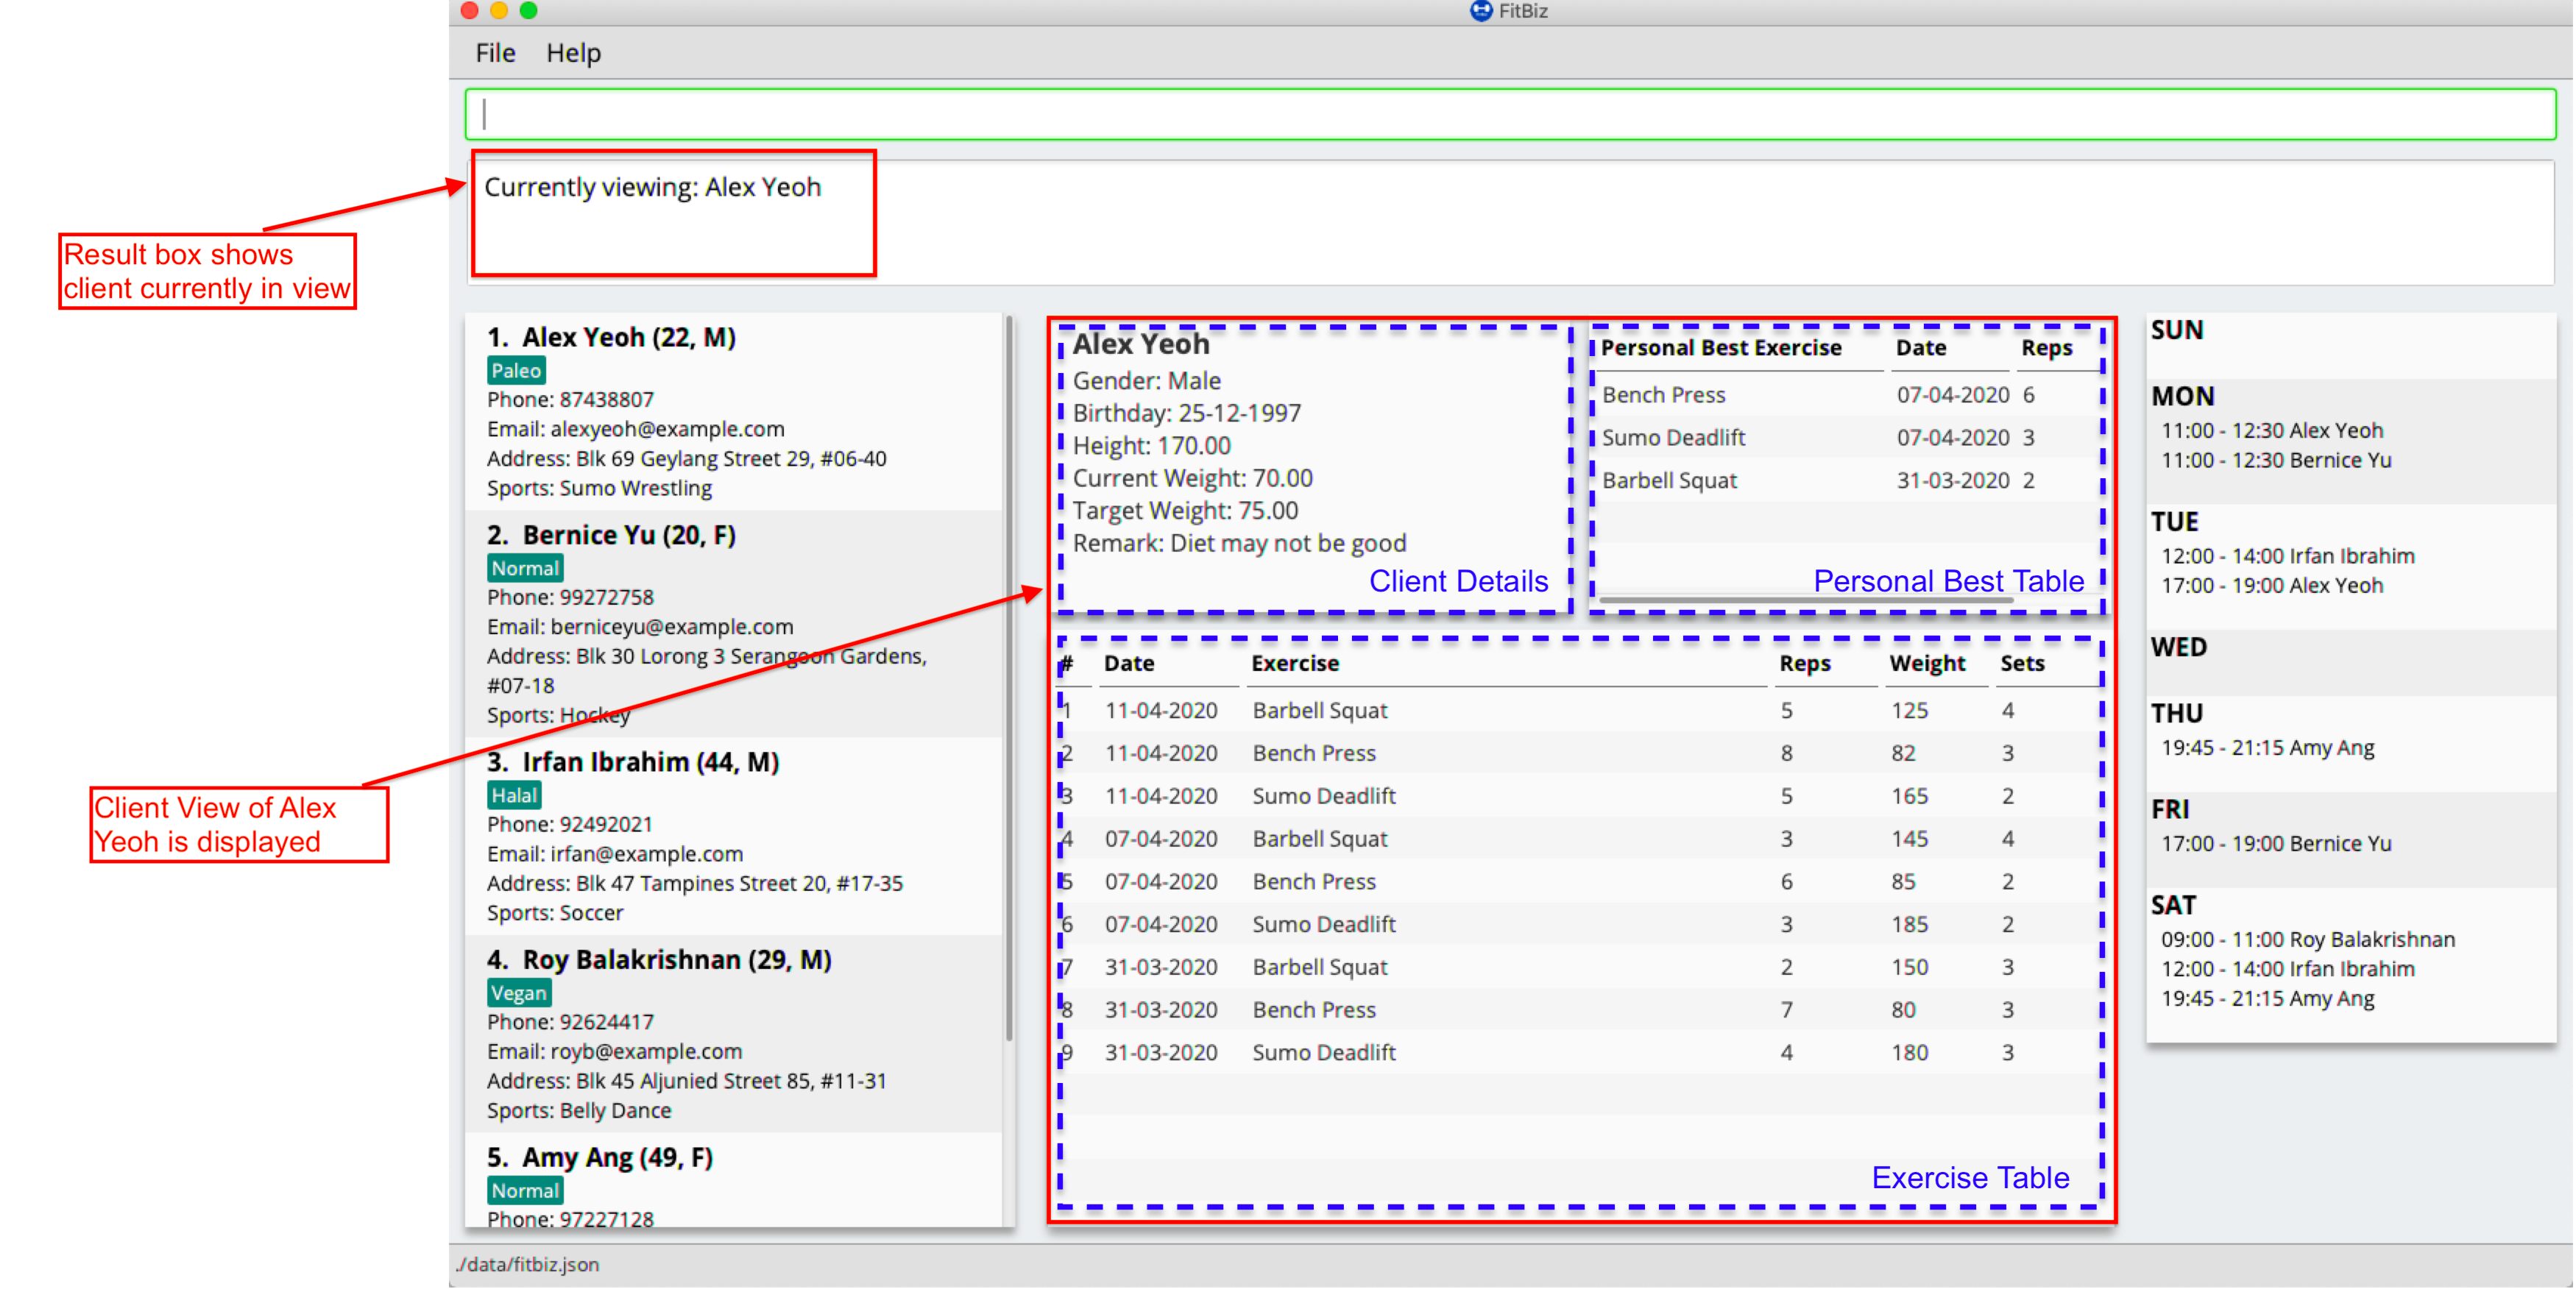
1.3. Understanding the Graphical User Interface (GUI)
When you first launch FitBiz, you will be greeted by the GUI. In this section, we shall learn about what each section of this GUI is responsible for.
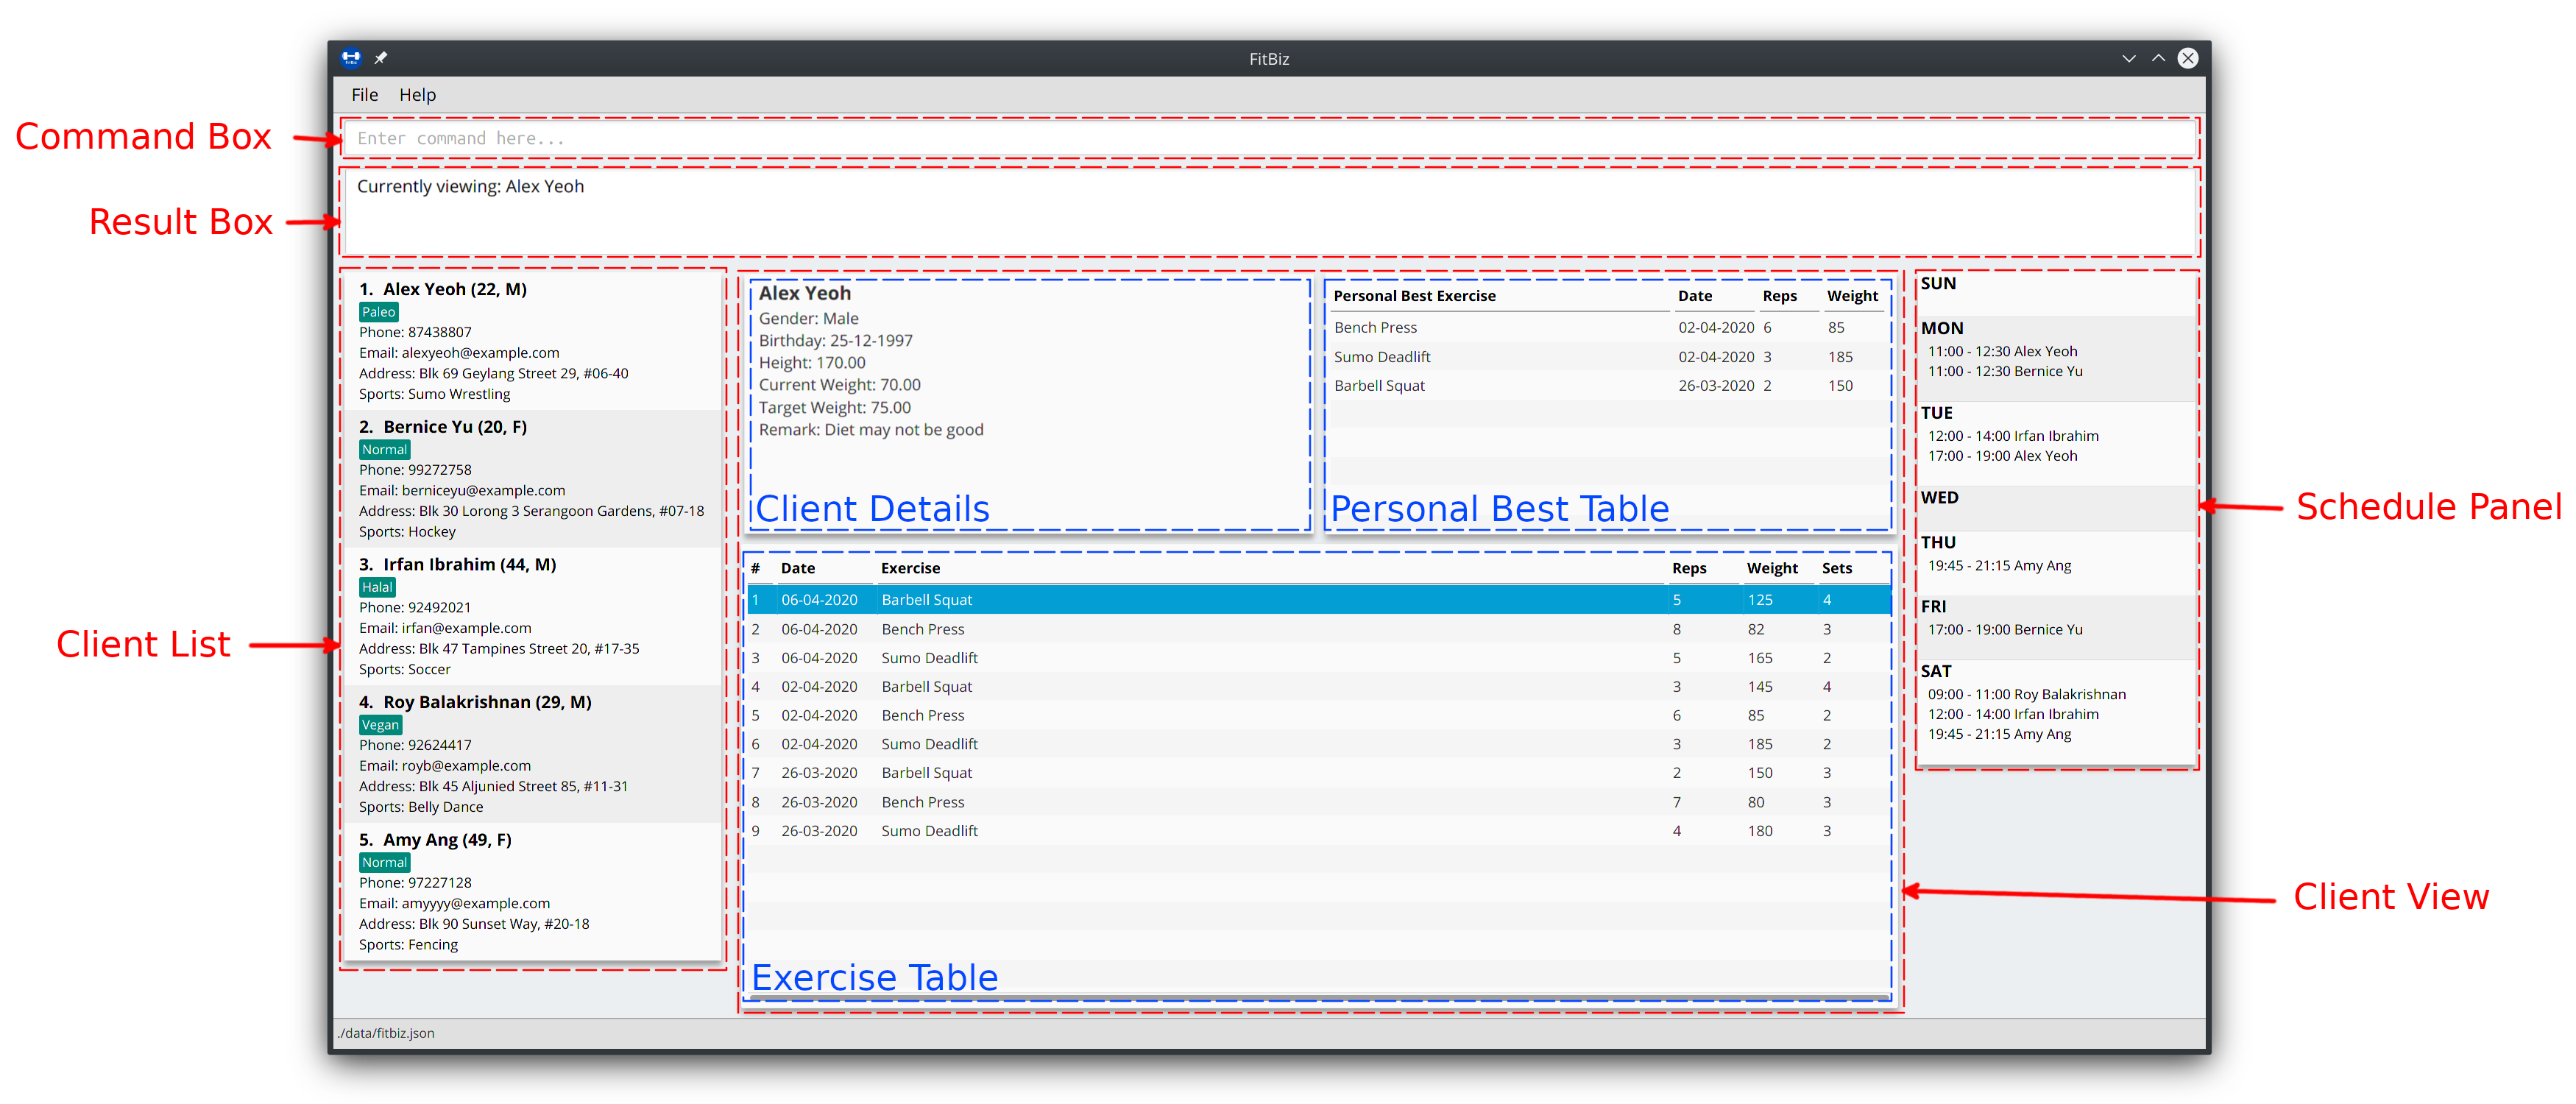
-
Command Box: this is where you enter your commands
-
Note that the border will glow green if your command is successfully executed, and red otherwise
-
-
Result Box: this displays feedback and other useful information about your commands that you have just entered
-
Client List: this displays all your clients currently recorded in FitBiz
-
Schedule Panel: this displays all your schedules of your clients
-
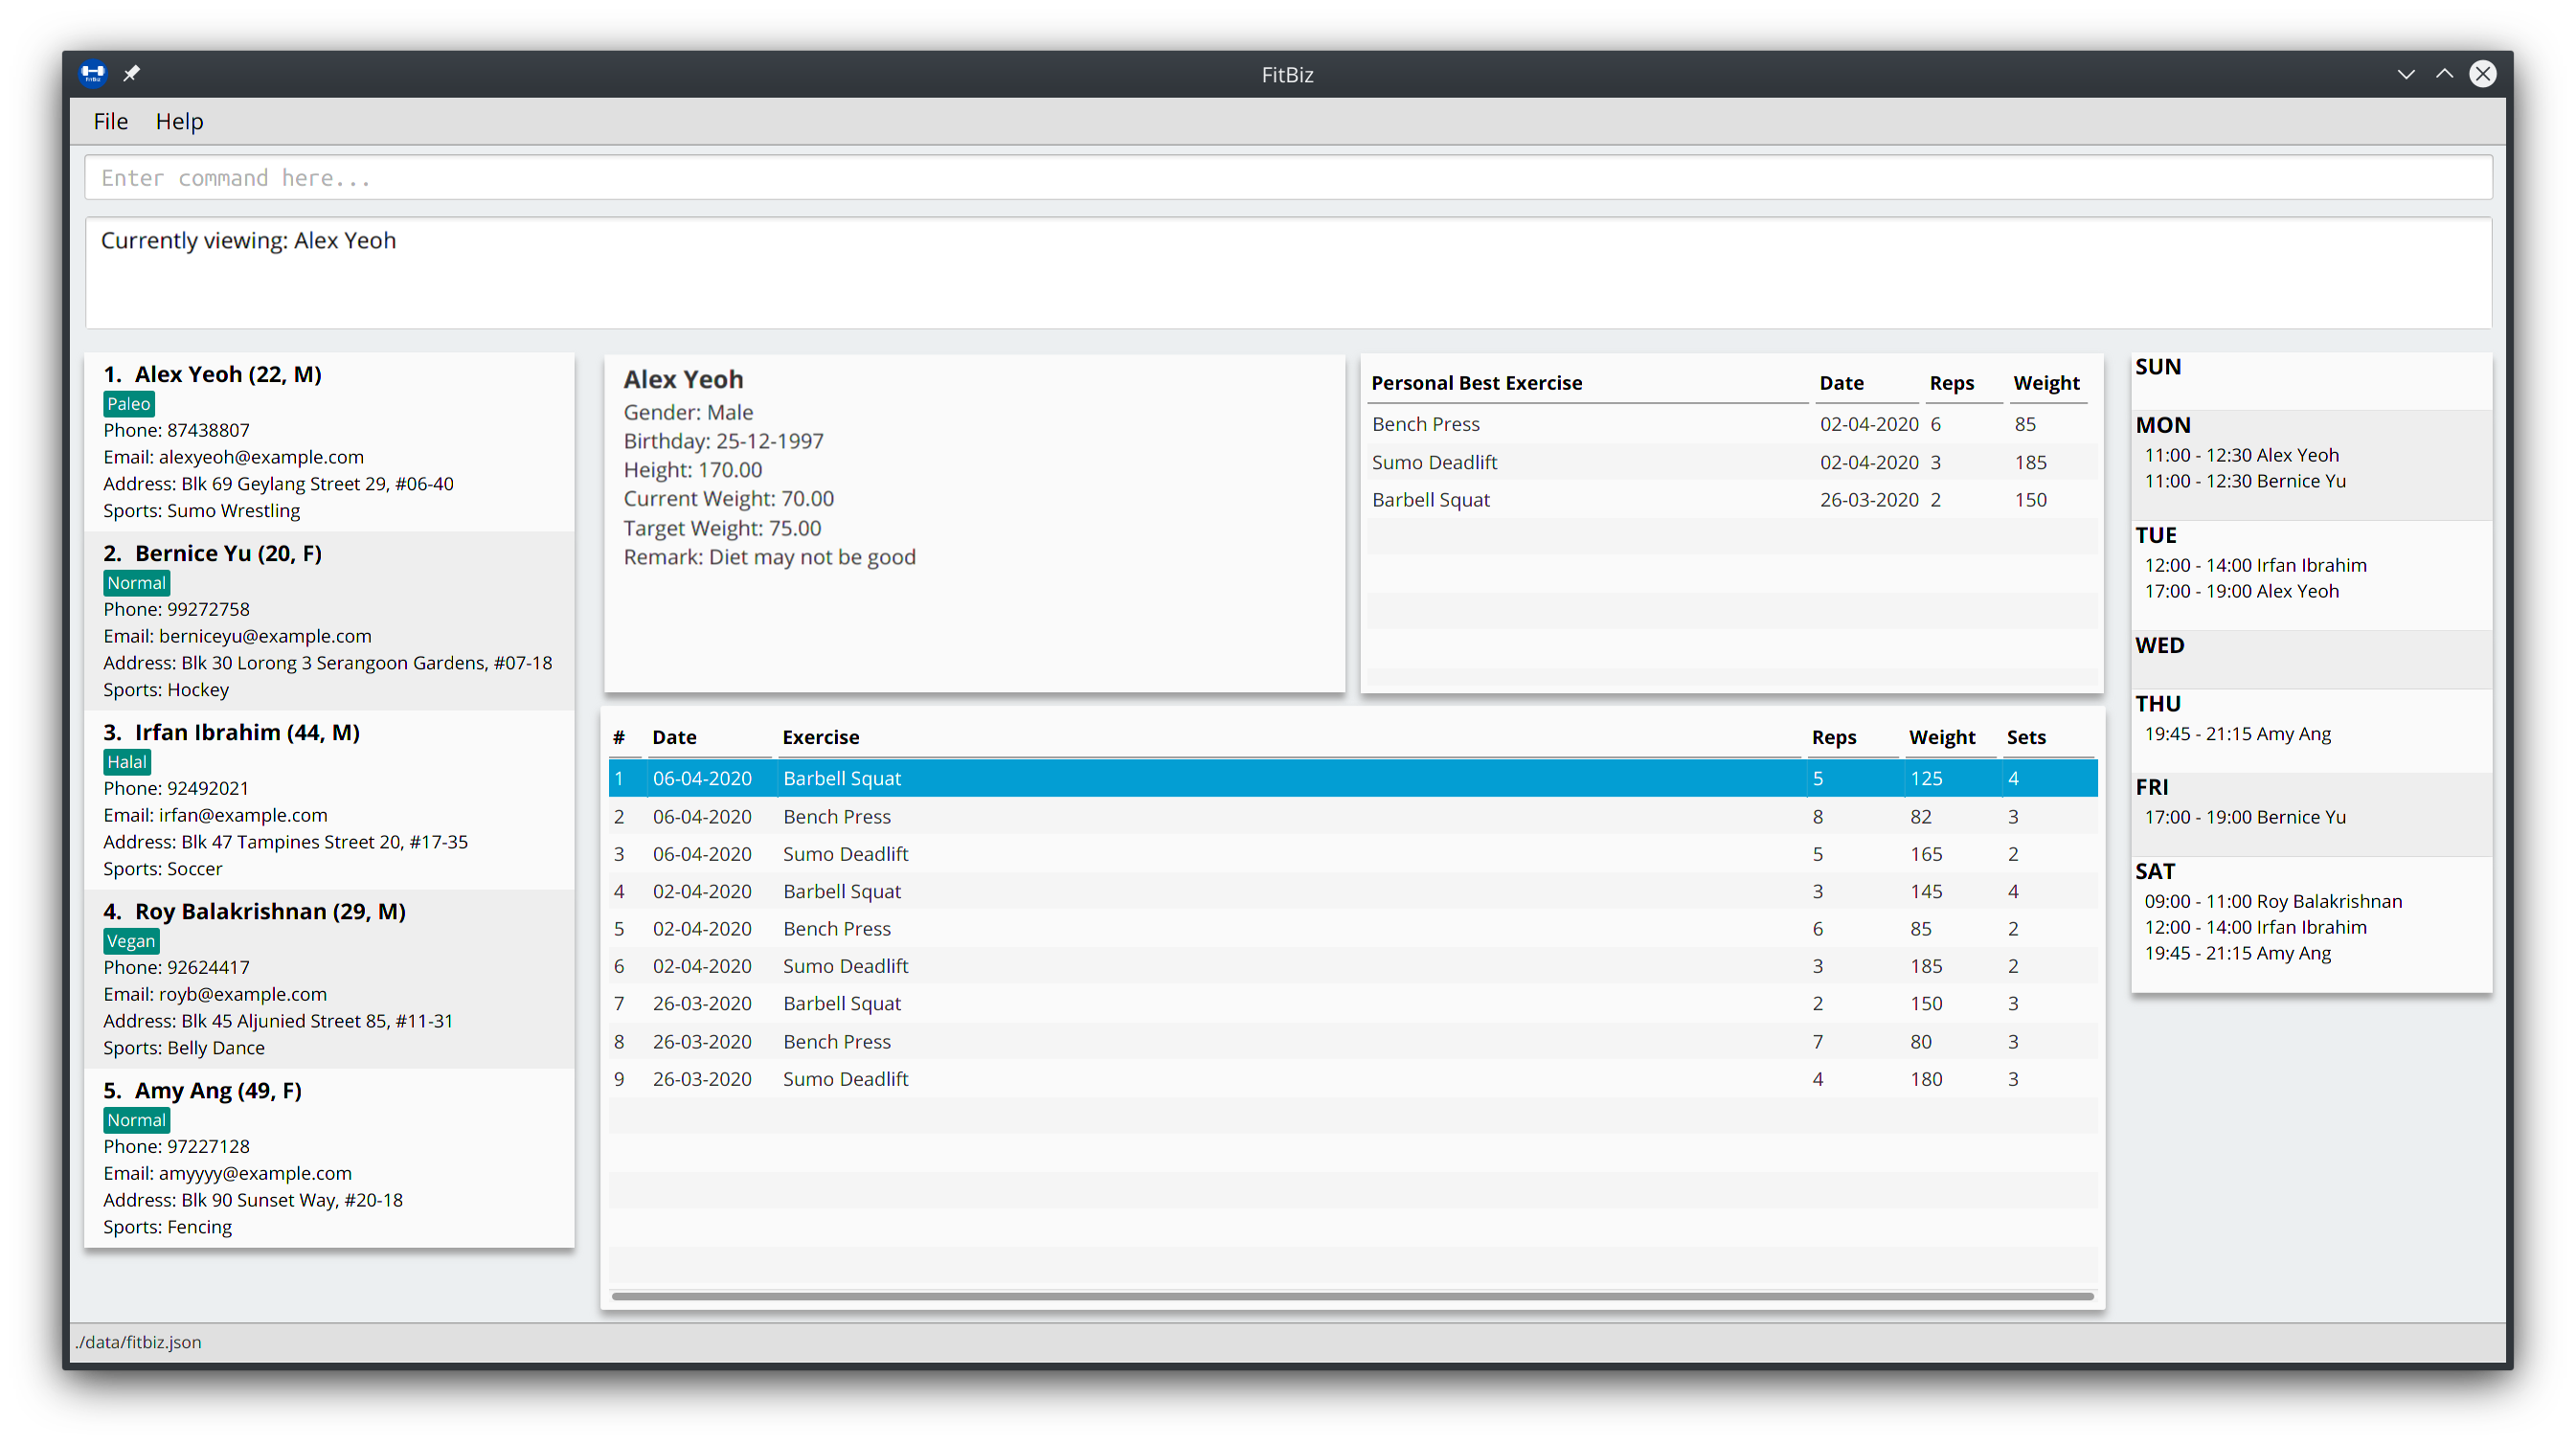
Client View: this displays all the important details about the client you are currently viewing (which we refer to as client in view). In here, we have 3 further sections:
-
Client Details: this displays other information about your client that is otherwise not found in Client List
-
Exercise Table: this displays all the exercises recorded for the current client in view
-
Personal Best Table: this displays the personal bests of the exercises done by the current client in view
-
| If this is your first time using FitBiz and you have just started up the application, you may realise that the Client View section is missing. This is because you are currently not viewing a client. Refer to [view-c-command] for more information about what you need to do. |
1.4. Understanding the Command Line Interface (CLI) --- Aaron Choo
Even though FitBiz comes with a GUI, it is mainly used to display data. Most of the user interaction occurs via the CLI, which in FitBiz, is comprised of the Command Box and the Result Box. We understand that CLIs have higher barriers to entry and may scare some inexperienced users away. As such, we have provided some features common to most modern CLIs to make your user experience with FitBiz much better. In this section, we shall look at the Command History and the Command Autocomplete feature, and learn how to effectively utilise them.
1.4.1. Command History
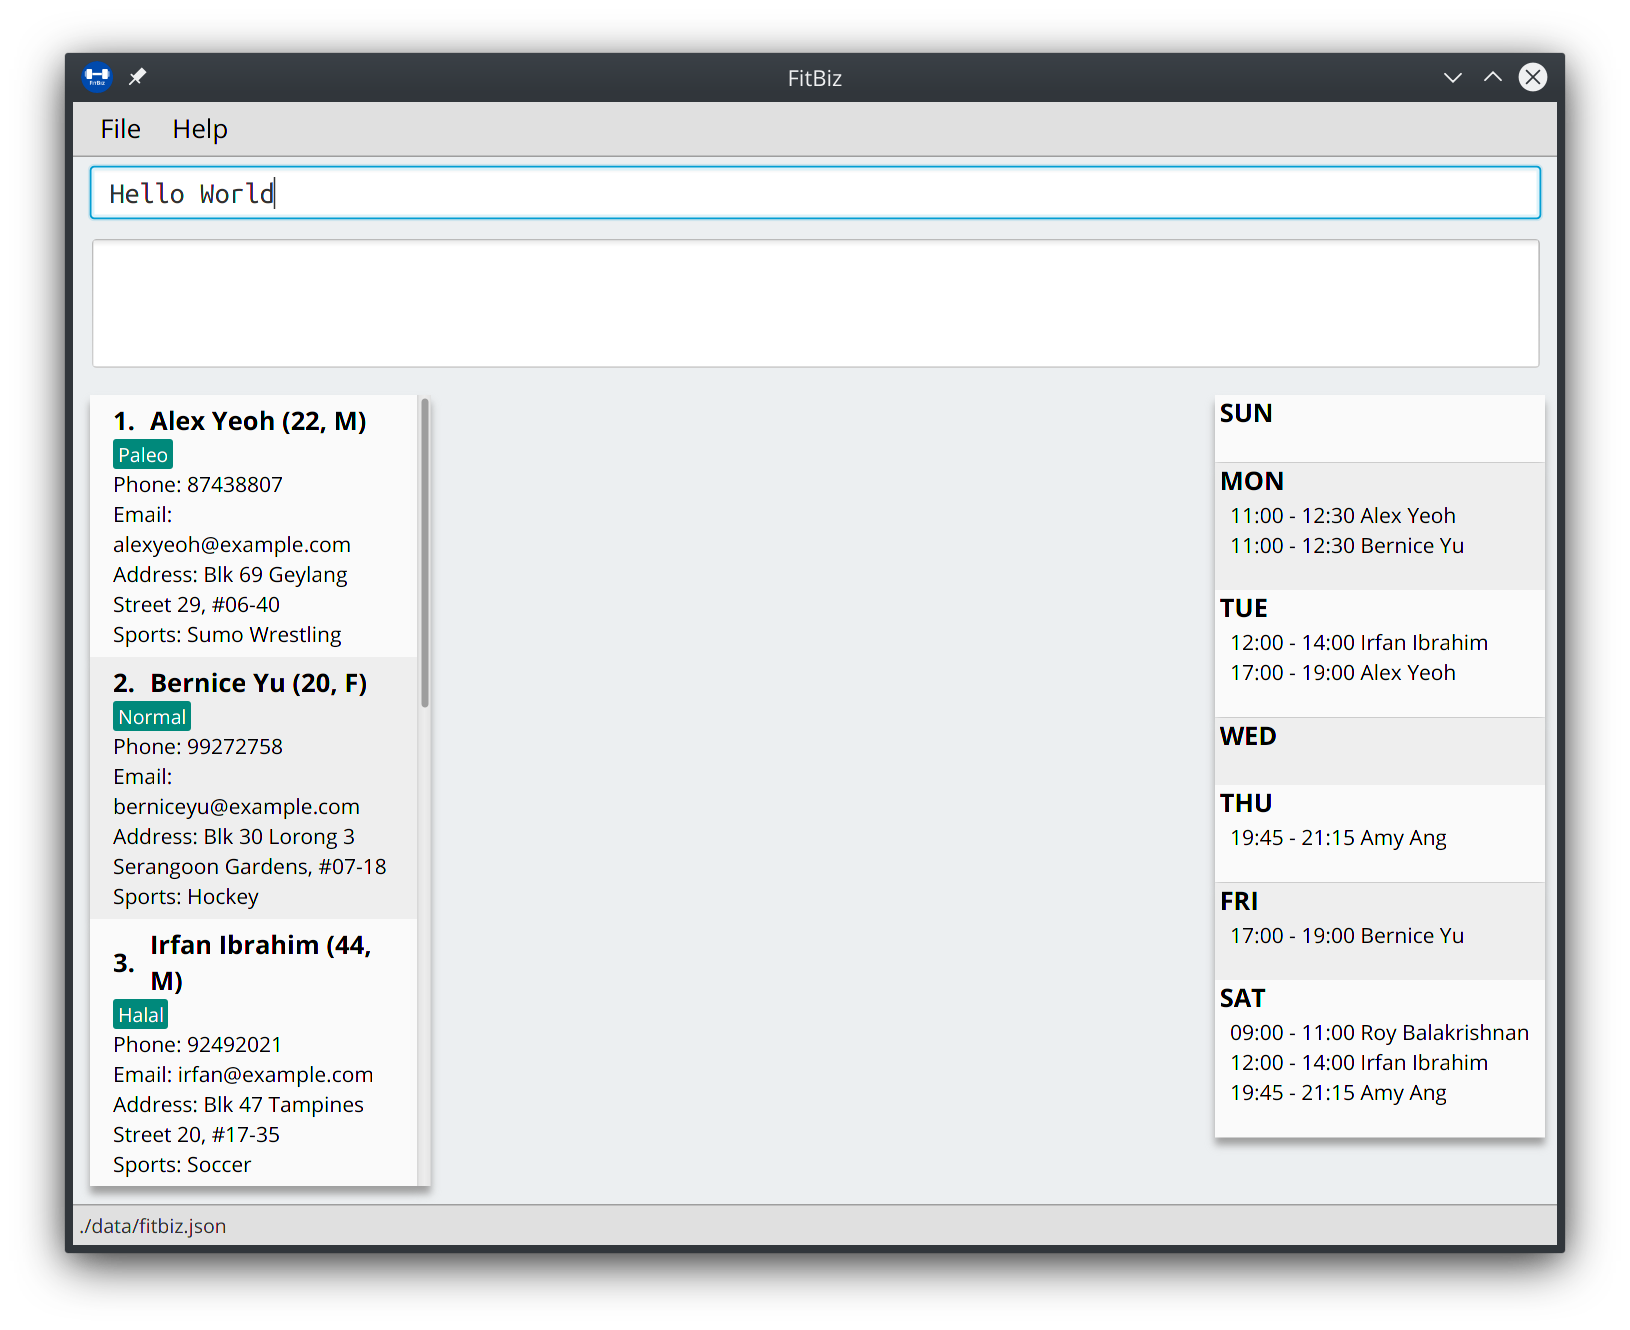
Similar to most modern CLIs, users of FitBiz can press the ↑ and ↓ arrow keys to cycle through their previously entered commands. If you have prior experience in using a CLI, feel free to skip this section as this should be second nature to you. If not, here is a quick tutorial on how to use this time saving feature.
First, start by typing anything into the Command Box. It need not have to be a valid command (like those shown in Section 3, “Commands”). In our example, we chose to type Hello World:
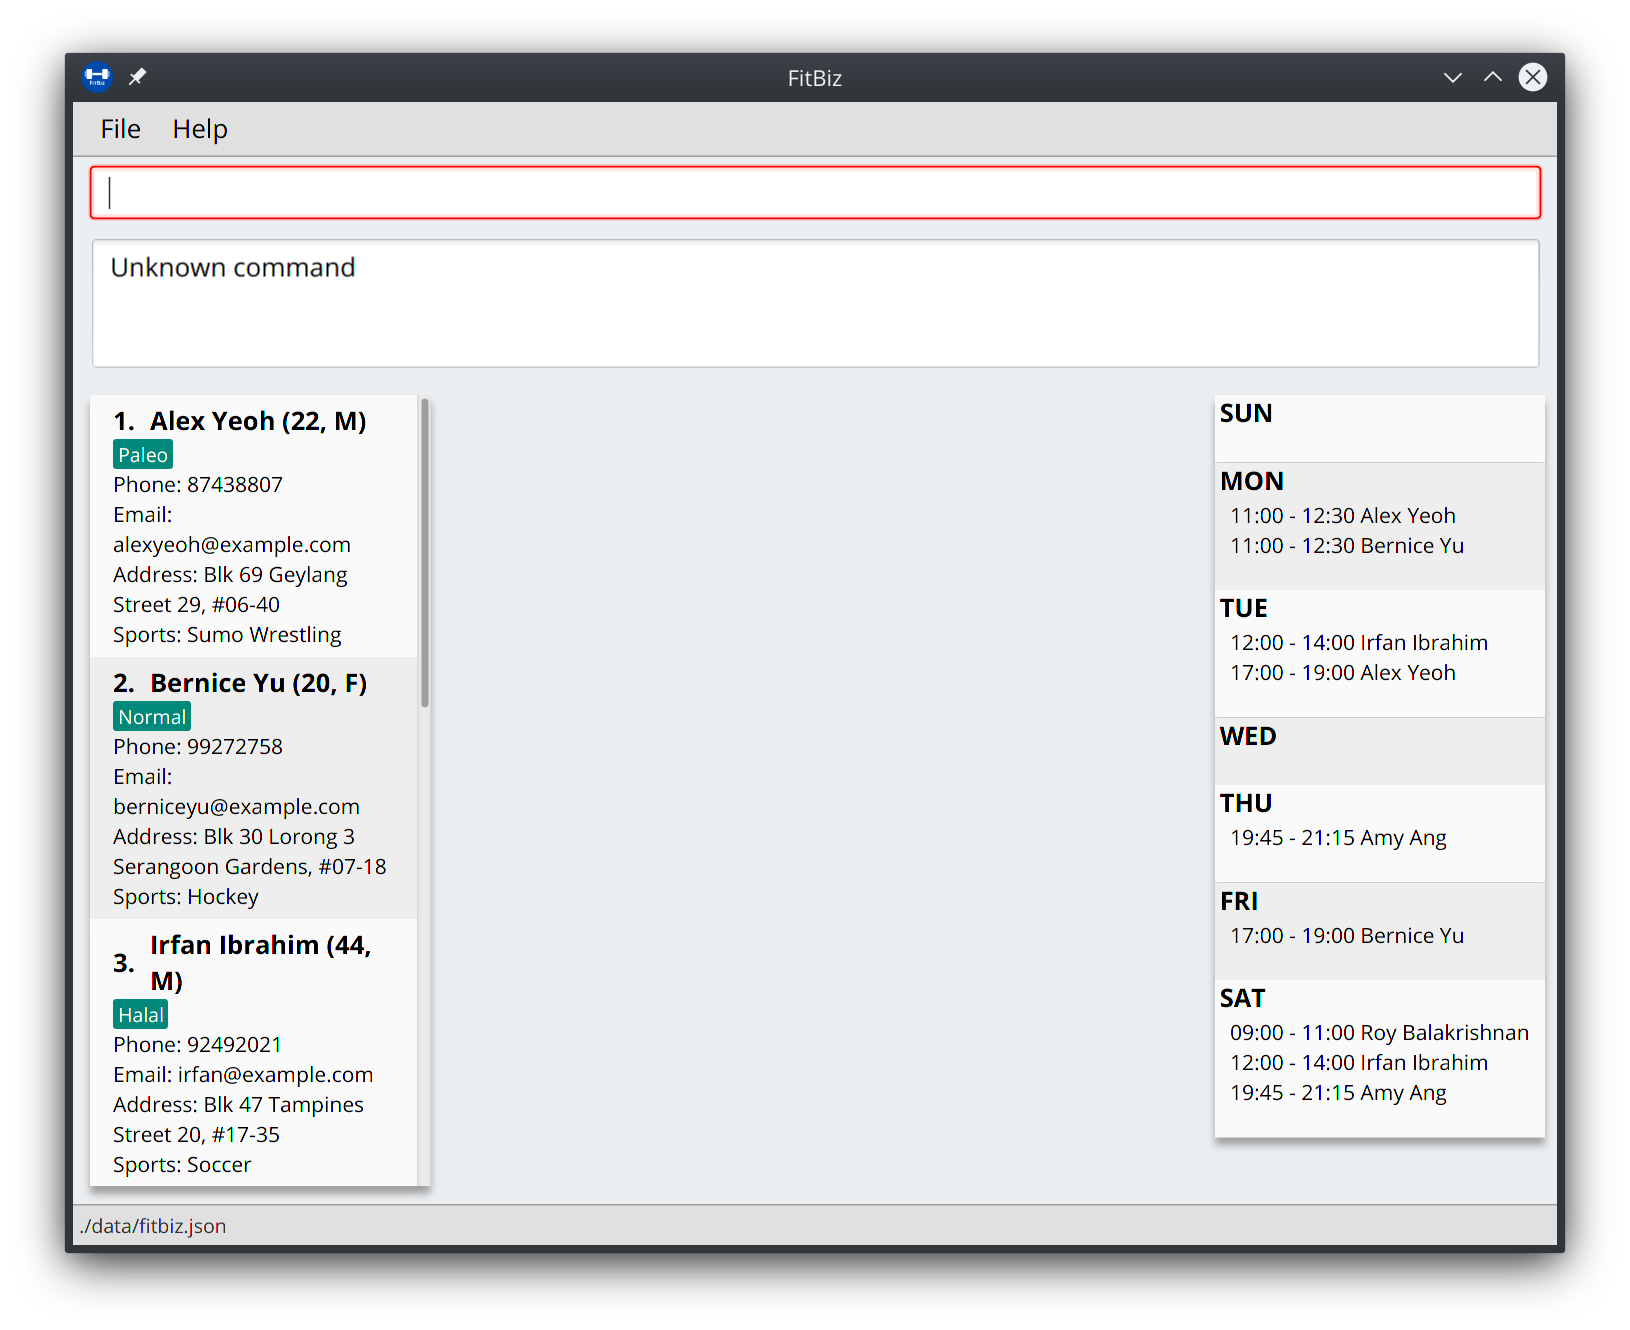
Next, hit the Enter key to enter the command into FitBiz. Notice that whatever you have typed in the Command Box should have disappeared. If you did not enter a valid command (like Hello World), the border of the Command Box would have turned red, and you would have been prompted by a message saying Unknown command in the Result Box like shown:
Next, continue entering different commands into the Command Box. You can safely ignore all the Unknown command prompts for now.
Once you feel like you have entered enough commands into FitBiz, try hitting the ↑ key several times. You should start to see the history of your entered commands displaying in the Command Box in reverse chronological order. If you press the ↑ key enough times (or simply hold down the key), you would realise that the command in the Command Box no longer changes. In our case, it displays Hello World, our first ever entered command.
Likewise, you can also see your more recent commands by pressing the ↓ key. Again, if you press it enough times, you would realise that the text from the Command Box disappeares (right after displaying your most recent command). This means that you have reached the end of your command history.
| If you are not currently browsing the history, you can press the ↓ key to immediately clear what you are currently typing in the Command Box. |
1.4.2. Command Autocomplete
Again, similar to most modern CLIs, users of FitBiz can press the Tab key to autocomplete commands that they have partially typed. If the partially typed letters uniquely identifies a valid command in FitBiz (see Section 3, “Commands”), the complete command will automatically appear in the Command Box. Otherwise, a list of all commands similar to the ambiguous letters will appear in the Result Box.
Also, we understand that some of FitBiz’s commands may be particularly long and diffcult to remember. In order to remedy this, we have also provided autocompletion of parameter prefixes for some commands, as well as the use of Tab to easily get to the next prefix. When autocompleting commands, the caret position will also be automatically set to the most optimal position corresponding to the completed command.
To see this feature in action, type add-c into the Command Box and press Tab:
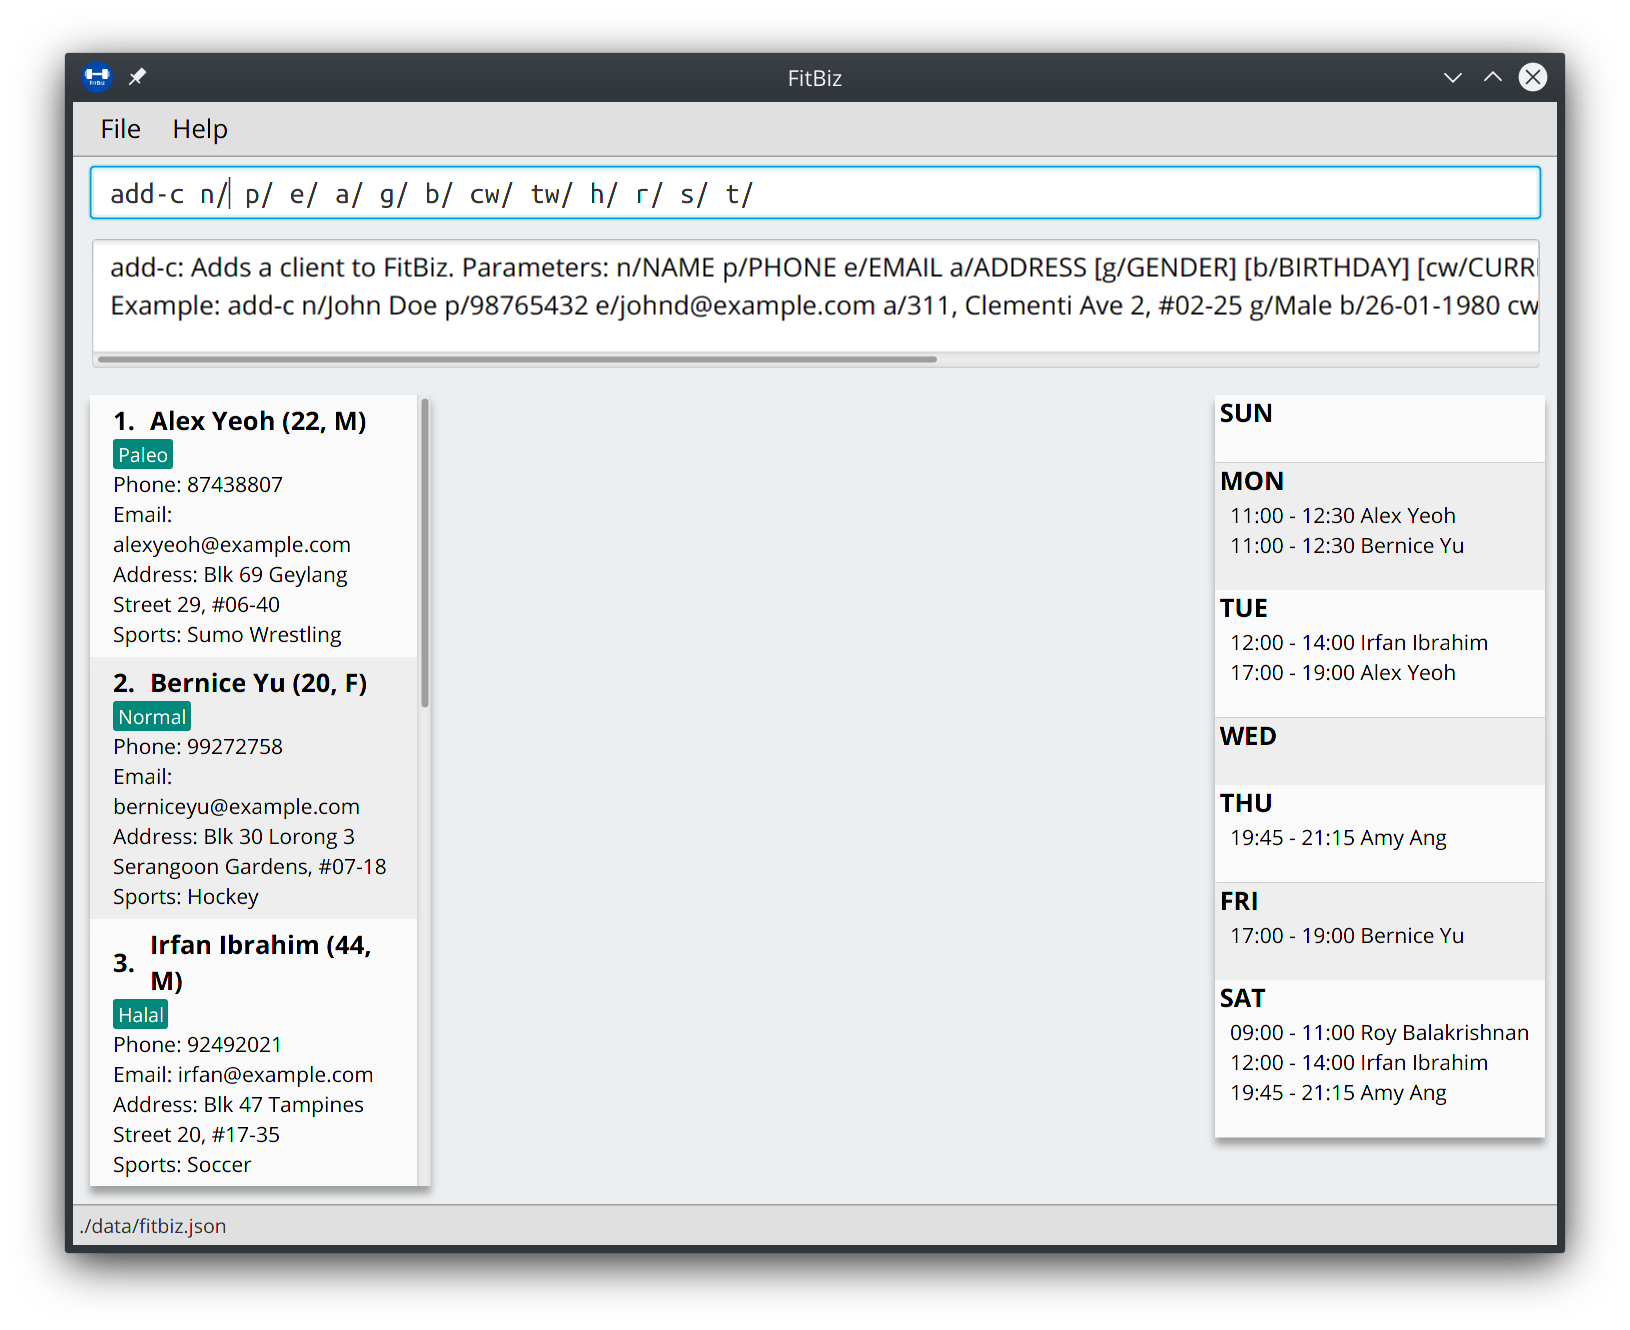
Immediately, you should have noticed three things:
-
All the parameter prefixes pertaining to the
add-ccommand have been automatically completed for you -
Your caret is placed right after the
n/for you to type your parameter -
The Result Box shows you the usage of the
add-ccommand
Now, you can also press the Tab key repeatedly to go to the next parameter prefix, instead of wasting time using your mouse.
Note however, that there are some similar commands in FitBiz that have the same few starting letters. For example: both add-c and add-e starts with the letter "a". As such, hitting Tab when you have only typed a in the Command Box will not autocomplete either command (unfortunately, FitBiz cannot read your mind). However, you will find that the command will be completed up till add-, the point where add-e and add-c differs. The Result Box will also prompt you with the list of all similar commands found:
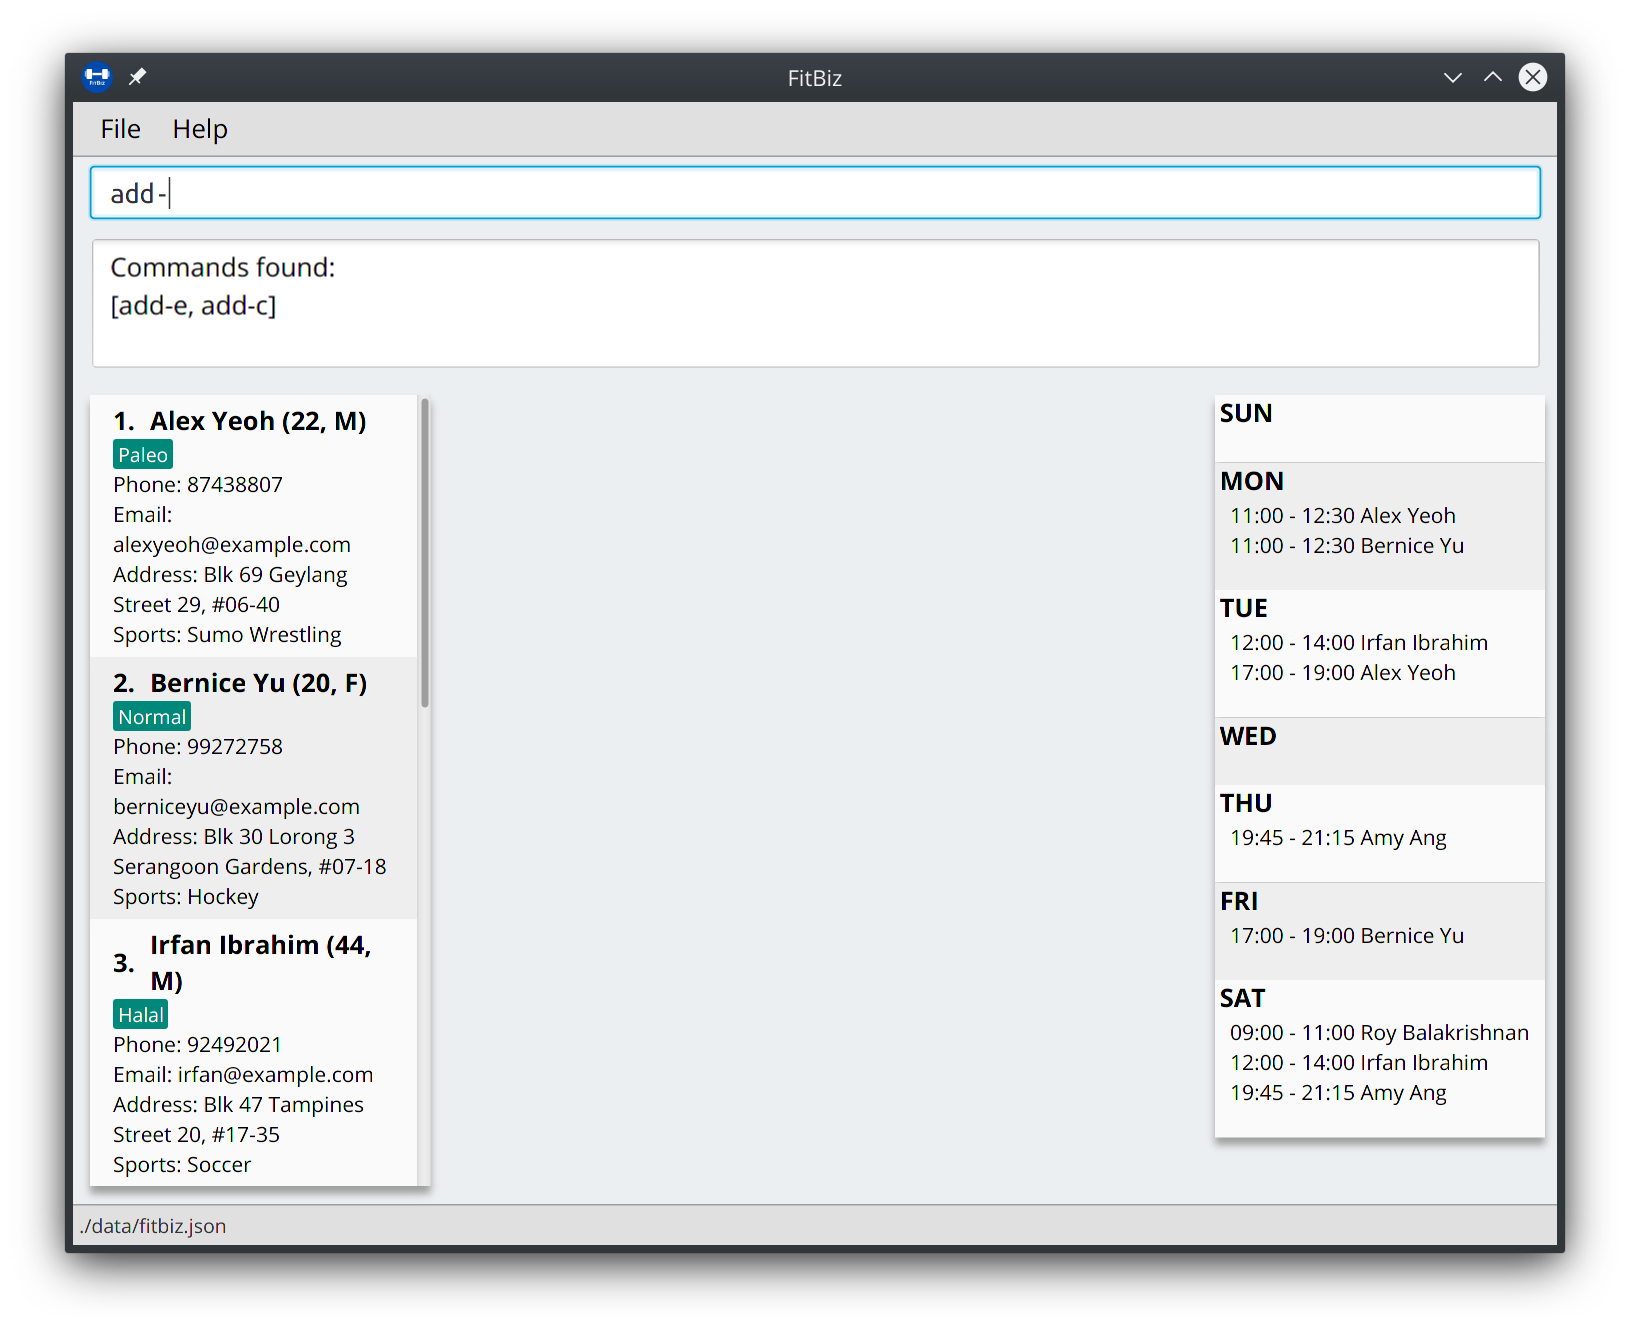
To autocomplete the parameter prefixes like in the first example above, you would just have to complete the command and press Tab once more.
Commands and their parameters in FitBiz are always separated by white spaces (ie. schedule 1 sch/). As such, the Tab key will only try to autocomplete your command if your current input in the Command Box is a single word. In other words, if your input is made up of more than one word separated by white spaces, FitBiz will ignore your use of Tab. Do not be surprised when you try to autocomplete more than a single word like add some thing, and yet receive no response from FitBiz.
|
The autocompletion of the parameter prefixes are only for these commands: add-c, add-e, filter-c, graph, and schedule. Autocompletion of prefixes for edit commands are not included as we understand that most likely than not, users would only choose to edit one field at a time.
|
2. Quick Start
-
Ensure you have Java 11 or above installed in your Computer
-
Download the latest
FitBiz.jarhere -
Move the
FitBiz.jarfile to the folder you want to use as the home folder of this application (to reduce clutter, an empty folder is recommended as files will be generated) -
Double-click the file to start the app. The following GUI should appear in a few seconds:
-
Type the command in the Command Box and press Enter to execute it
-
For example, executing the
helpcommand will lead you to this page
-
-
Refer to the GUI and CLI guides if you need help navigating this application
-
Refer to Section 3, “Commands” for the details and syntax of each command
3. Commands
This section introduces the syntax and the usages of the commands available in FitBiz. In explaining the syntax, we will adhere to the following format:
-
Words in
UPPER_SNAKE_CASEare the parameters to be supplied by the user-
e.g. in
add-c n/NAME,NAMEis a parameter which can be used asadd-c n/John Doe
-
-
Items in square brackets are optional
-
e.g.
n/NAME [t/TAG]can be used asn/John Doe t/friendor asn/John Doe
-
-
Items with
…after them can be used multiple times including zero times-
e.g.
[t/TAG]…can be used as (i.e. 0 times),t/friend,t/friend t/familyetc.
-
-
Parameters can be in any order
-
e.g. if the command specifies
n/NAME p/PHONE_NUMBER,p/PHONE_NUMBER n/NAMEis also acceptable
-
3.1. View help: help
Entering help into FitBiz will bring you right here! 😬
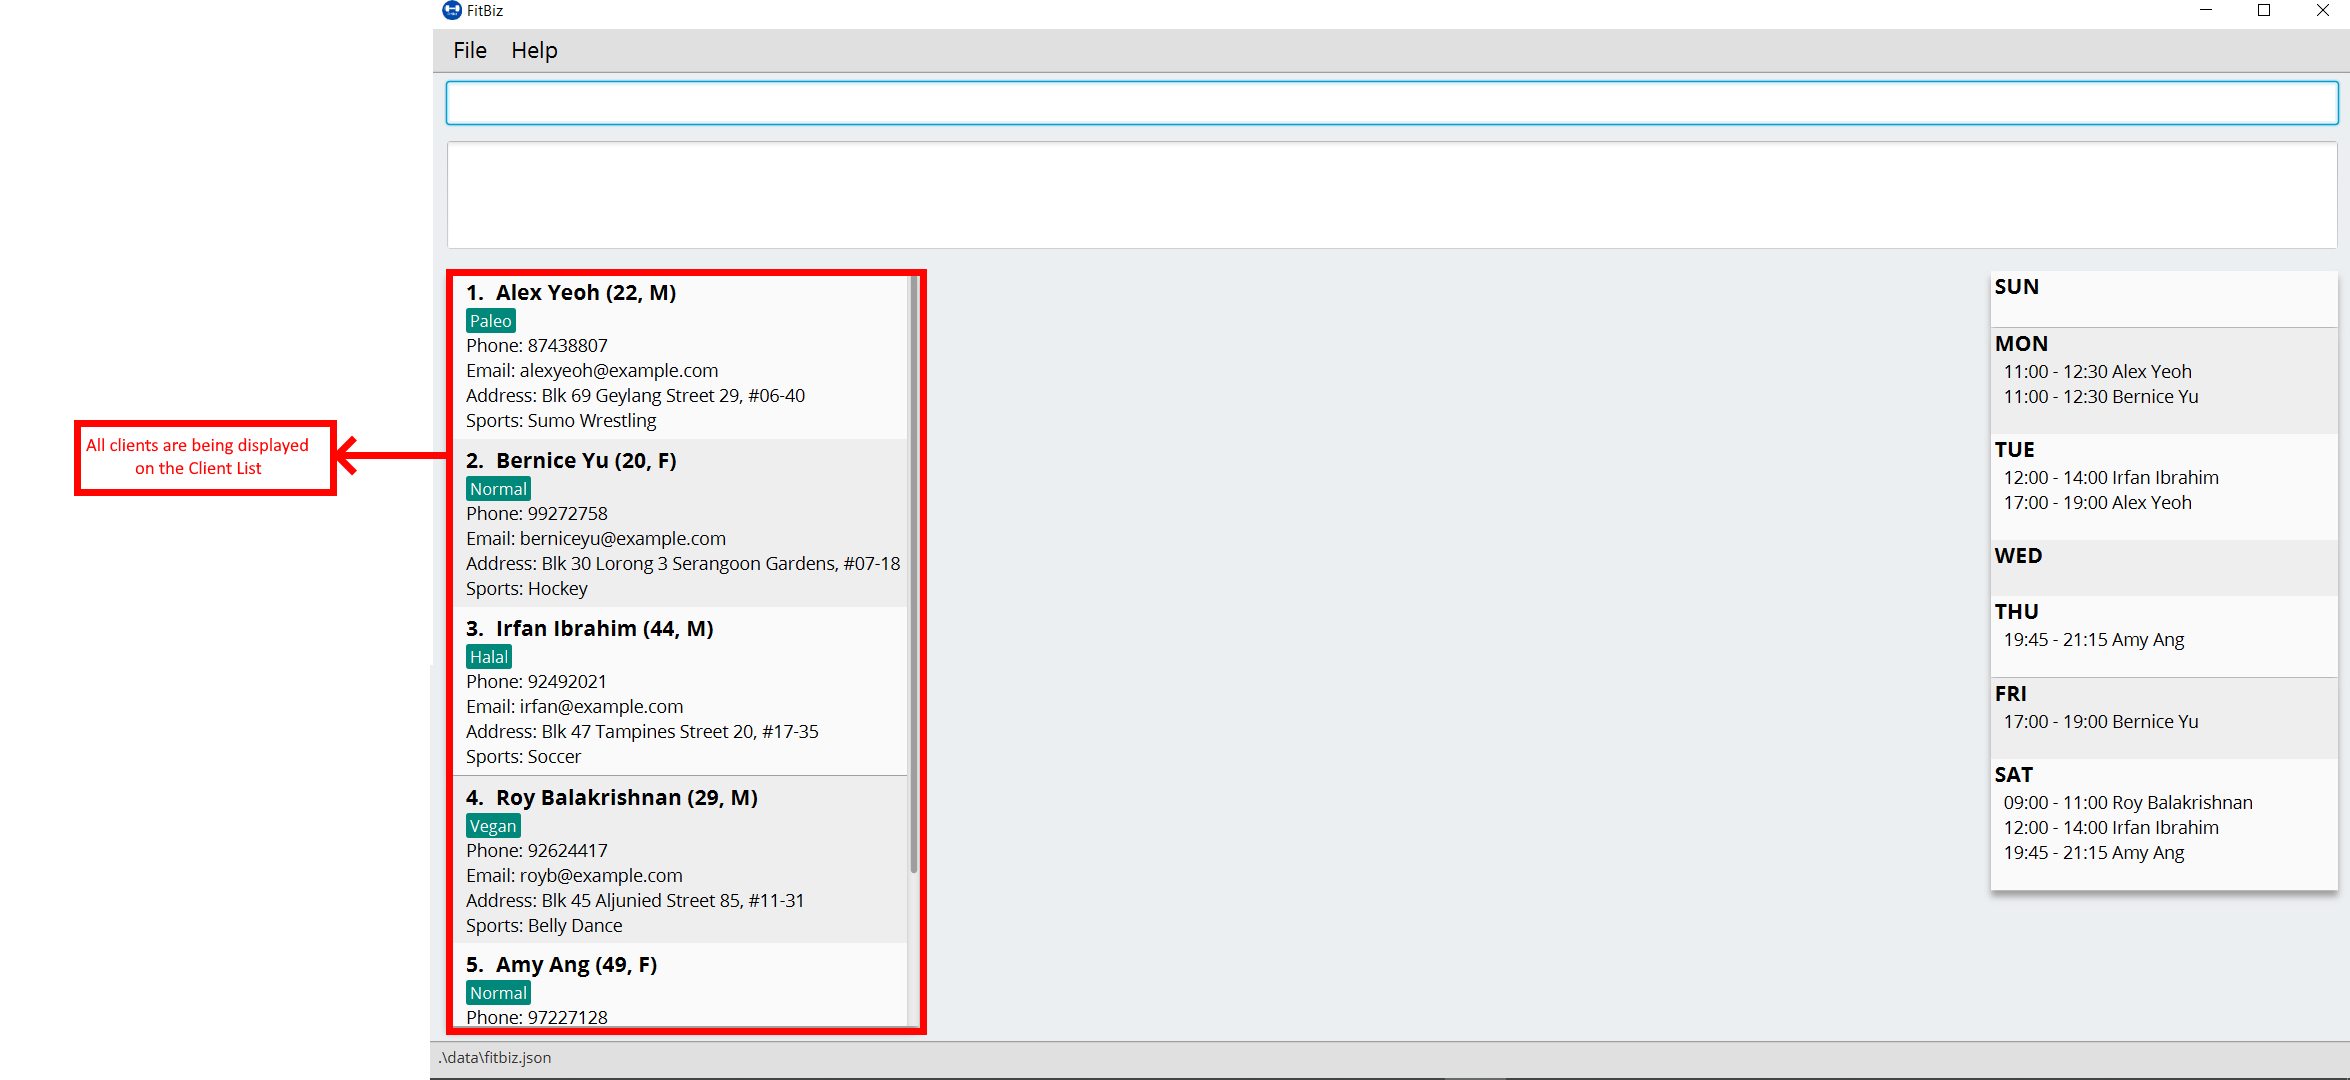
3.2. List all clients: list-c ---Ng Ming Liang
You can list all clients on the Client List. This is useful when your Client List has been filtered by the filter-c command, and you want to view all clients again. When using list-c, there will be no difference to the Client List if it is already showing all clients.
Format: list-c
3.2.1. Parameters
The command is simply list-c, and has no additional parameters.
3.2.2. Example
Let’s say you start off with the full Client List as shown below.
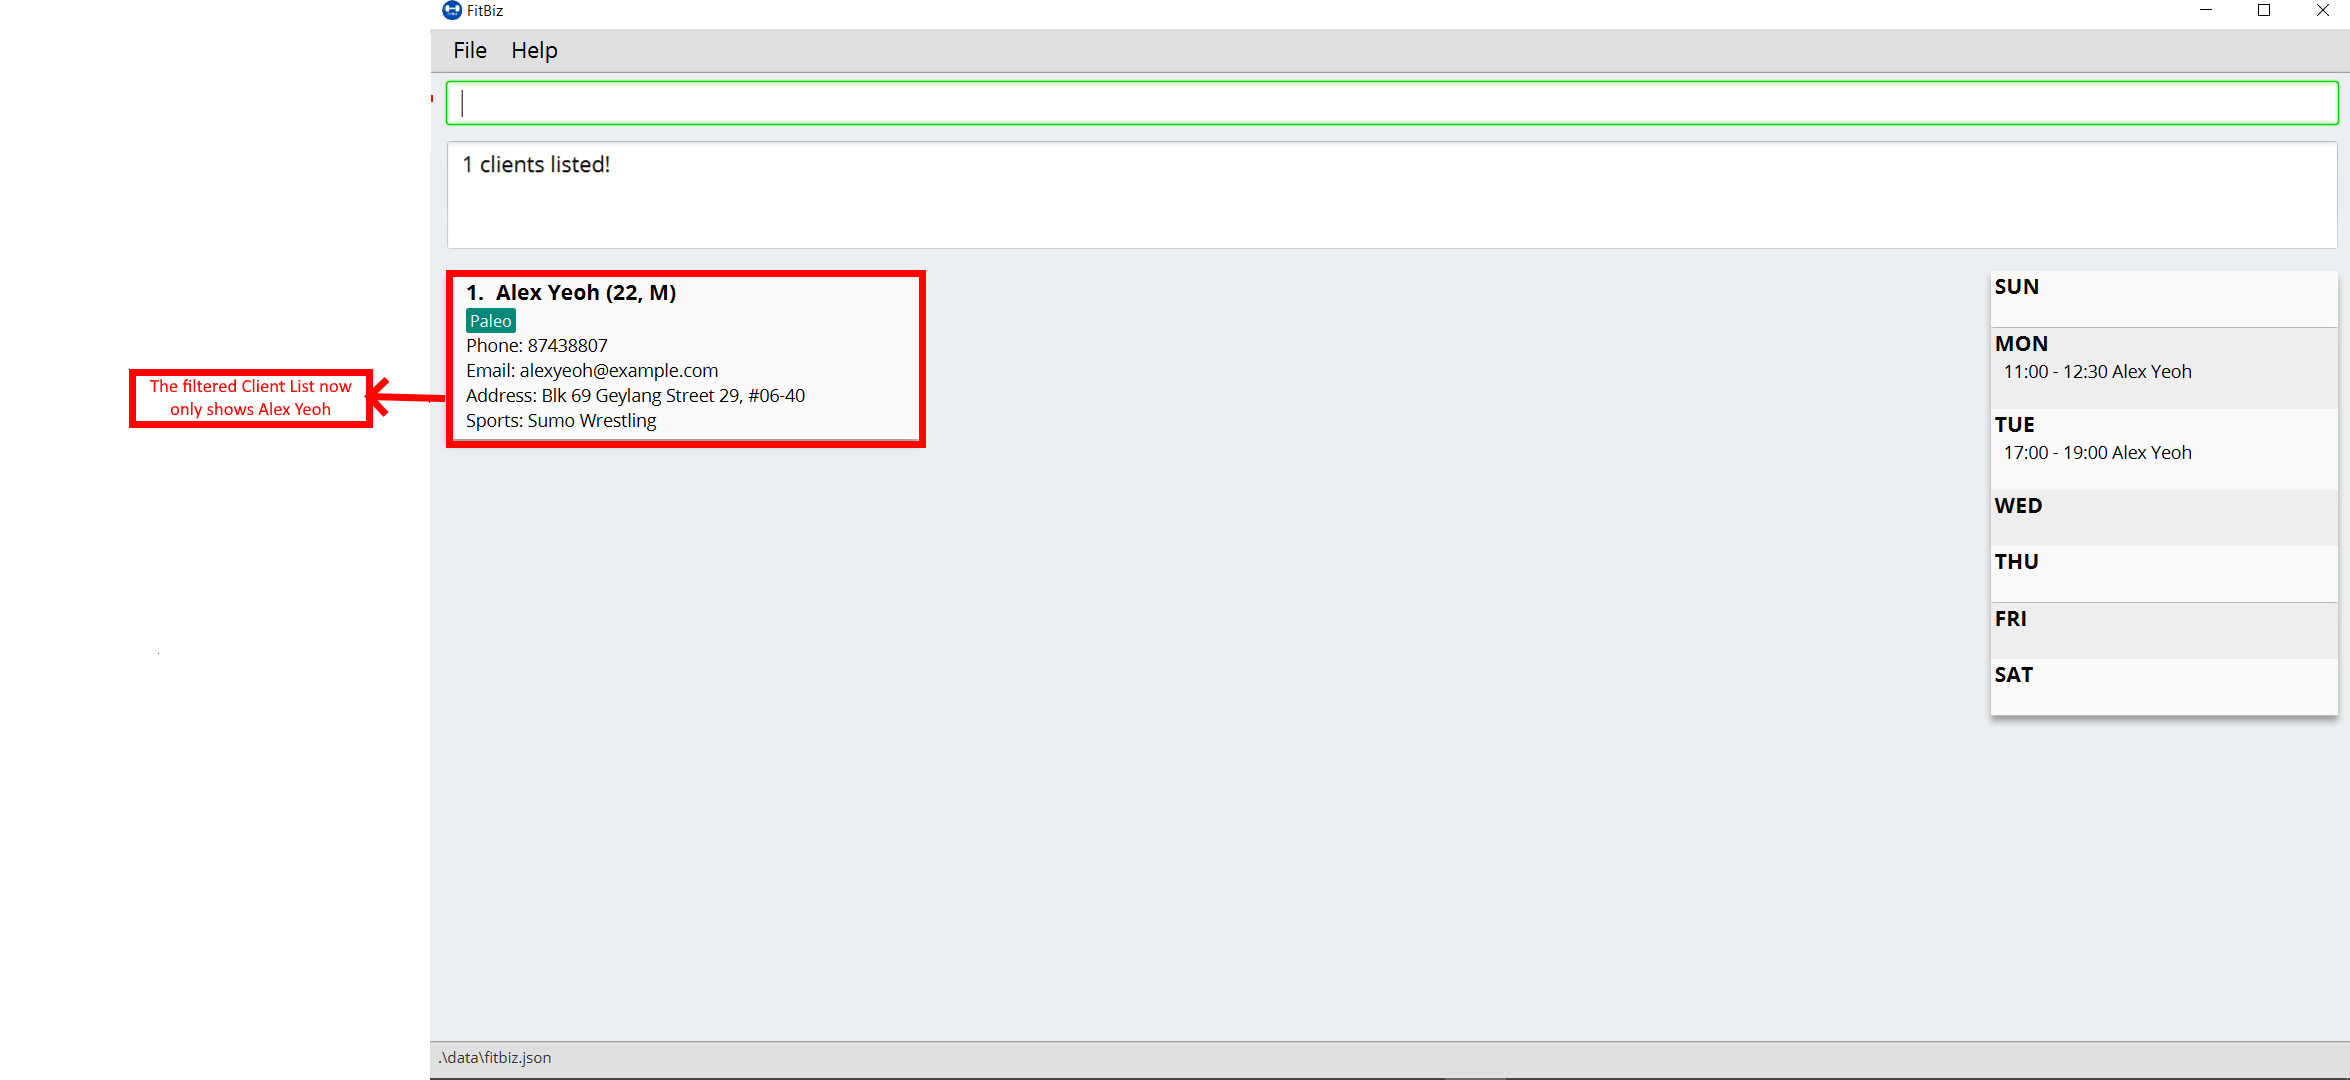
Now, let’s say you use the command filter-c to filter the clients with the Paleo tag as such:
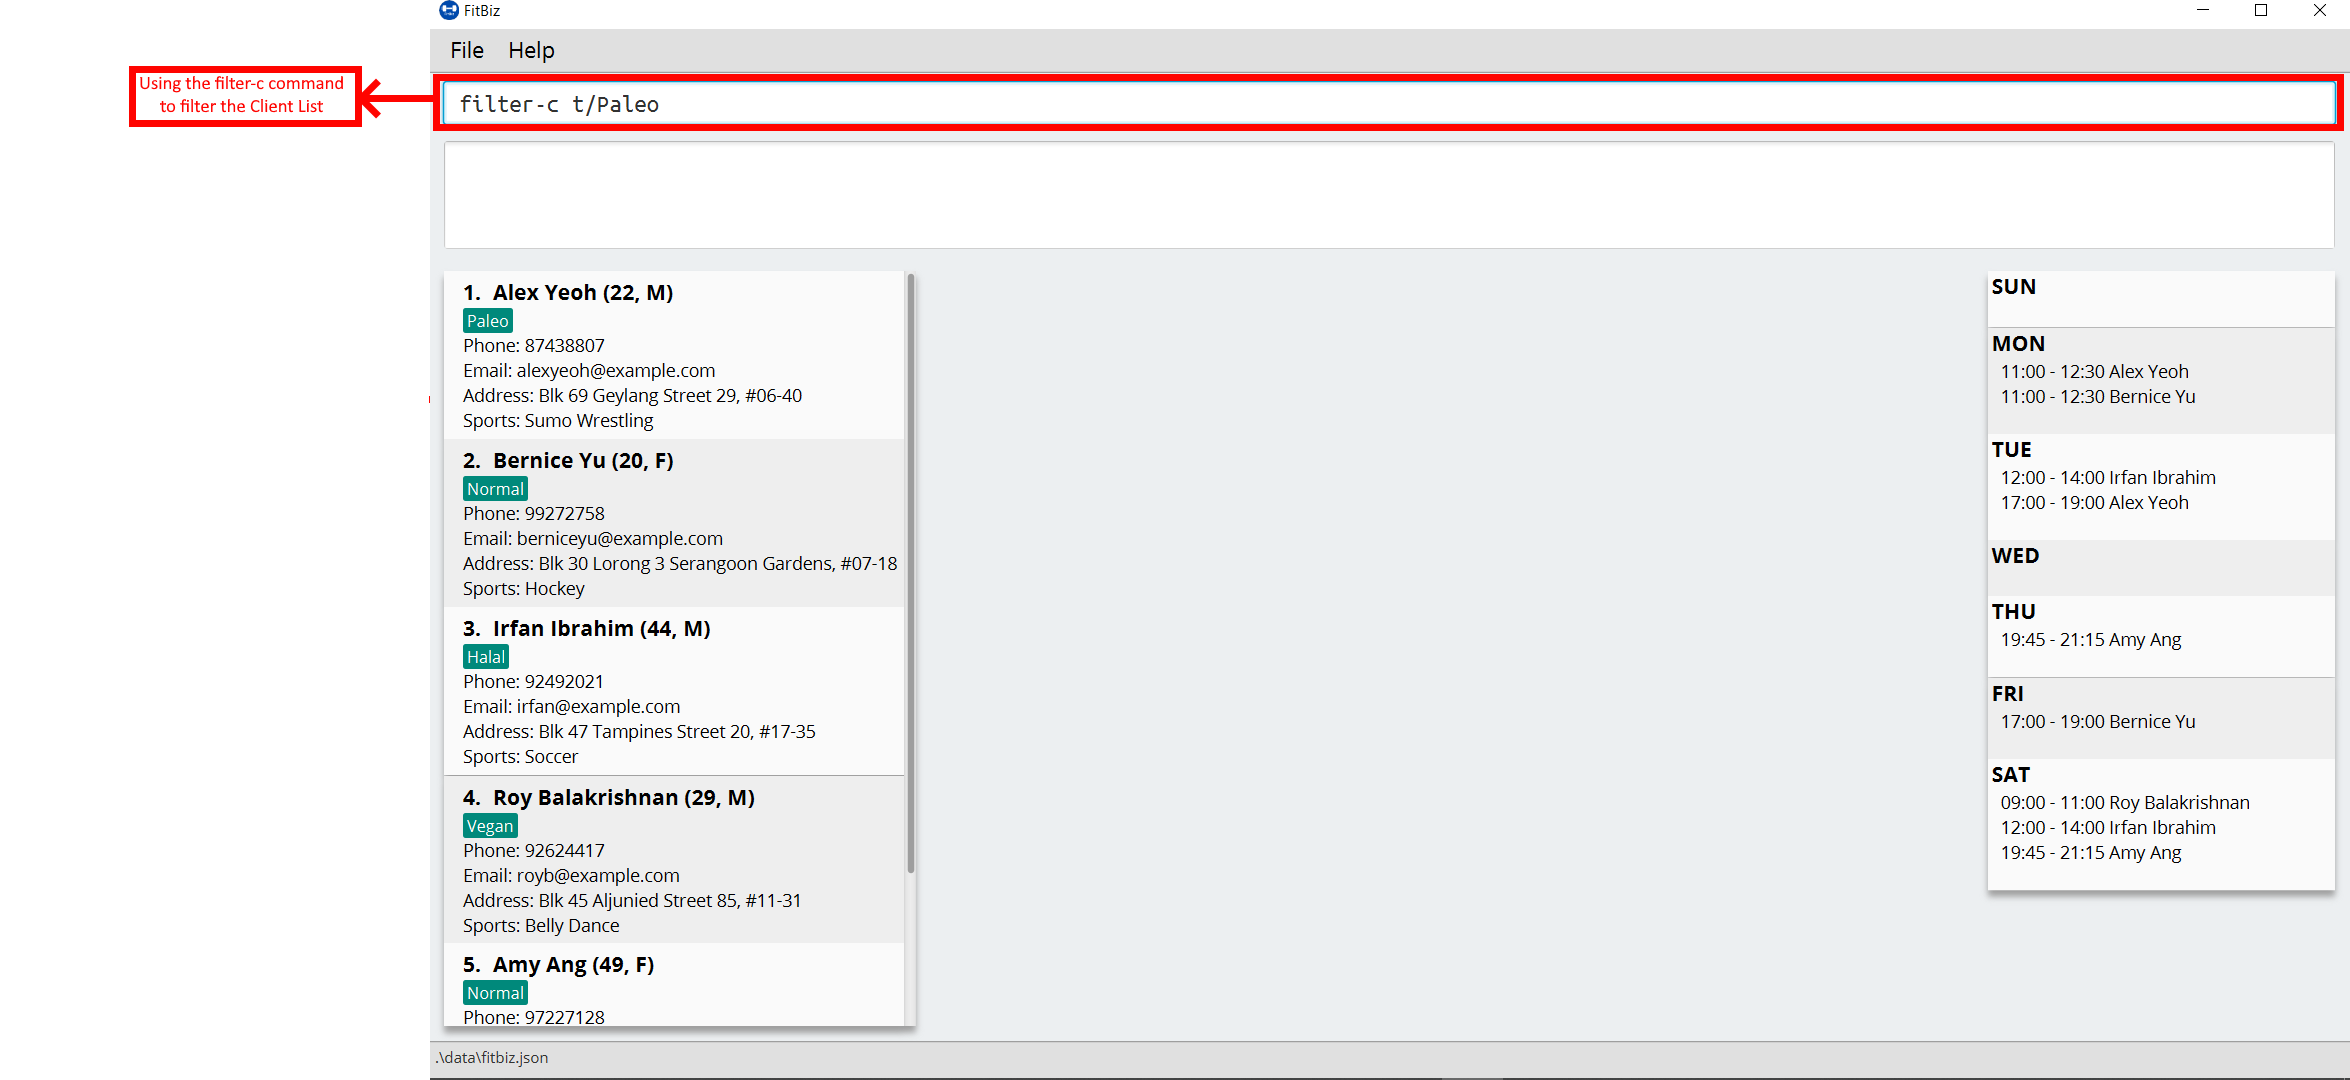
Your Client List will now display only the clients that have the Paleo tag. In this example, the only client that fit this requirement is Alex Yeoh.
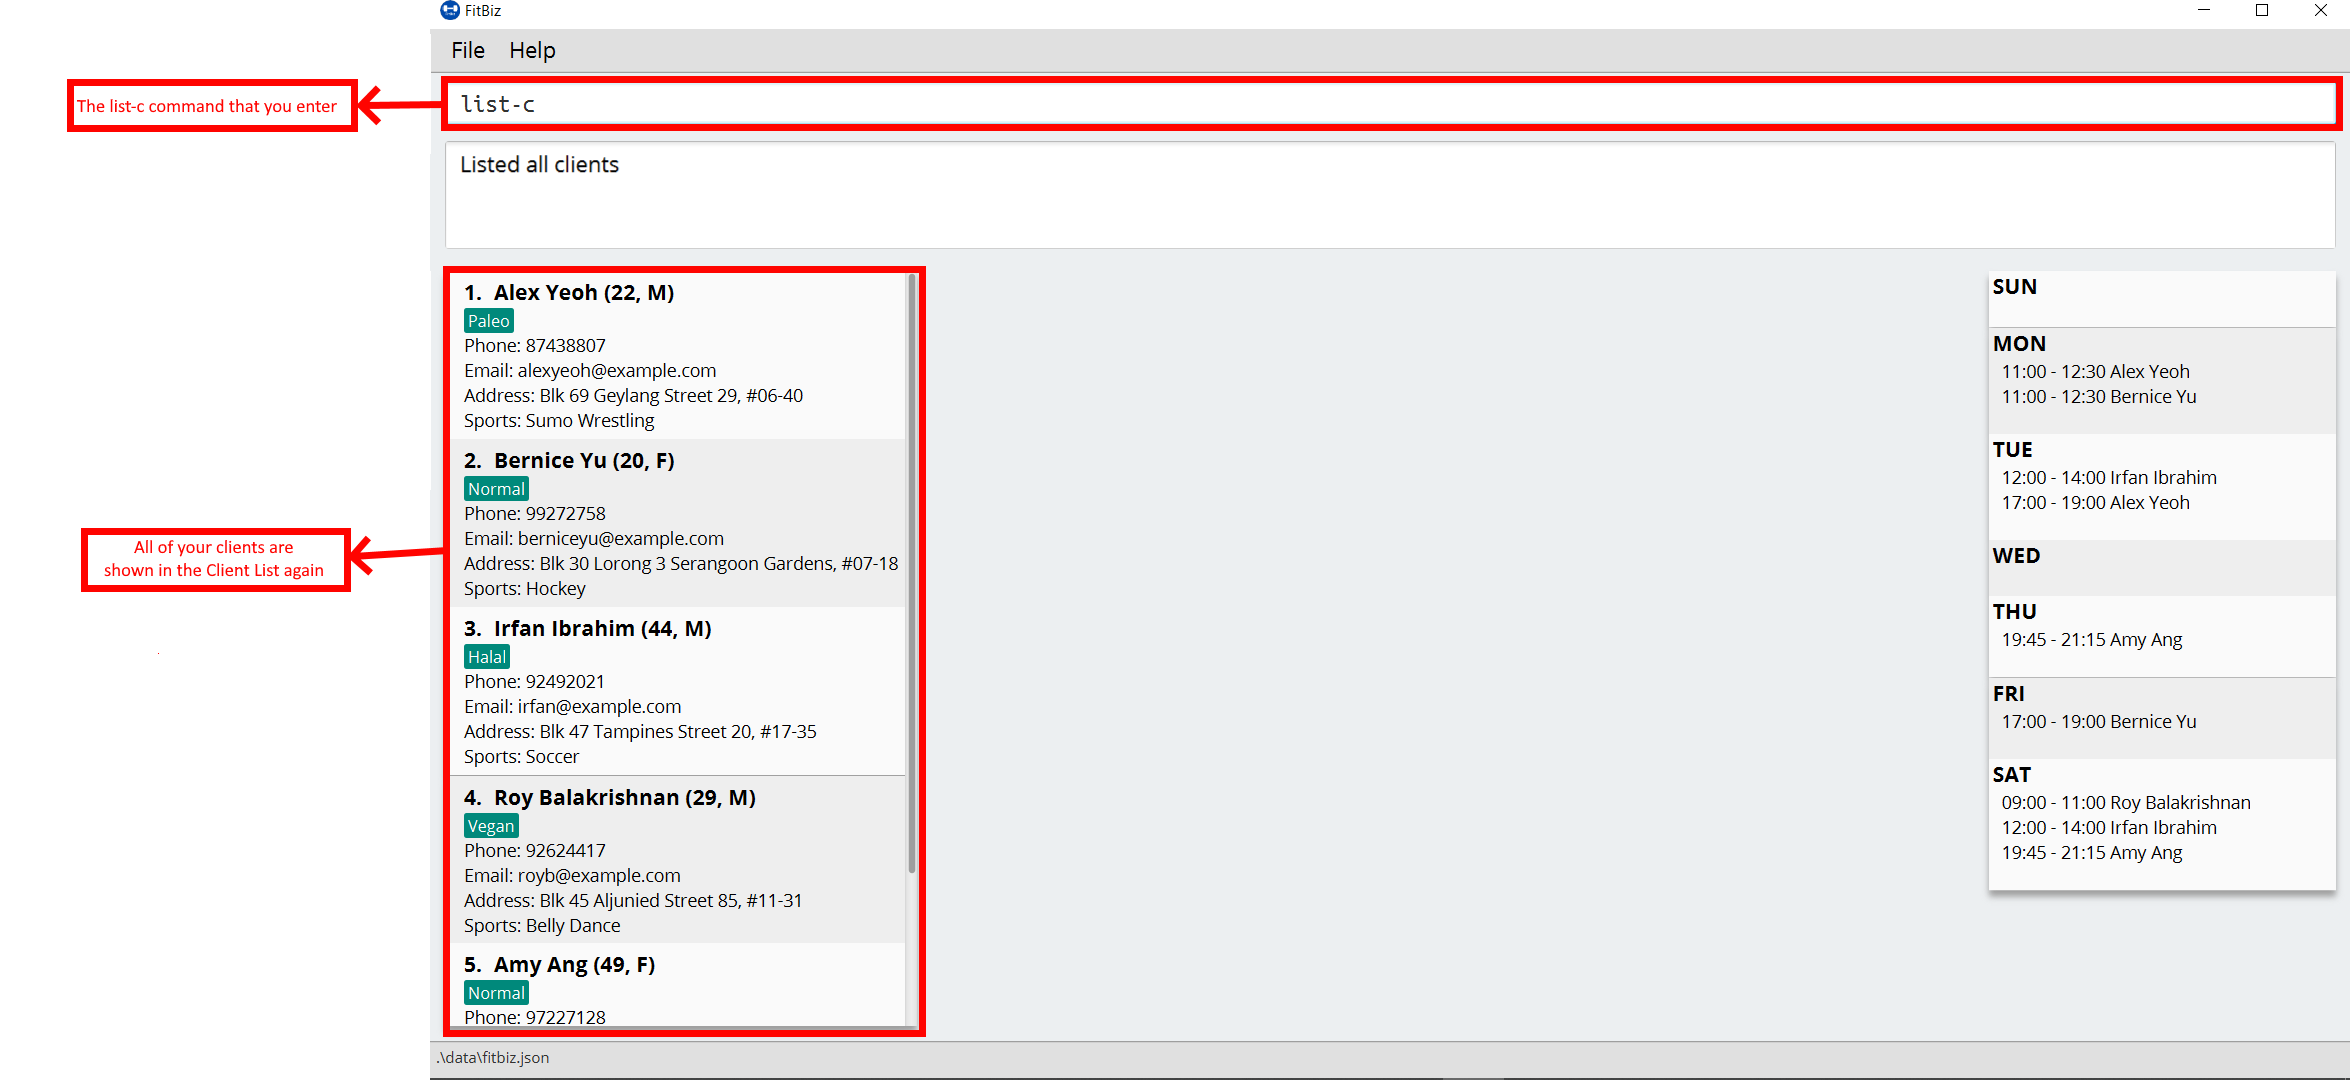
Let’s say you are done with the filter, and want to list all your clients on the Client List again. Simply enter `list-c`into the Command Box and you should be able to see the following:
3.2.3. Common errors / problems
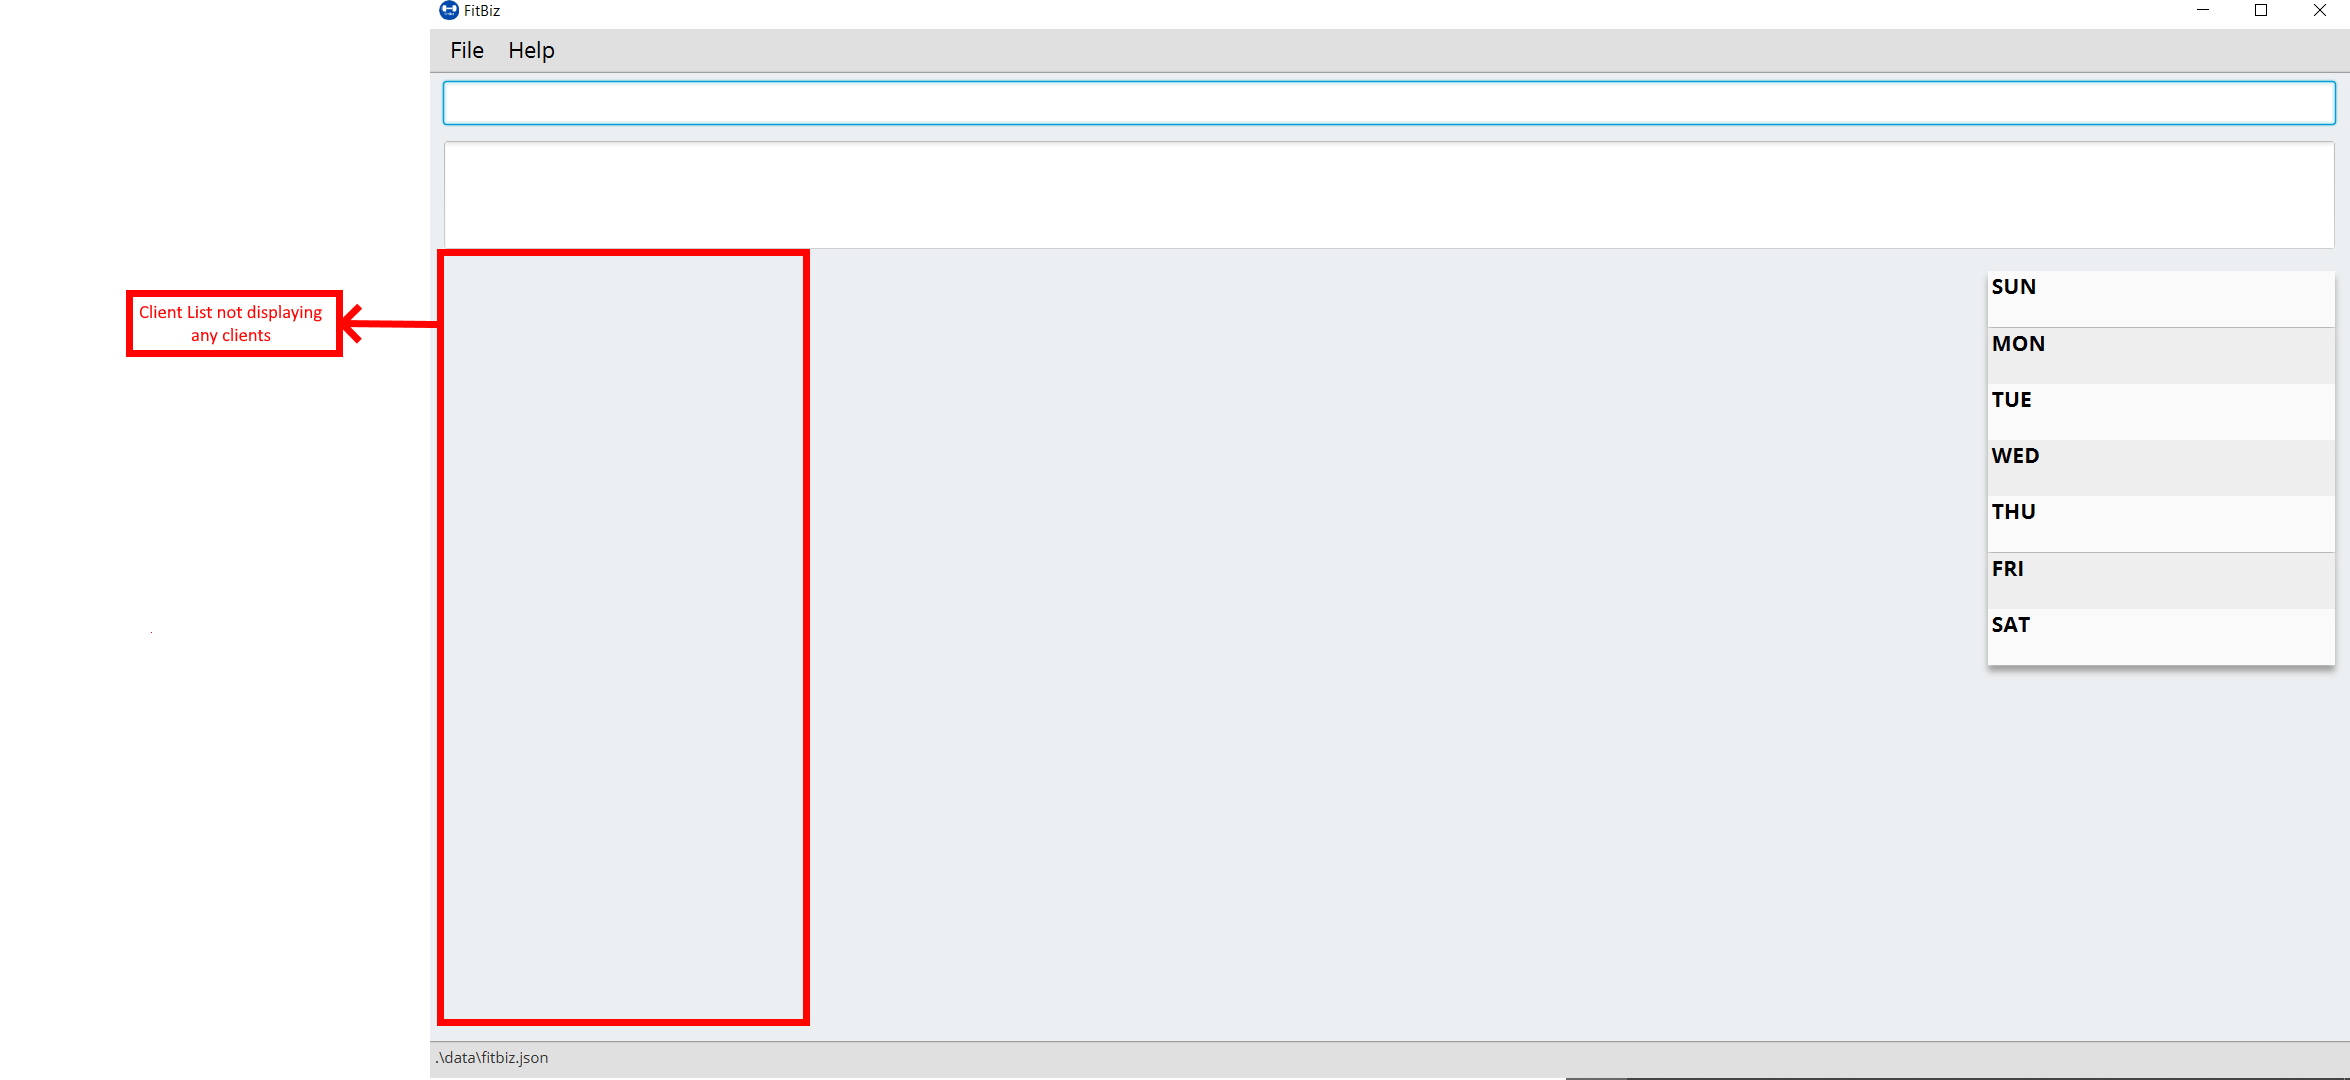
No clients shown on the Client List
You may be greeted with the following scene. This means that there are no clients in your FitBiz. You can begin adding clients by using the add-c command. Do refer to the add-c section in this document for help regarding add-c.
3.3. Find clients by name: find-c --- Yong Jie
find-c allows you to find clients with the names that are specified in your input. You might have many clients and finding a particular client by scrolling through the entire Client List might be troublesome and difficult. find-c is the command for you.
Format: find-c KEYWORD [KEYWORD]…
3.3.1. Parameters
This section acts as a summary of the important things to note when using find-c including their parameters.
| Parameters | Important points to note |
|---|---|
|
* At least one * Substitute * You can use multiple * * The words used for * Clients matching at least one |
3.3.2. Example
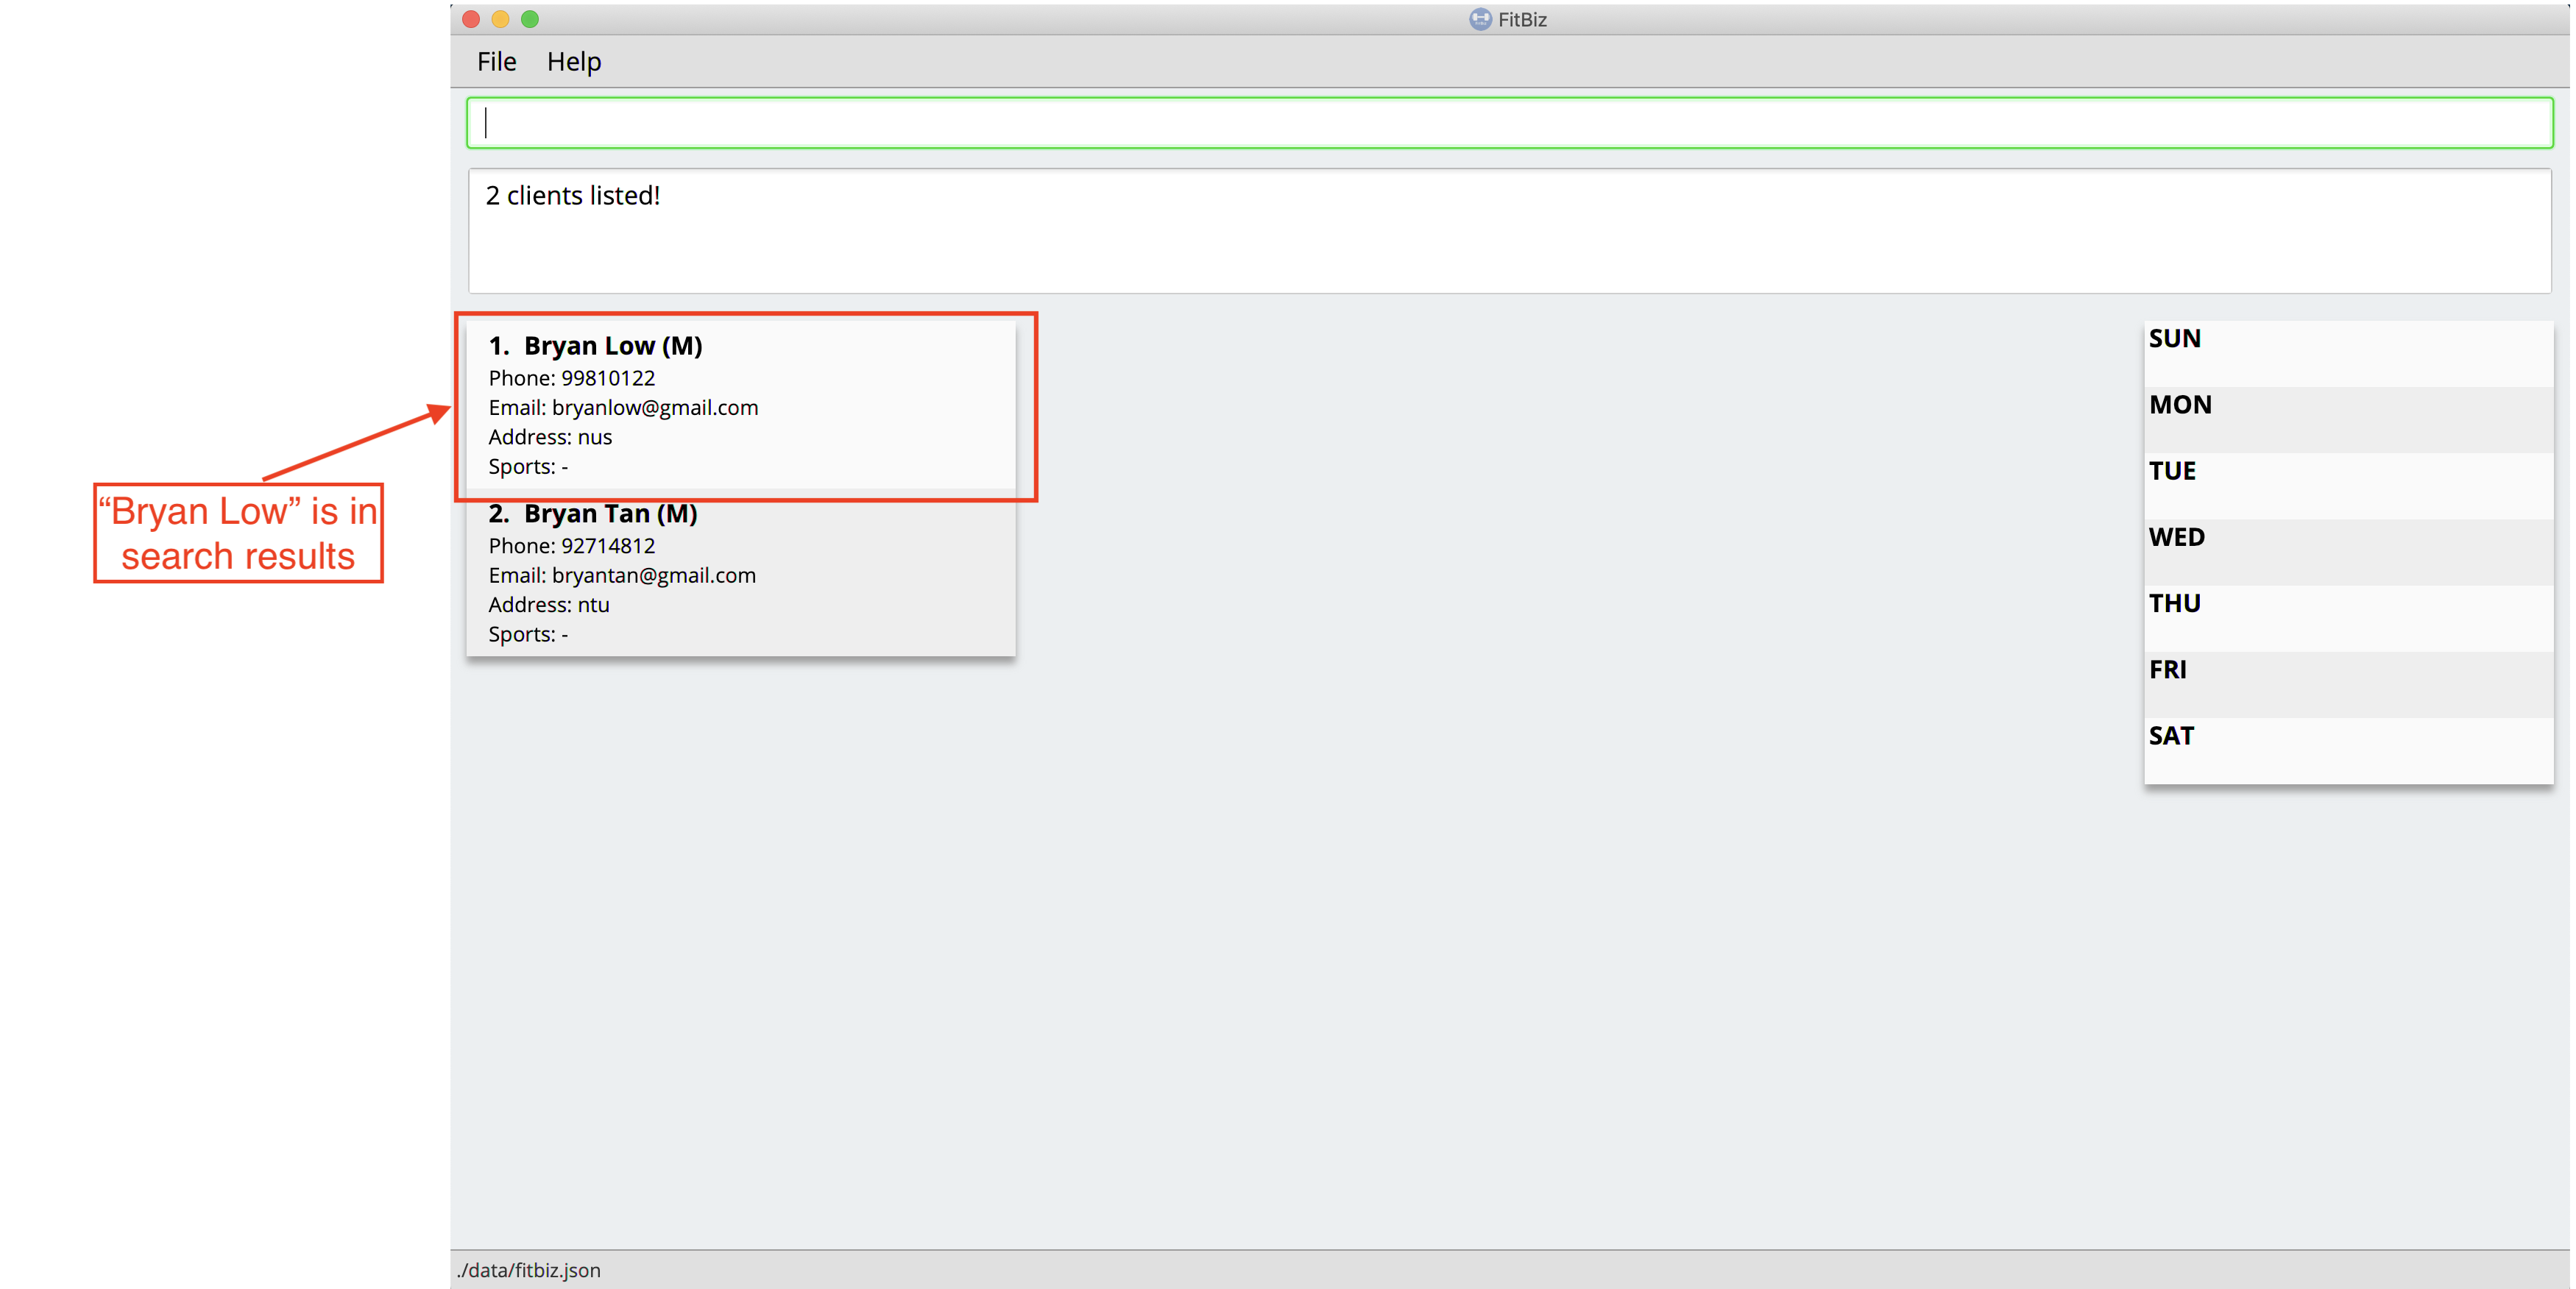
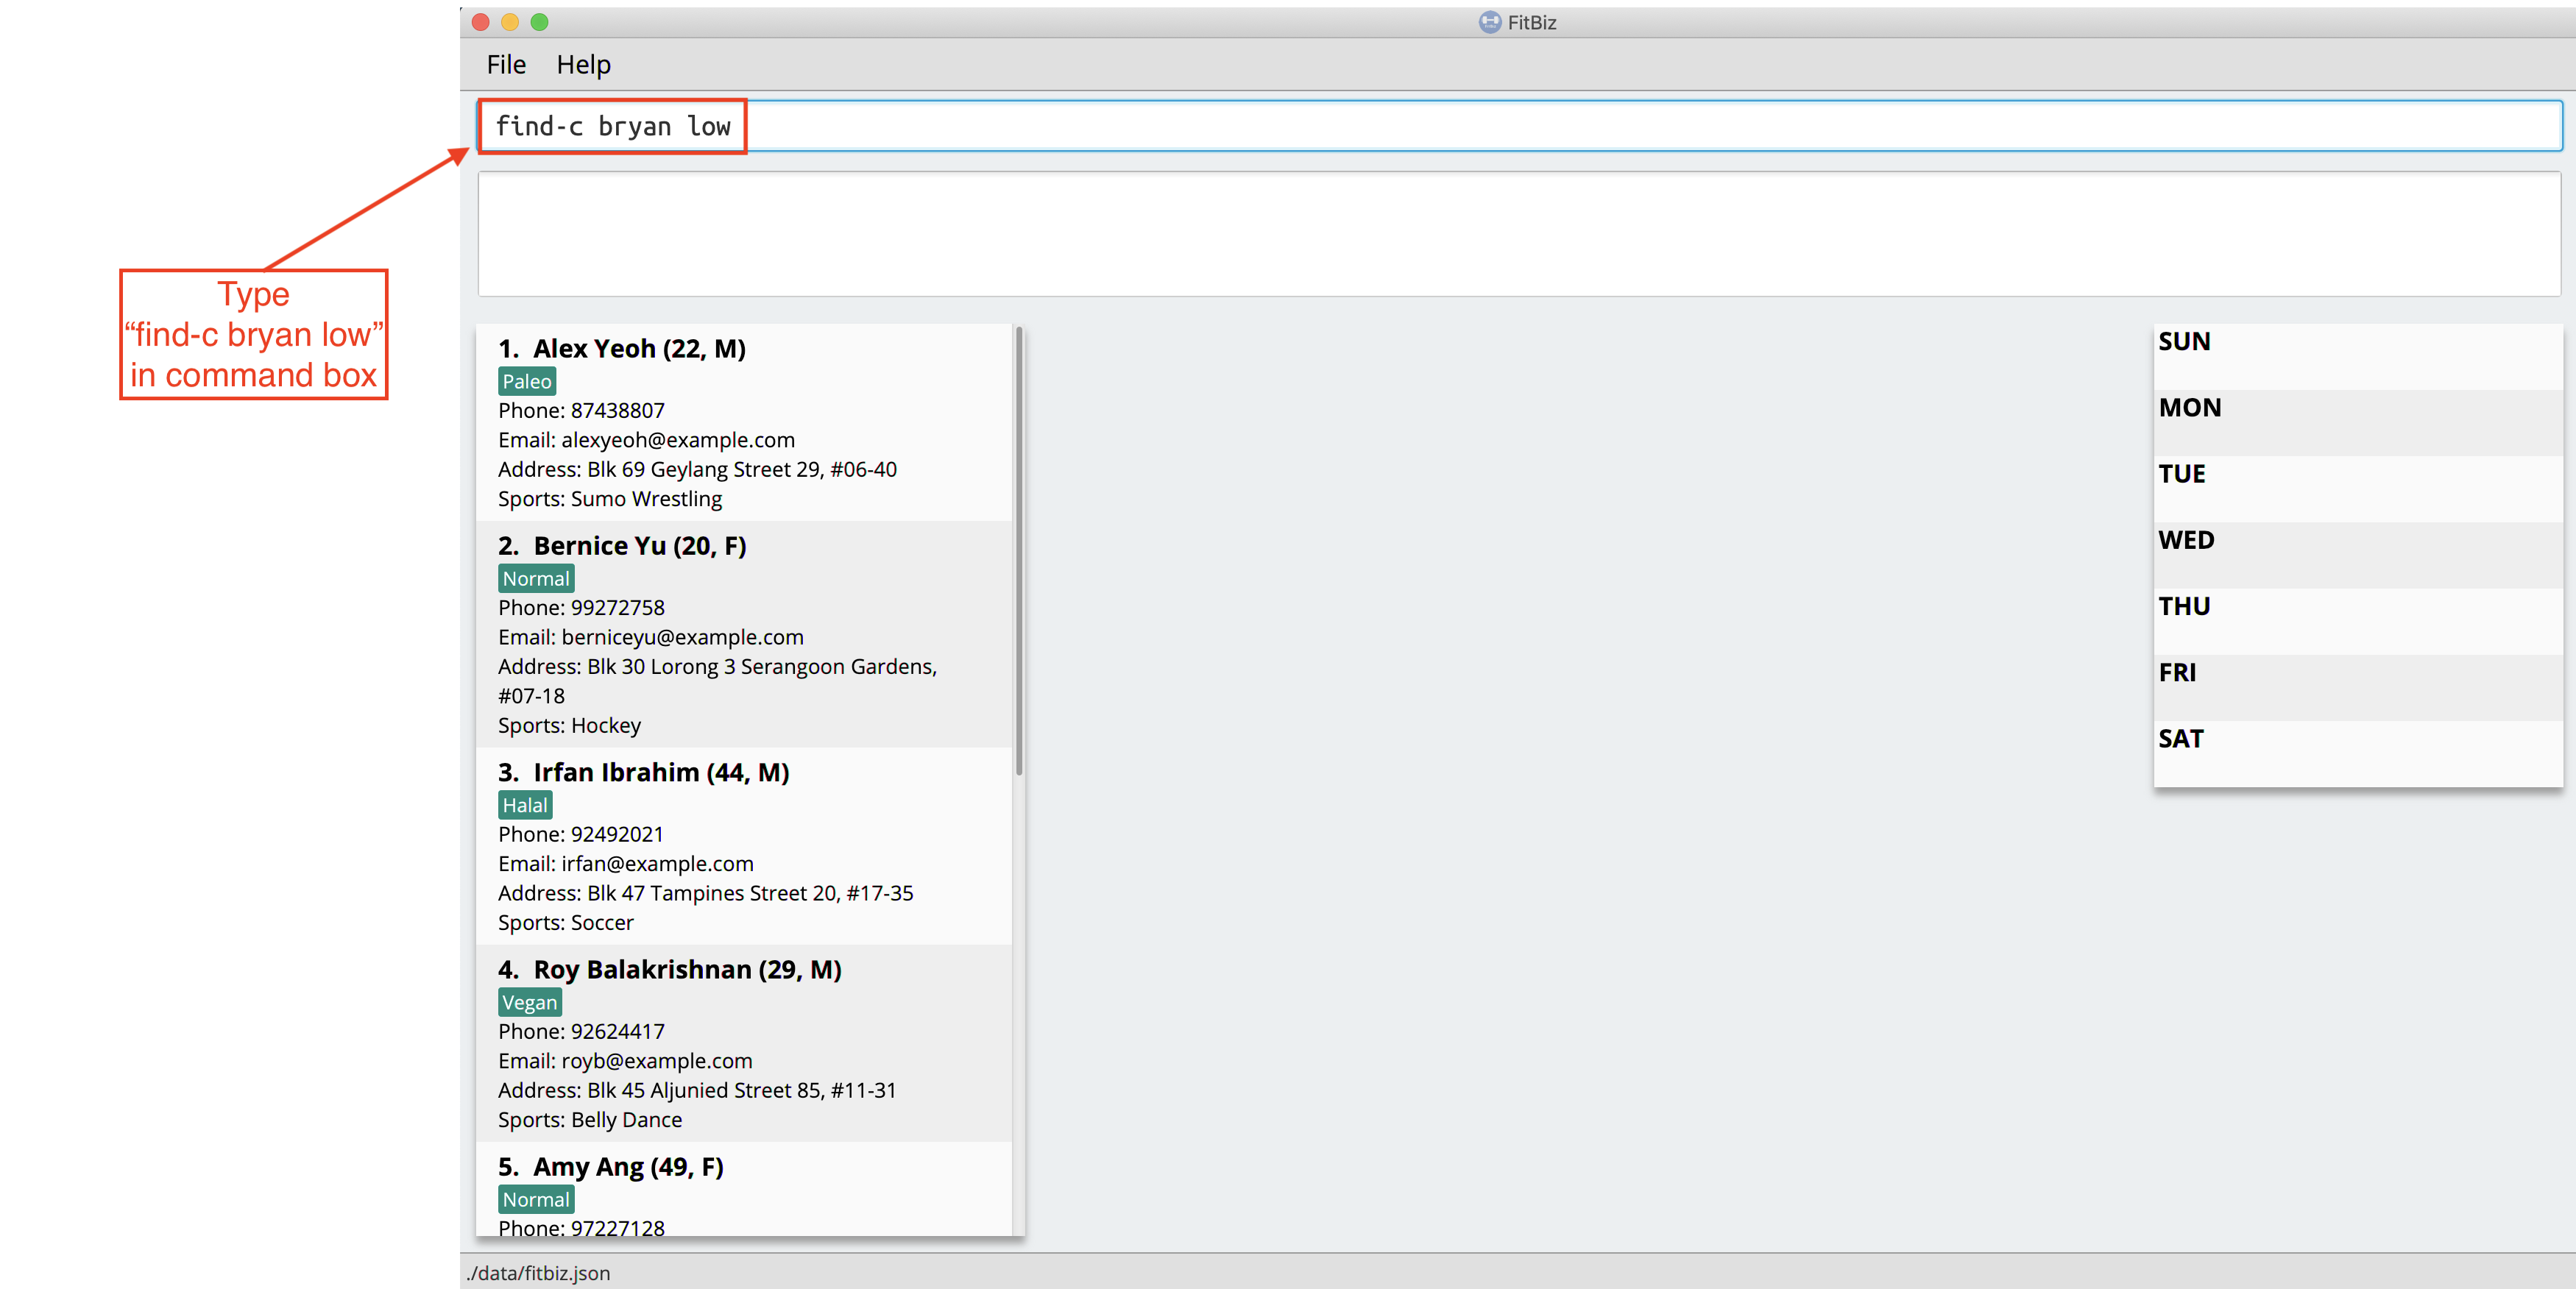
Let’s say that you want to find a client named "Bryan Low" in Client List. You can simply use the find-c command as shown.
-
Type
find-c bryaninto Command Box, and pressEnterto execute it.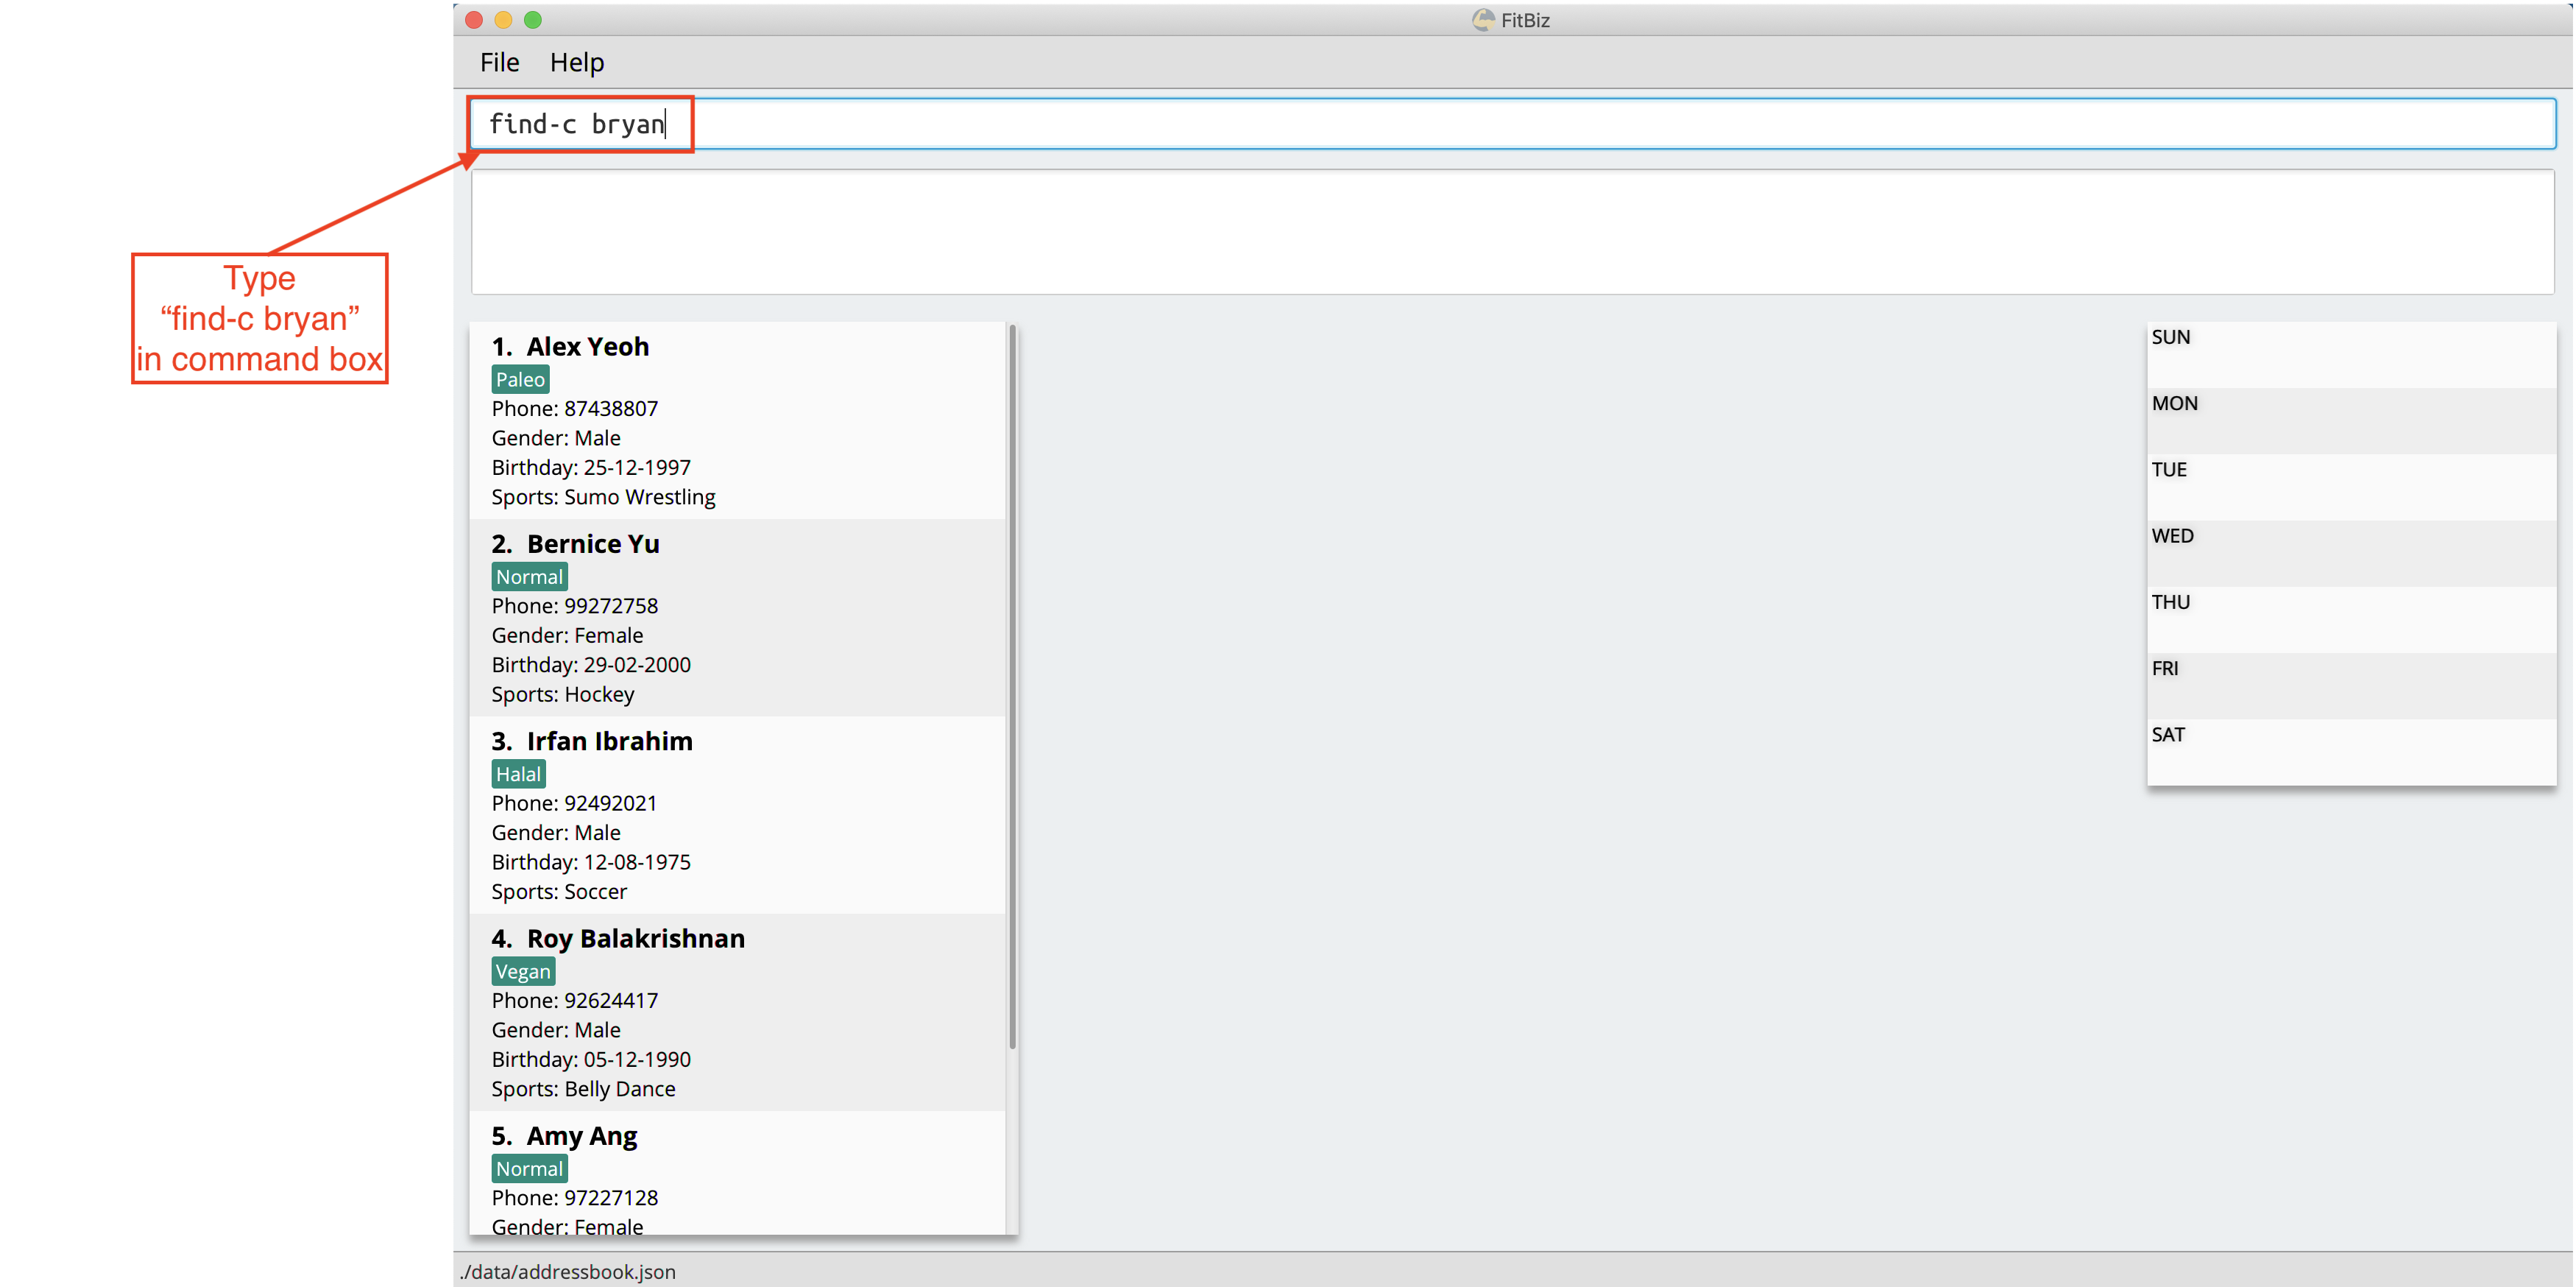
-
Result Box will display the message of the number of clients listed. In this case, there are 2 clients with "bryan" in their name.

-
You can now see the clients with "bryan" in their names. As you can see, the name you use to search does not need to be case-senstive. The client that we are looking for "Bryan Low" is in Client List.
3.3.3. Common errors / problems
You might face some errors or difficulties when you find-c. In this section, you will be able to understand these errors and resolve them. You will also get a better understanding of the reply from the result box when using find-c.
Using incomplete KEYWORD
You might wonder why find-c do not show the clients even though the client is clearly in your client list records. It might be possible that you have entered an incomplete name and does not match any word in the name of that client. The example below might help you understand better.
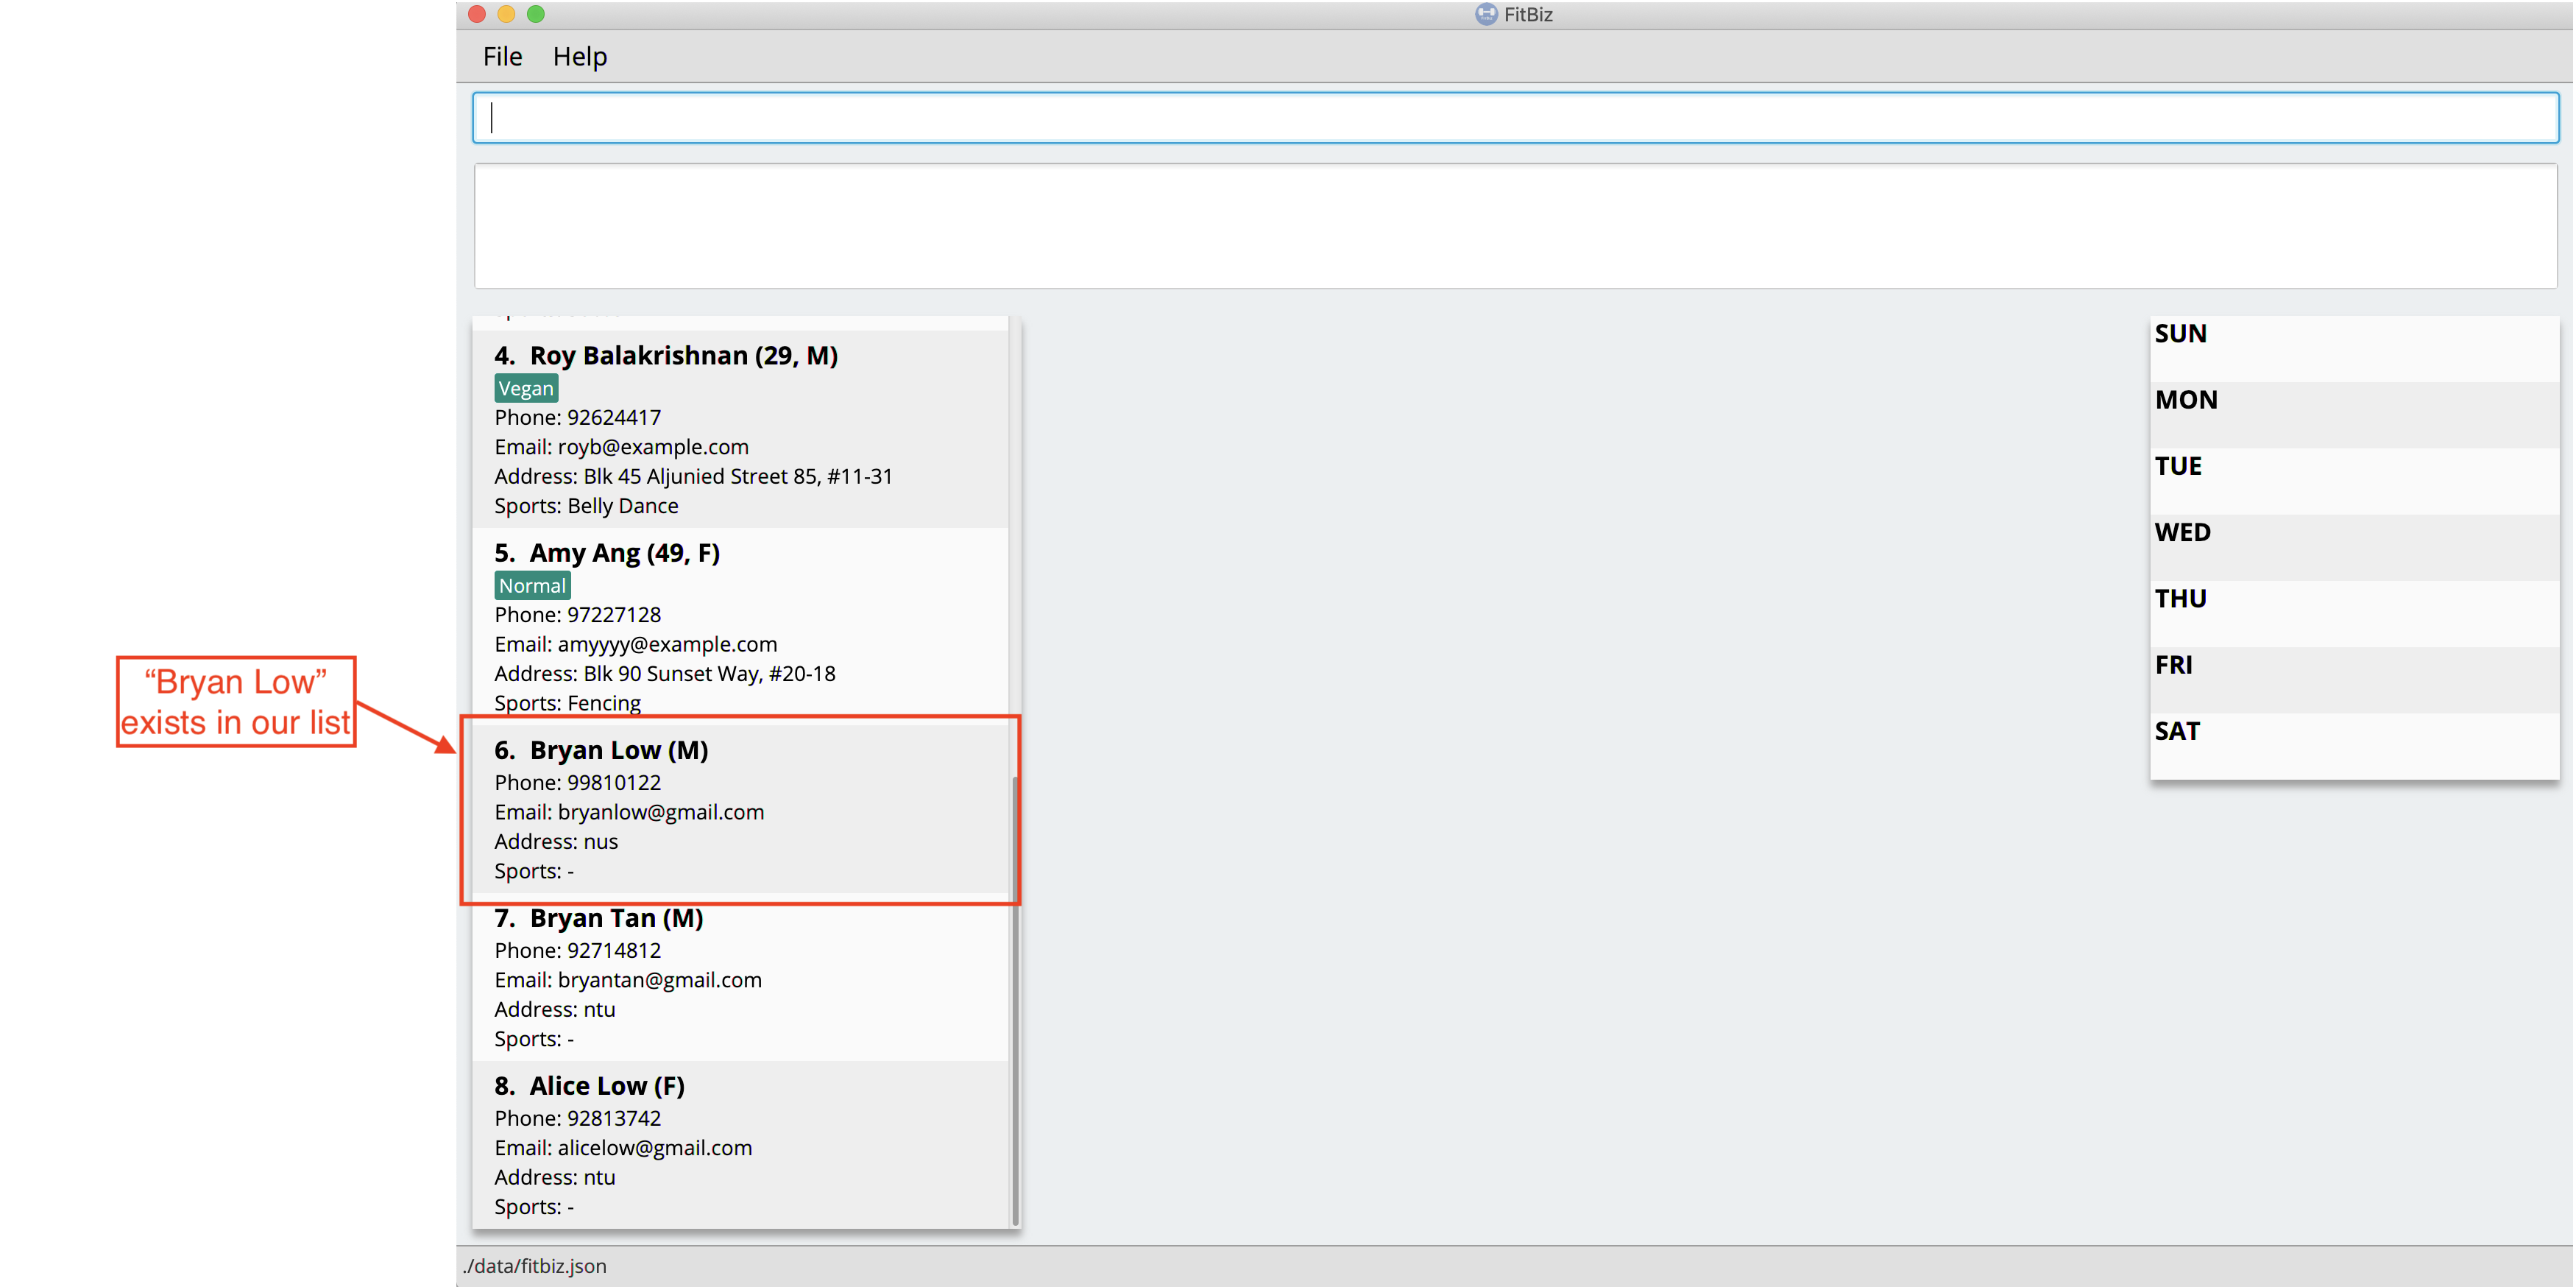
Example: You want to find the client named "Bryan Low" in Client List. Below shows that "Bryan Low" indeed exists and is recorded.
Type find-c bry into Command Box, and press Enter to execute it.
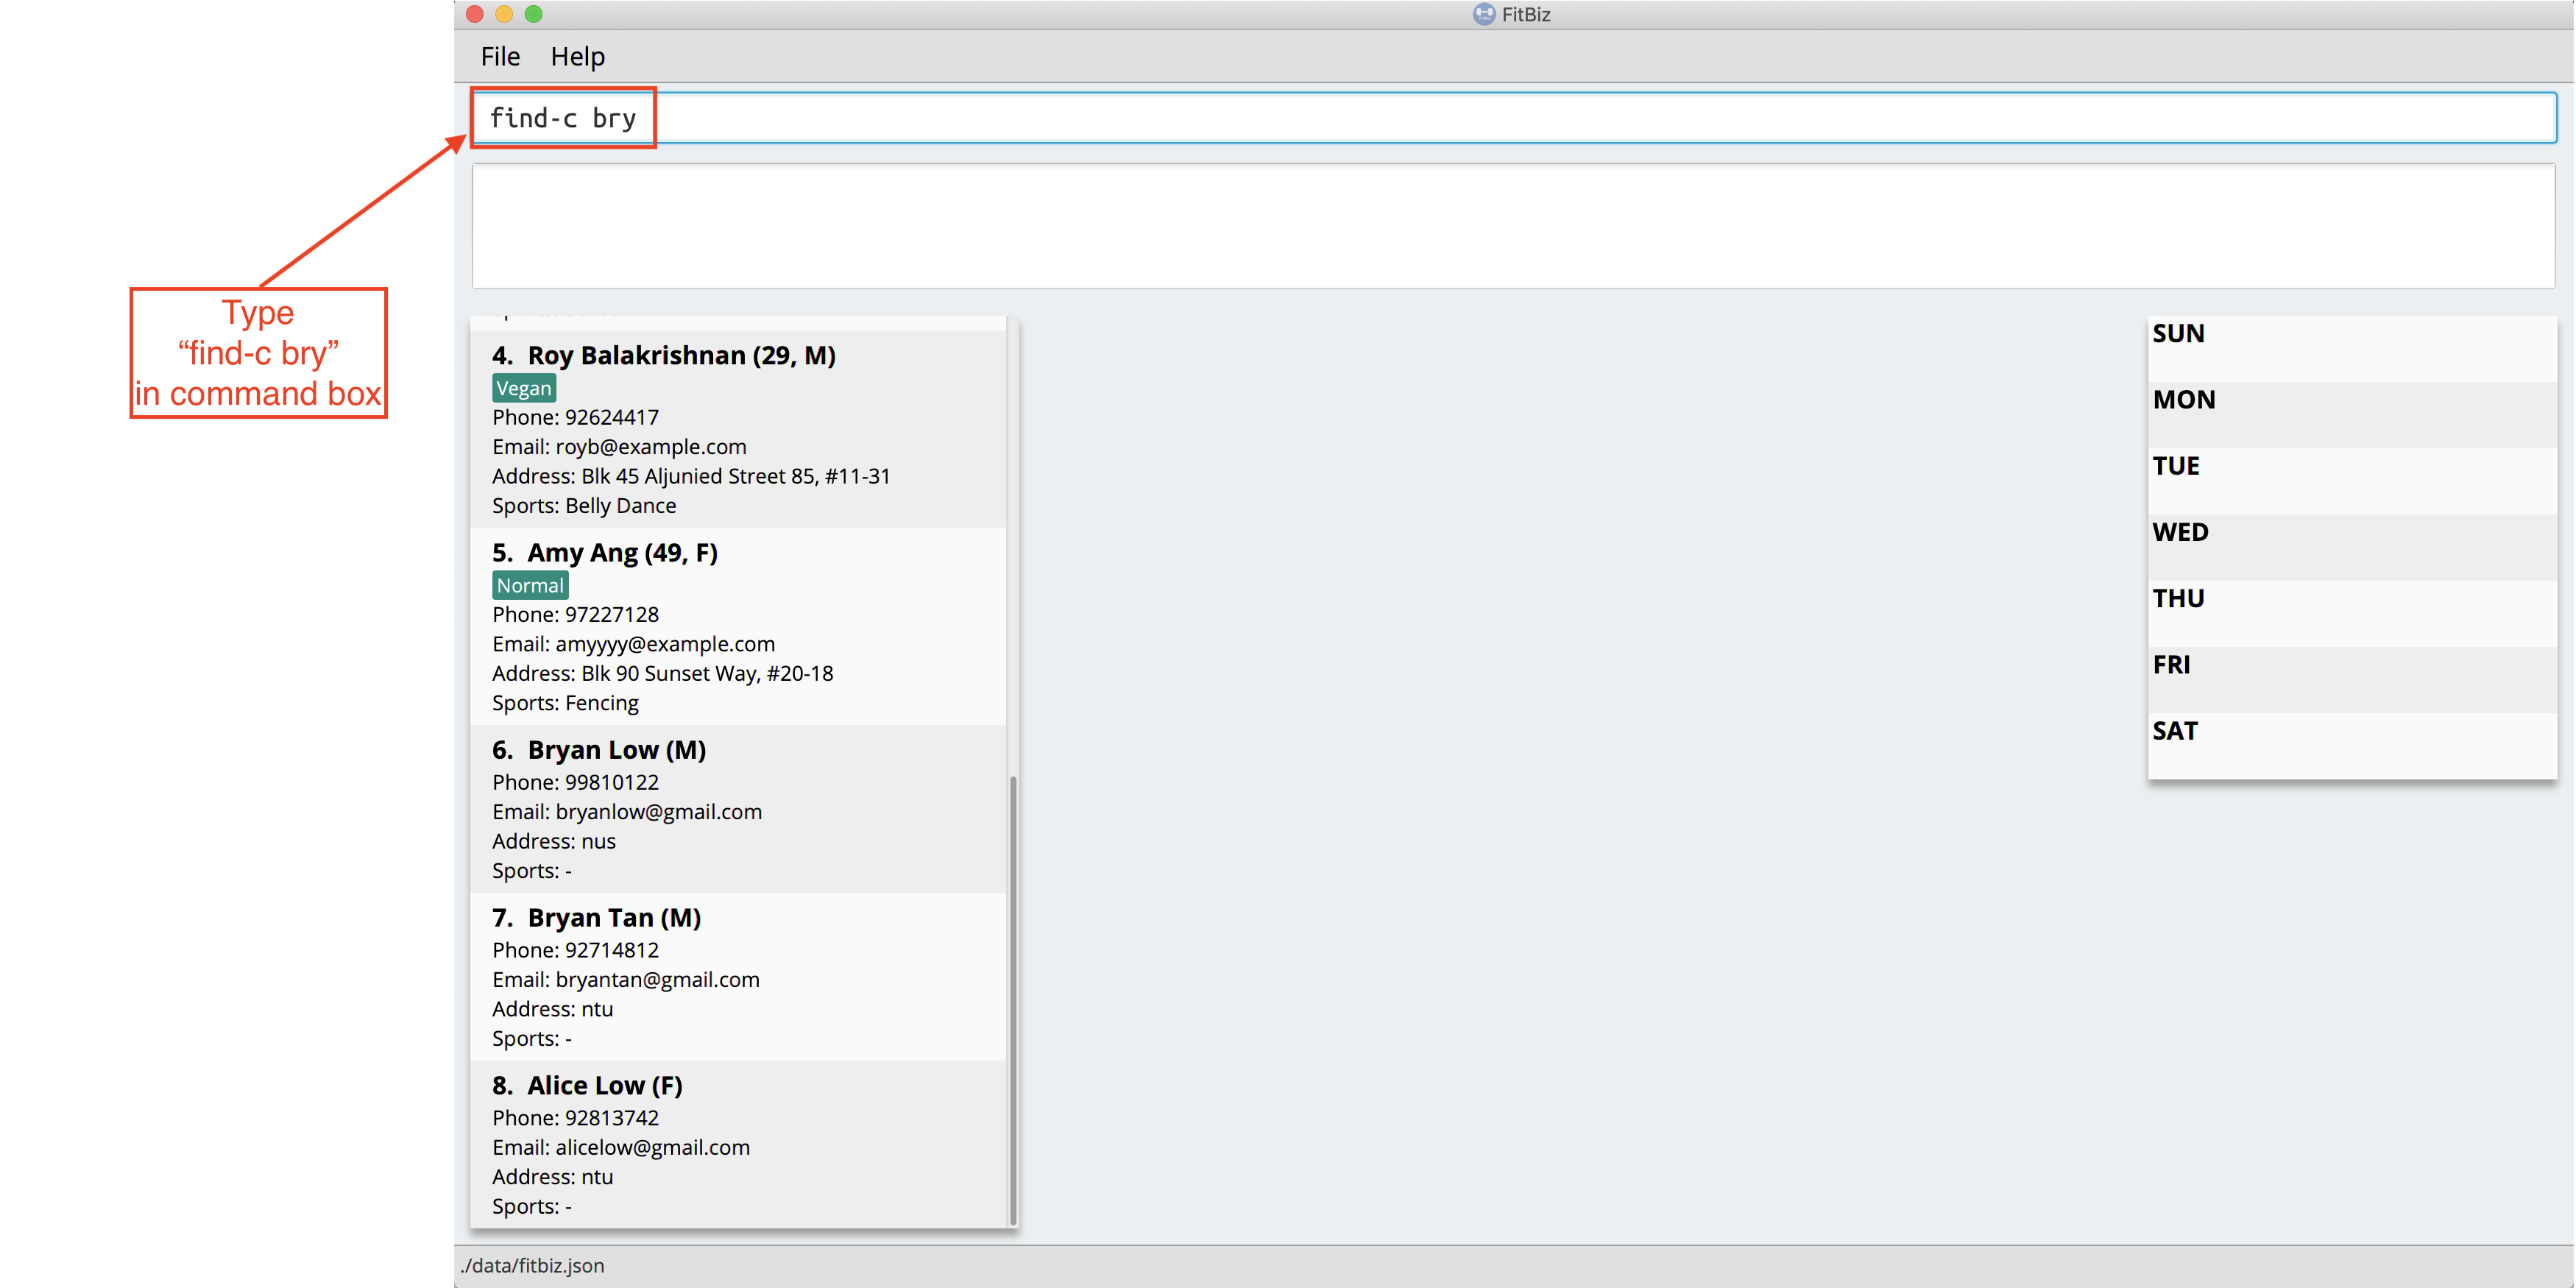
You will obtain "0 clients listed!" in Result Box.
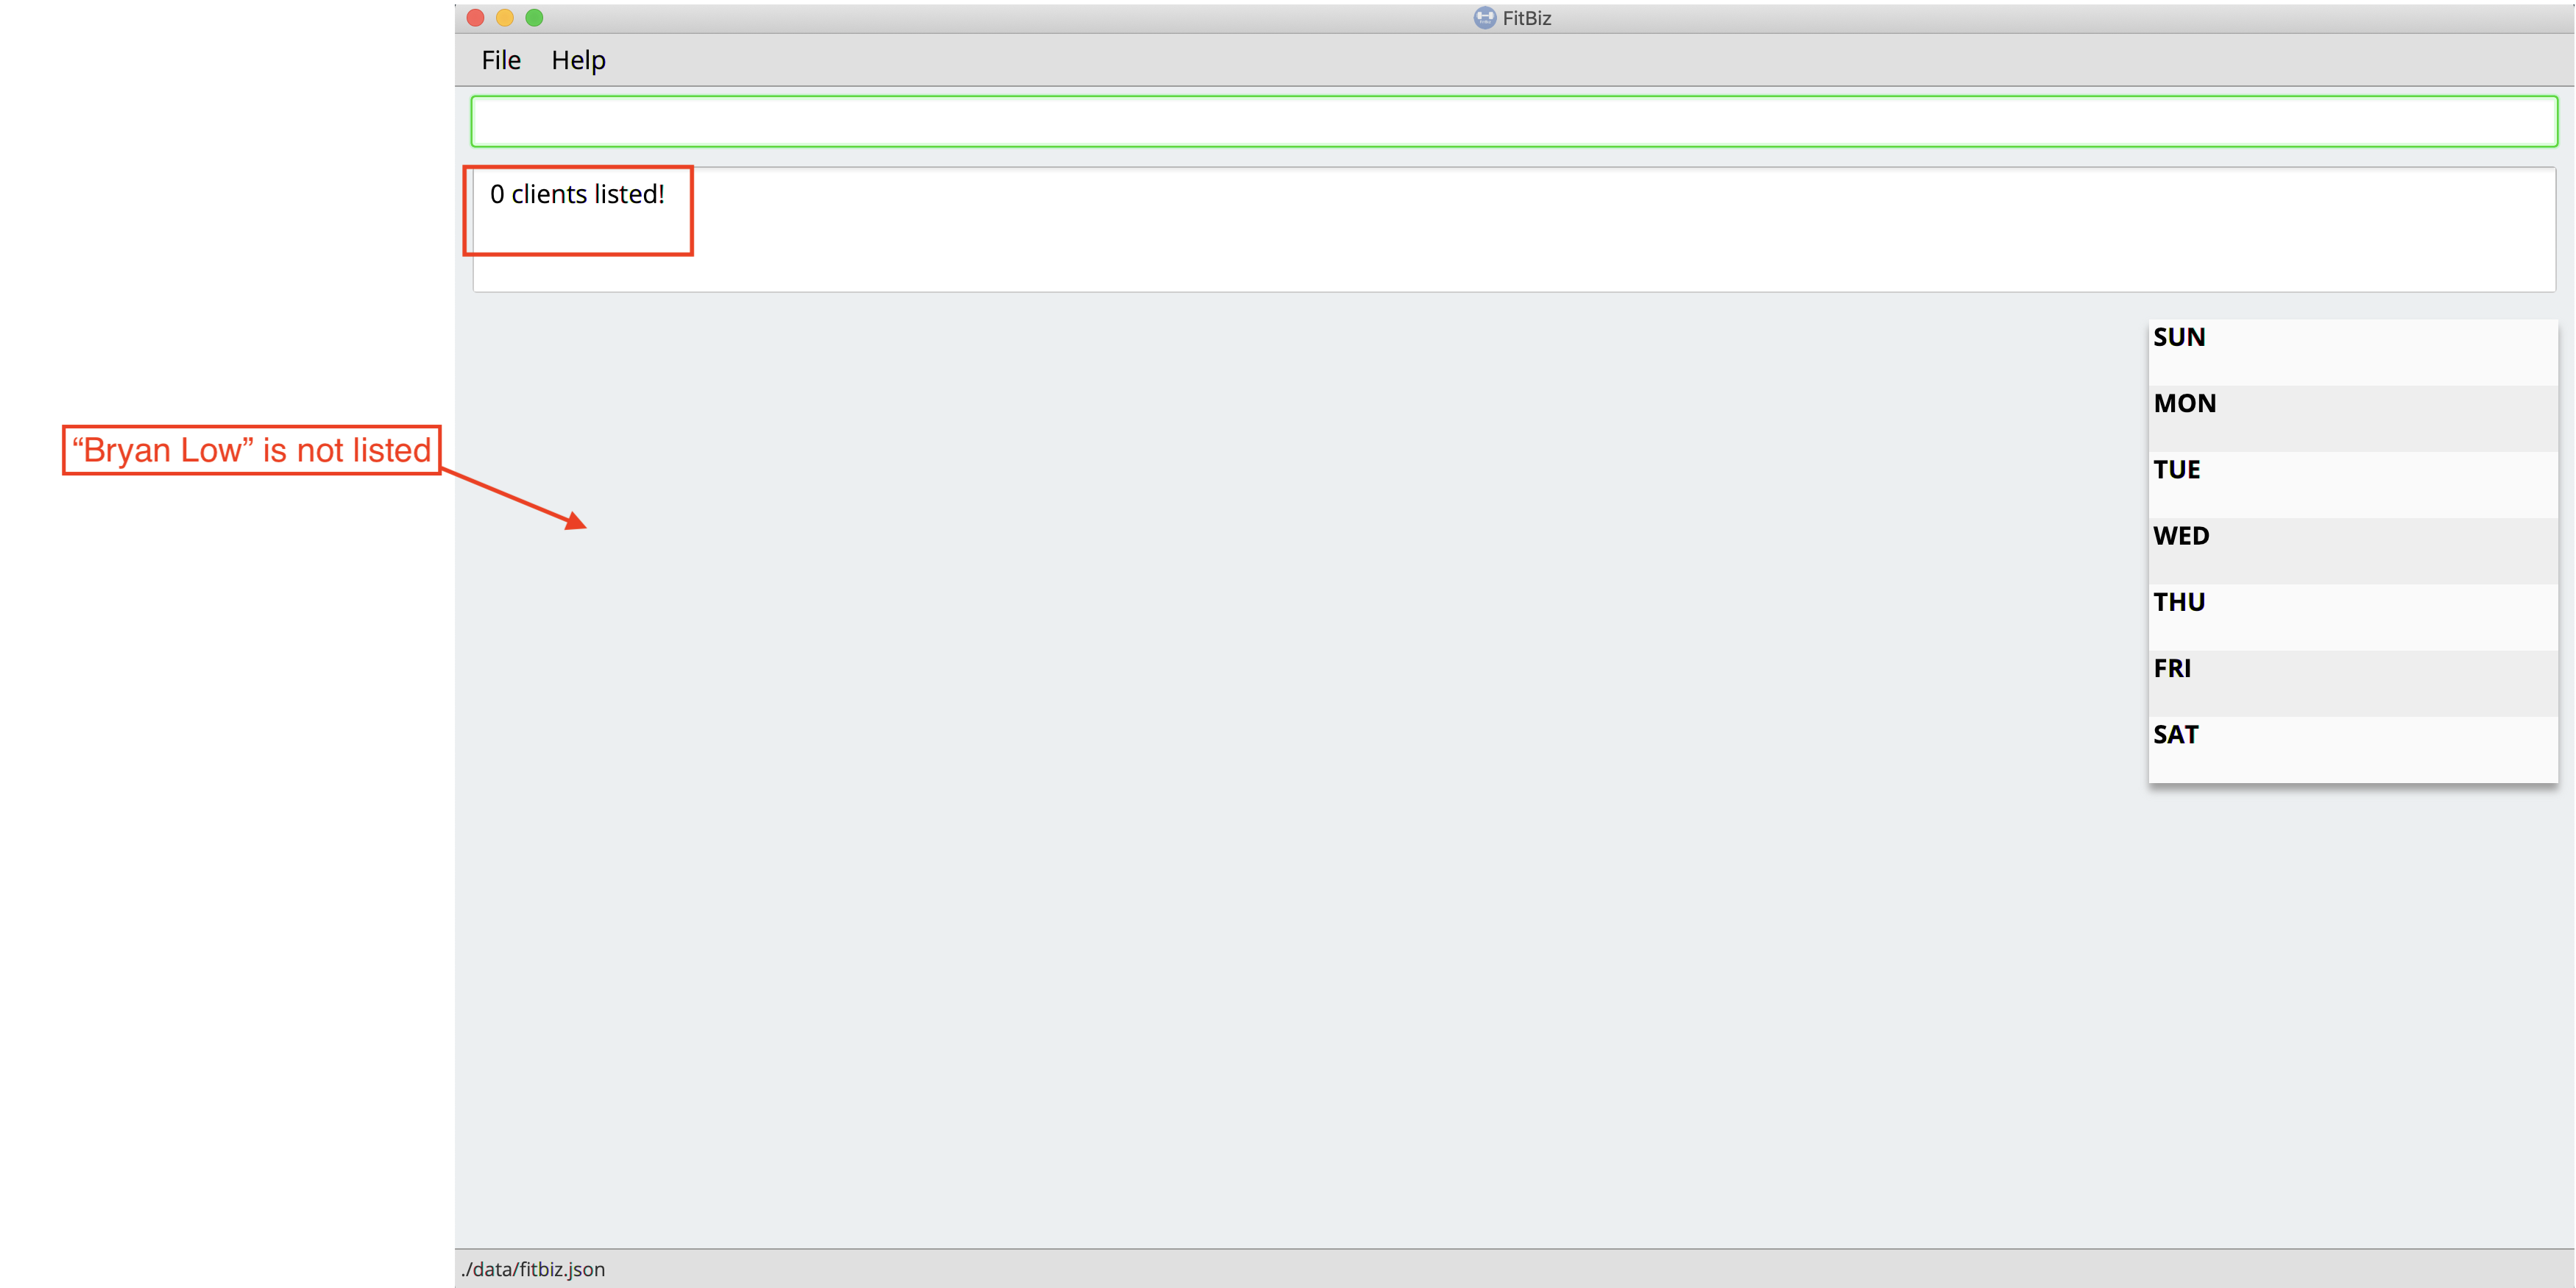
This is because the name that you have entered is incomplete and does not match any word in the name of any of the clients. To correct this, you have to enter find-c bryan as seen in the example.
Using multiple KEYWORD
You might wonder why the application shows more clients than you intended. It might be possible that you have misunderstood how the KEYWORD parameter gets the client you are finding. The application will show clients as long as one of the words of the client match a keyword you use for name. The example below might help you understand better.
Example: You want to find the client named "Bryan Low" in Client List.
Type find-c bryan low in to Command Box, and press Enter to execute it.
You will obtain clients which have bryan in their name or low in the name. In the case below, there are 3 clients. Bryan Low, Bryan Tan and Alice Low.
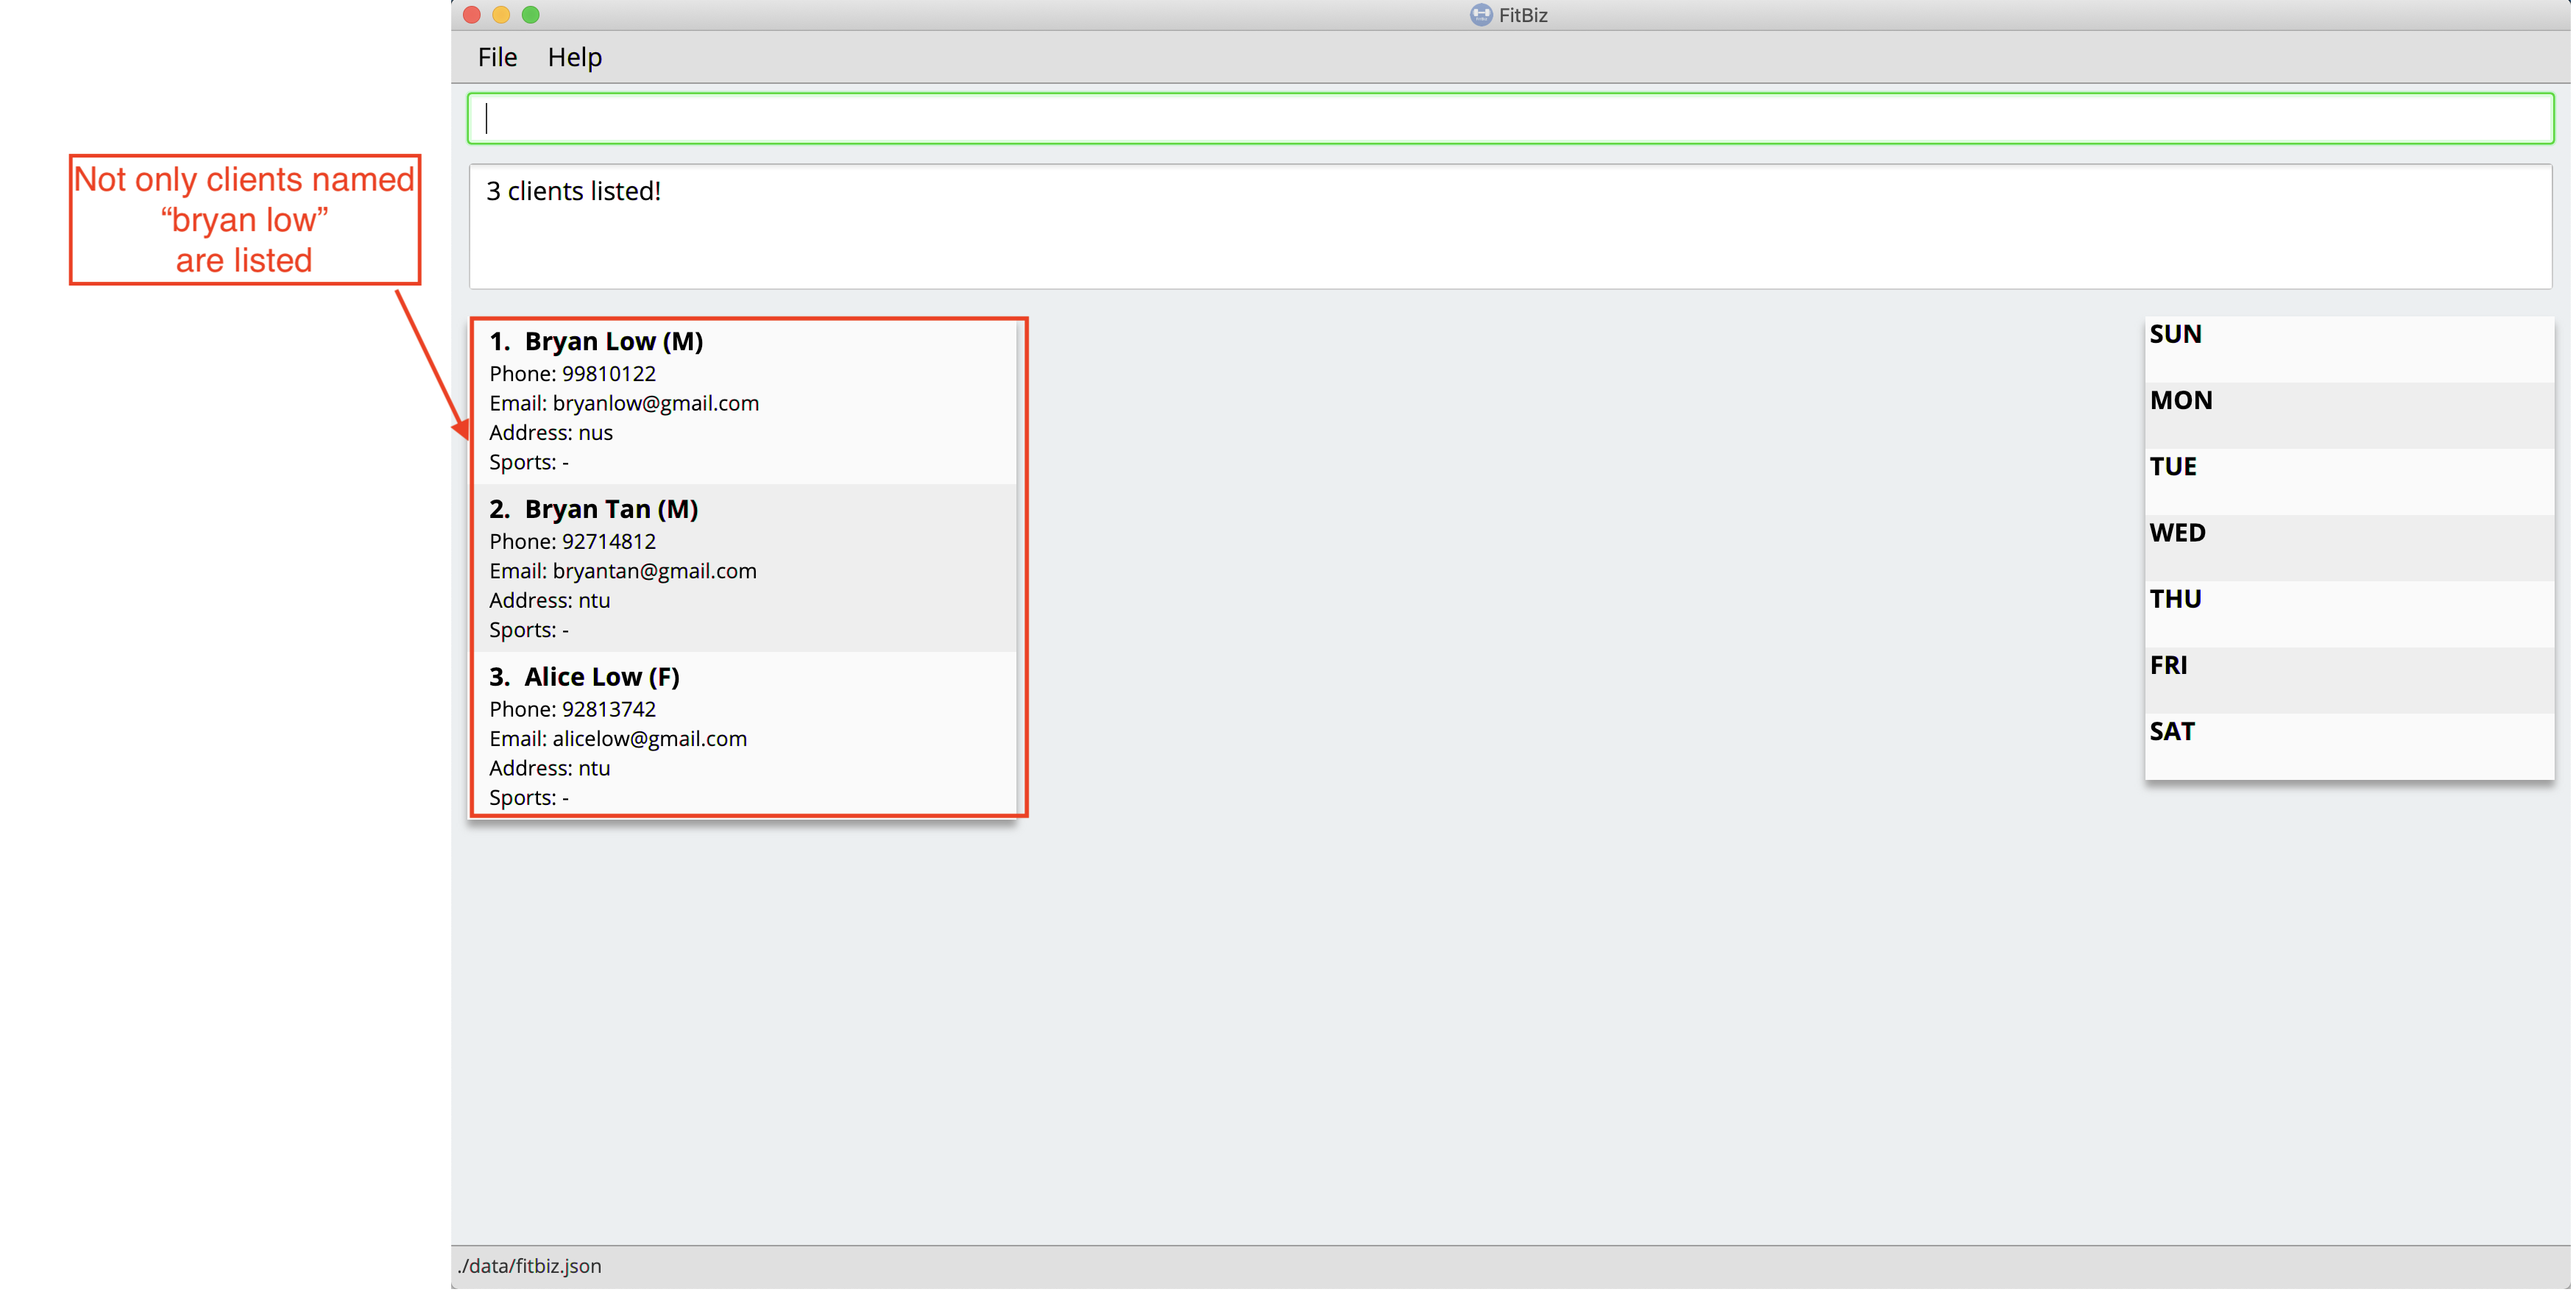
You can try to enter keywords for NAME that are more specific to the client you are looking for. This will help to keep your search more scoped.
3.4. Add a new client profile: add-c --- Toh Ker Wei
After setting up the program, the first thing you might want to do is to add your client to FitBiz. You can do so by using the add-c command, followed by the details of your client.
Format: add-c n/NAME p/PHONE_NUMBER e/EMAIL a/ADDRESS [g/GENDER] [b/BIRTHDAY] [h/HEIGHT] [cw/CURRENT_WEIGHT] [tw/TARGET_WEIGHT] [r/REMARK] [s/SPORT]… [t/TAG]…
3.4.1. Parameters
This section summarises the format and important information to note while using the add-c command.
| Parameters | Important points to note |
|---|---|
|
* Substitute * * |
|
* Substitute * * * |
|
* Substitute * * * * |
|
* Substitute * * |
|
* Substitue * * * |
|
* Substitue * * * * |
|
* Substitute * * * |
|
* Substitute * * * |
|
* Substitue * * * |
|
* Substitute * * Sports given in this command will overwrite all of the client’s existing sports. * |
|
* Substitue * * Tags given in the command will overwrite the Client’s existing tags * You can remove all of the client’s tags by typing * |
|
* Substitute * * Any whitespace at the start of * |
*The set of special characters are !#$%&'*+/=?{|}~^.-`
3.4.2. Example
Lets say you want to add a new client with the following details:
Name: Amanda Low
Phone number: 95436543
Email: AmandaLow@dmail.com
Address: West Coast Grove 69
Birthday: 5 April 1990
Sport: Swimmer
Tag: Vegetarian
-
Type the command below into the command box.
-
add-c n/Amanda Low p/95436543 e/AmandaLow@dmail.com a/West Coast Grove 69 s/Swimmer t/Vegetarian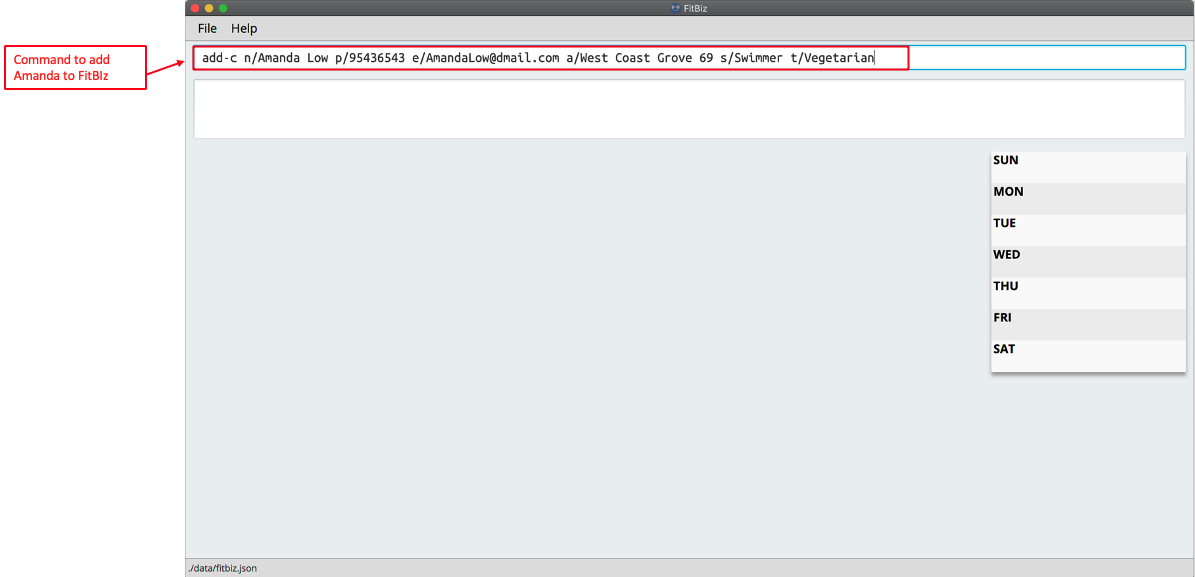
-
-
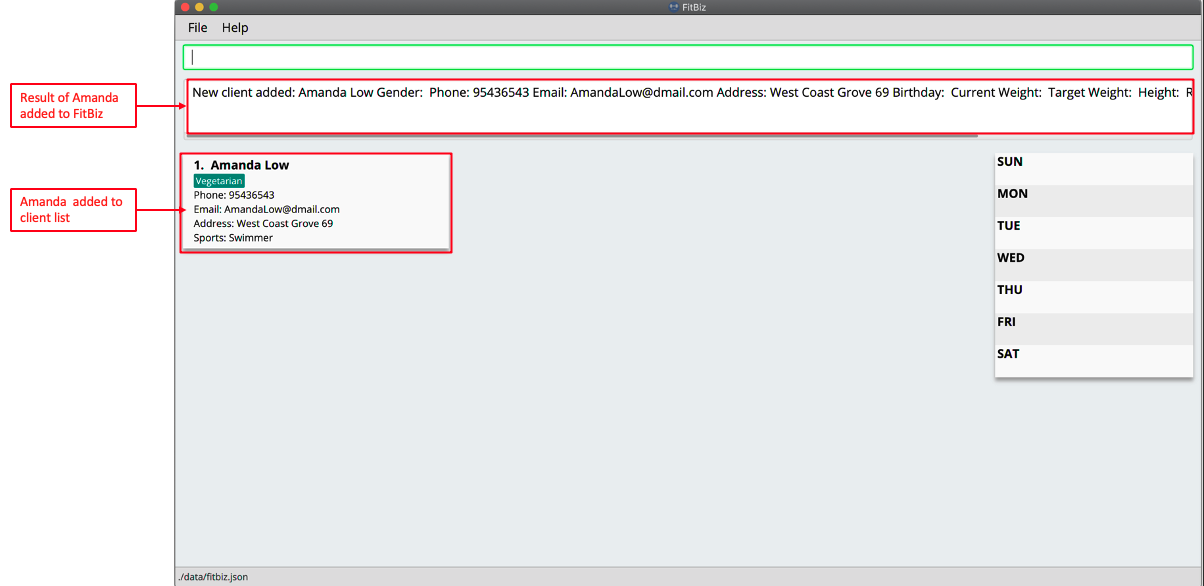
Press enter to execute.
-
After Amanda has been successfully added to the clients list, the result will be displayed as shown.
3.4.3. Common errors/ problems:
If you are facing errors or difficulty adding a client, you can refer to the common errors and problems listed below and resolve your error using the solution given.
-
Compulsory fields missing
If you are adding a client and miss out any of the compulsory parameters. You will not be able to add the client.
For example, when you want to add a
Rachel Taninto FitBiz but did not include the compulsory fielda/ADDRESS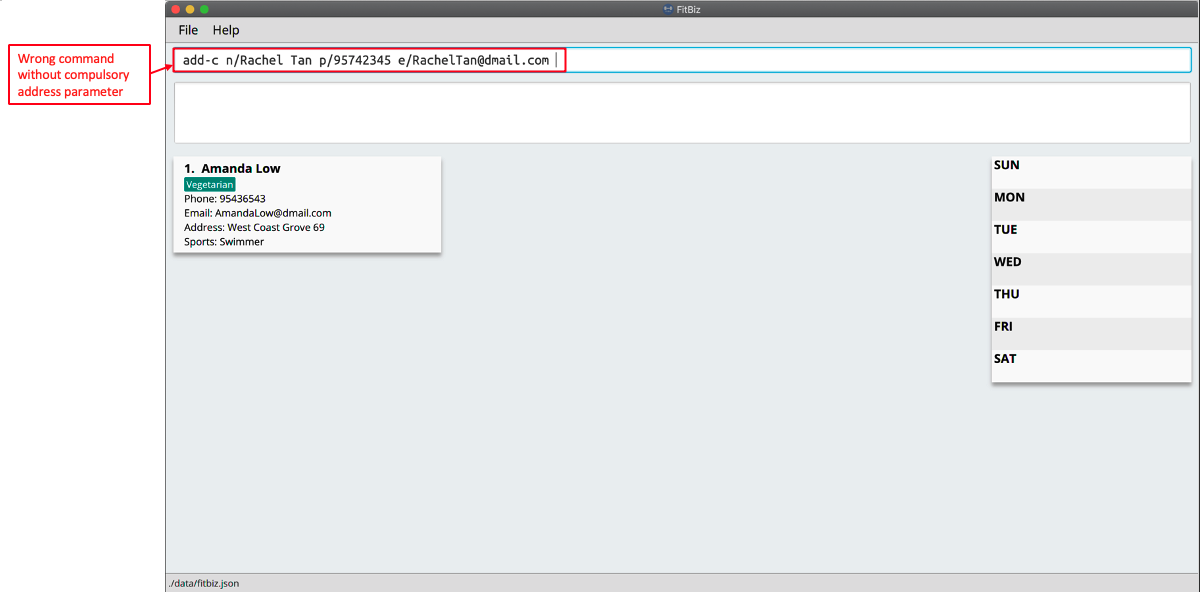
After pressing enter, the following error message will be shown.
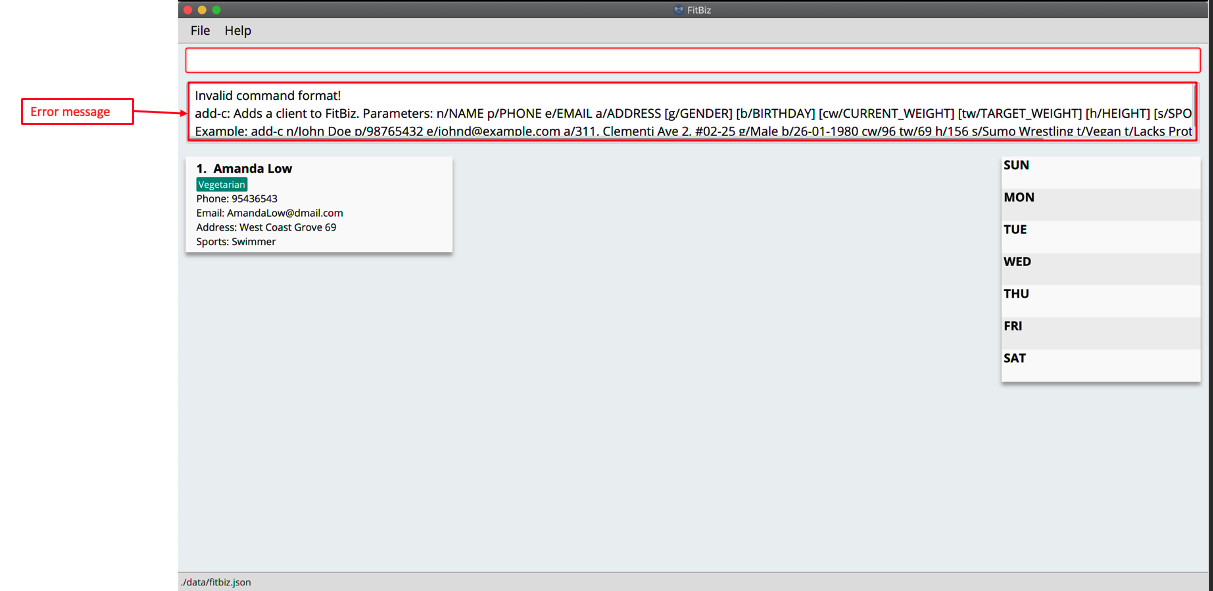
To solve this error, ensure that all compulsory parameters are included when adding a client. The compulsory parameters include:
n/NAME,p/PHONE,e/EMAIlanda/ADDRESS. To continue with the same example, the command will now include Rachel’s address.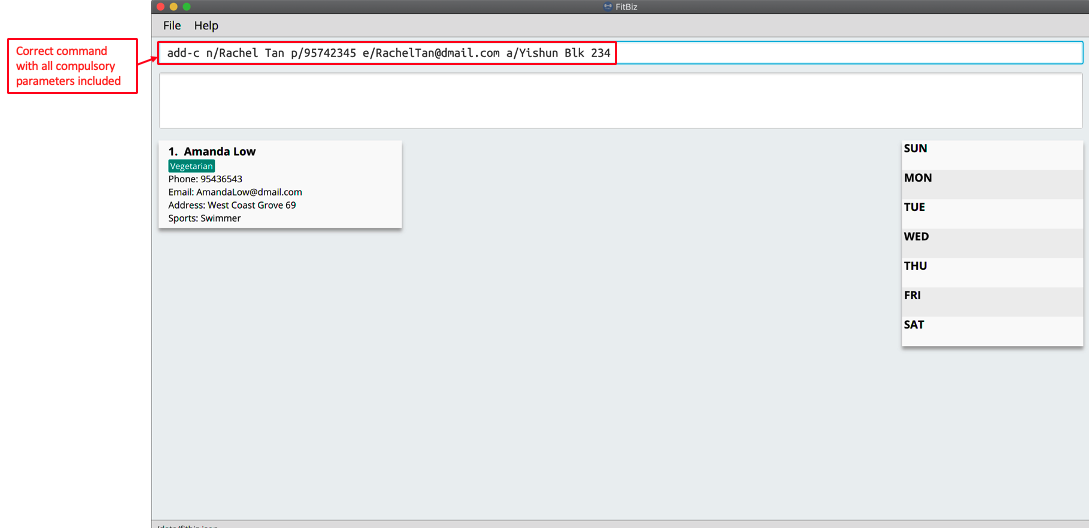
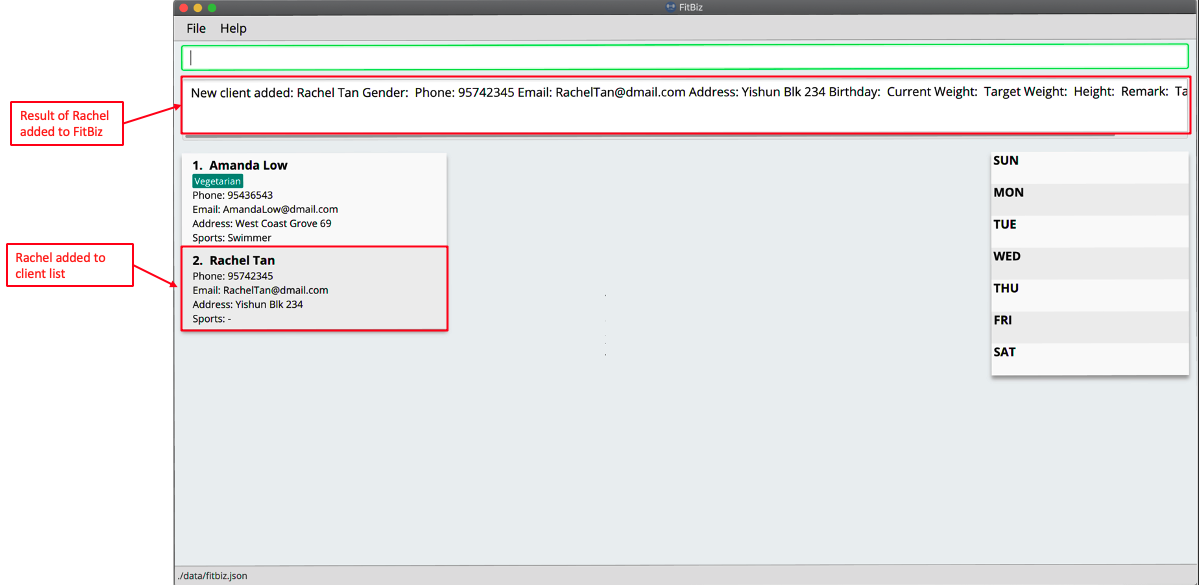
The result of successfully adding Rachel will show the following
-
Adding clients with the same phone number or email
In FitBiz, you cannot add 2 clients with the either same phone number or email.
For example, you have client with the email RachelTan@dmail.com and you want to add another client with the same email.
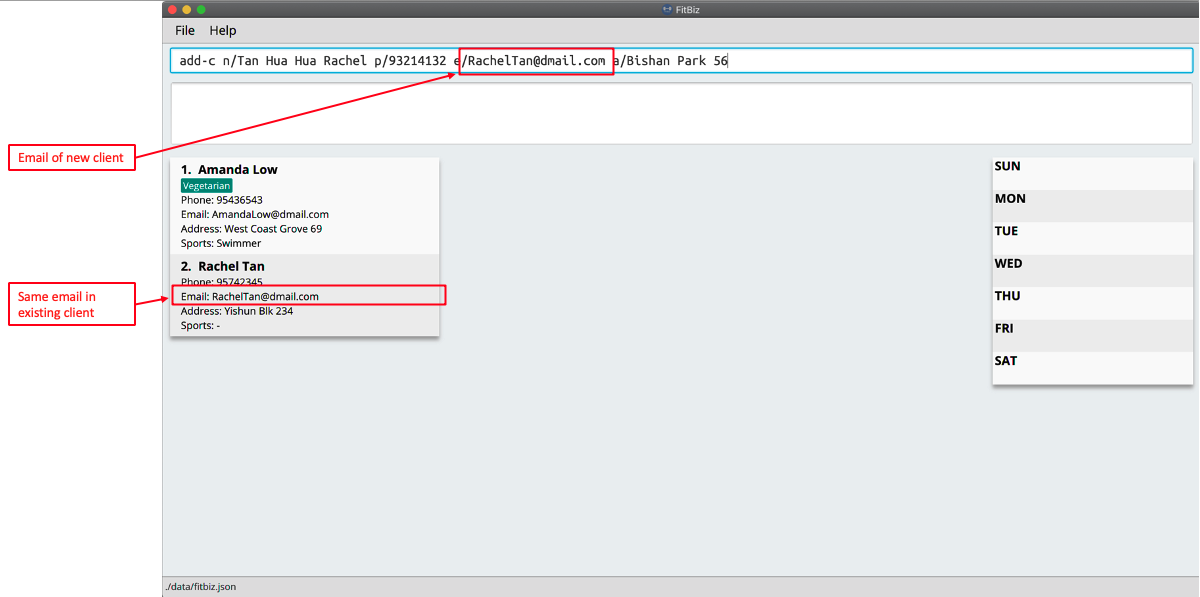
The following error message will be shown.
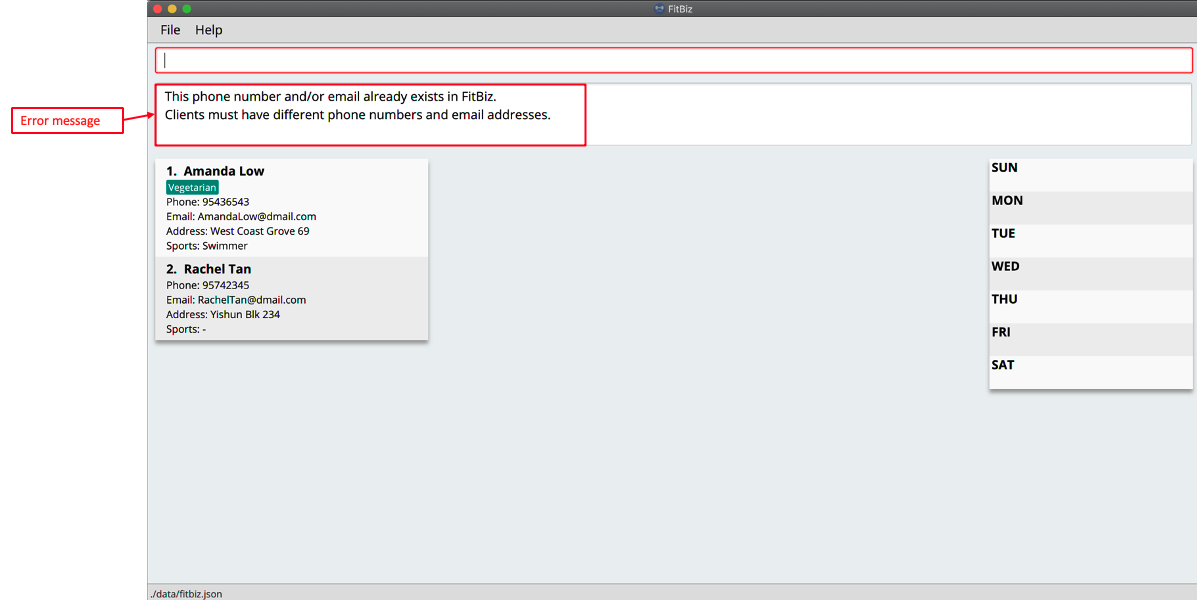
To solve this issue, ensure that any new client you add does not have the same phone number or email as existing client.
3.5. Edit a client’s profile: edit-c ---Ng Ming Liang
edit-c allows you to edit an existing client’s details from the Client List. There are various attributes that can be edited for the client using this command, which will be covered in this section.
Format: edit-c INDEX [n/NAME] [p/PHONE] [e/EMAIL] [a/ADDRESS] [g/GENDER] [b/BIRTHDAY] [cw/CURRENT_WEIGHT] [tw/TARGET_WEIGHT] [h/HEIGHT] [s/SPORT]… [t/TAG]… [r/REMARK]
3.5.1. Parameters
This section acts as a summary of the important things to note when using edit-c and its parameters. The square bracket shows that it is optional and your command will still execute even if you do not enter them. However, at least one of them have to be specified. The ellipsis after a parameter … means that there can be multiple of that same type of parameter.
| Parameters | Important points to note |
|---|---|
|
* Substitute * * |
|
* Substitute * * |
|
* Substitute * * * |
|
* Substitute * * * * |
|
* Substitute * * |
|
* Substitue * * * |
|
* Substitue * * * * |
|
* Substitute * * * |
|
* Substitute * * * |
|
* Substitue * * * |
|
* Substitute * * Sports given in this command will overwrite all of the client’s existing sports. * |
|
* Substitue * * Tags given in the command will overwrite the Client’s existing tags * You can remove all of the client’s tags by typing * |
|
* Substitute * * Any whitespace at the start of * |
*The set of special characters are !#$%&'*+/=?{|}~^.-`
| At least one of the optional fields must be provided. |
3.5.2. Example
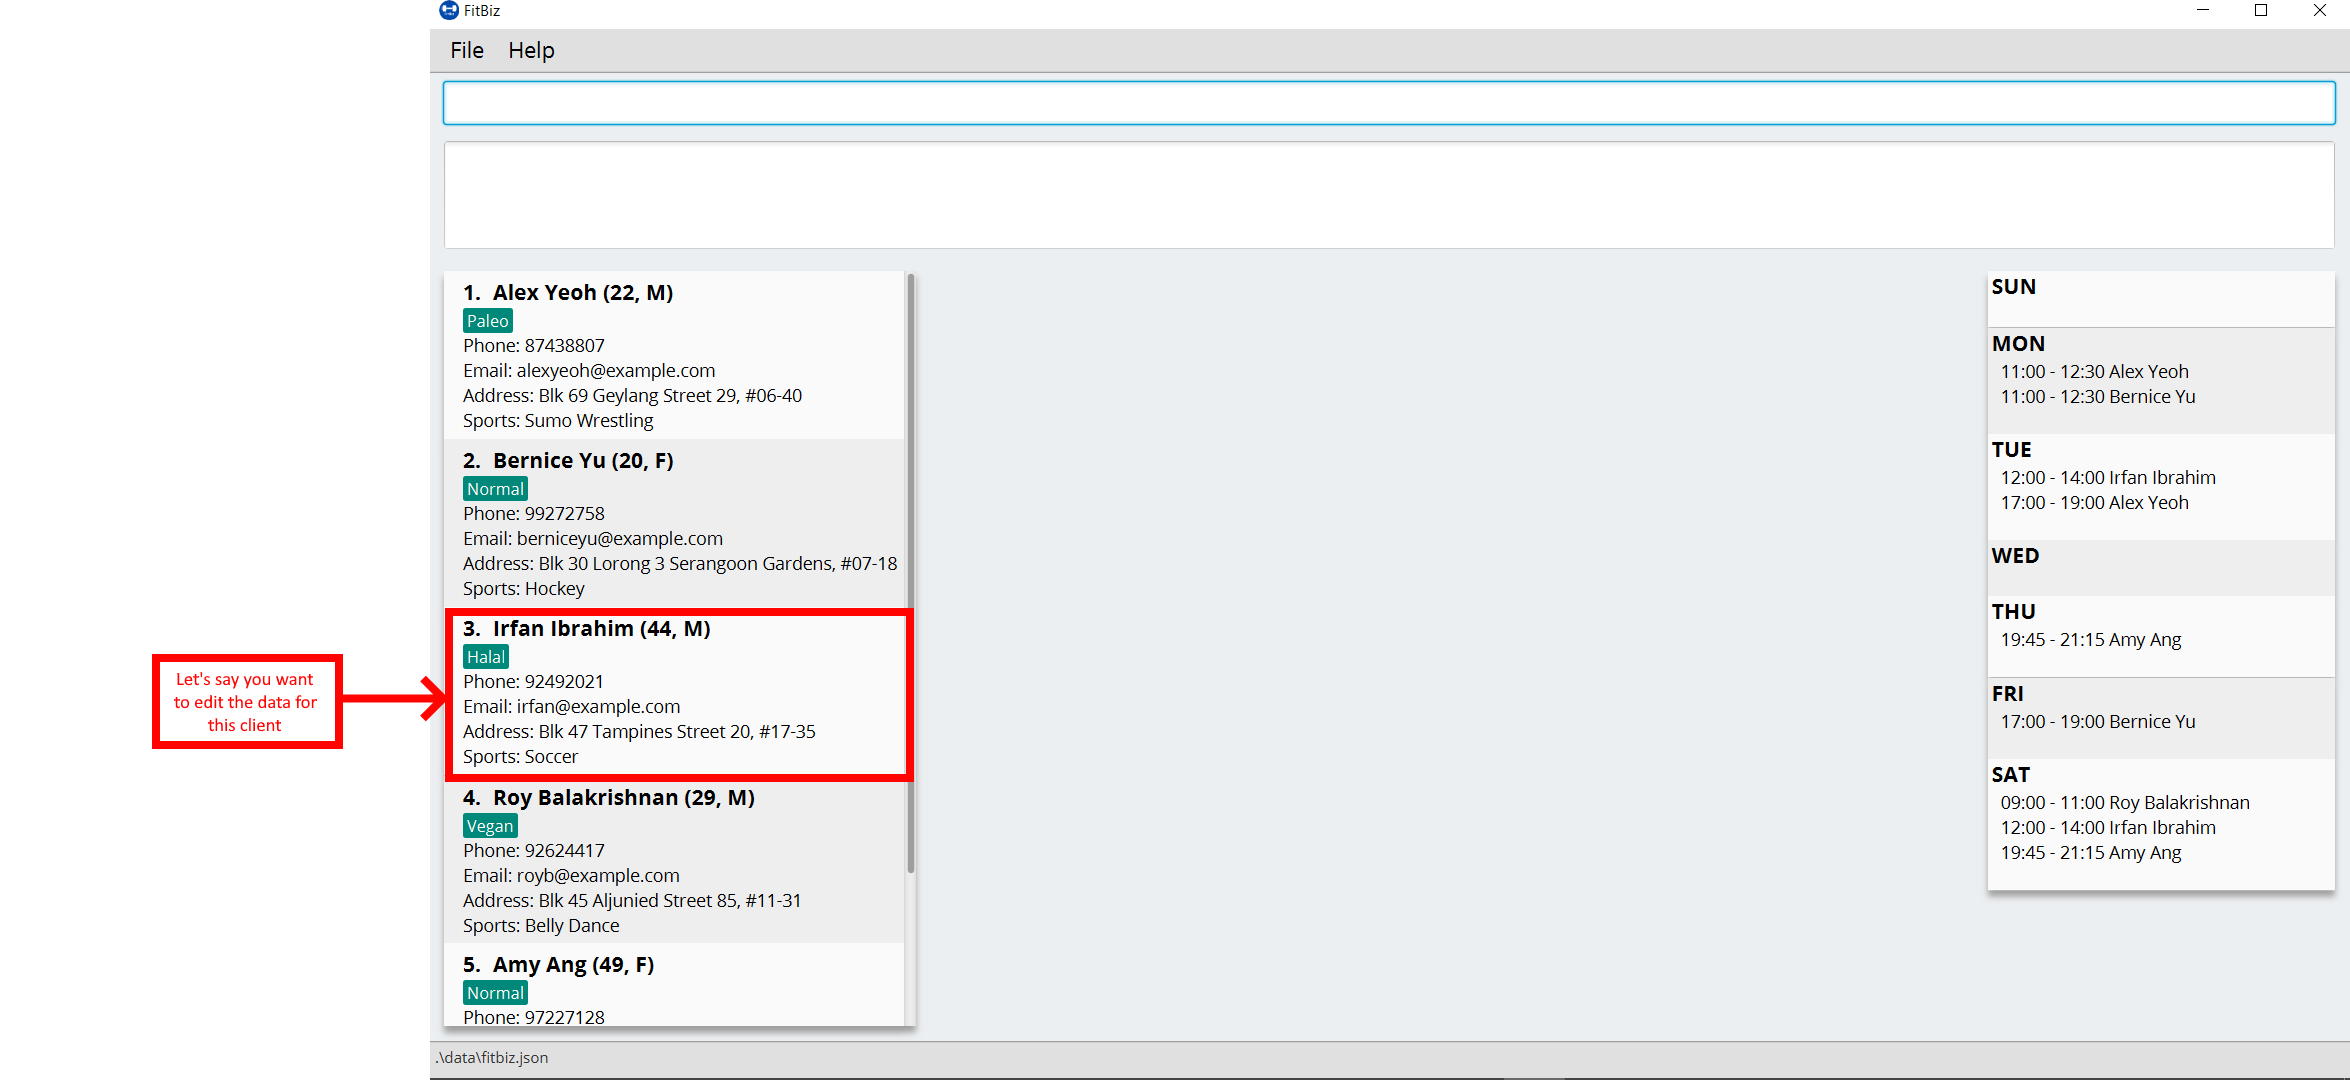
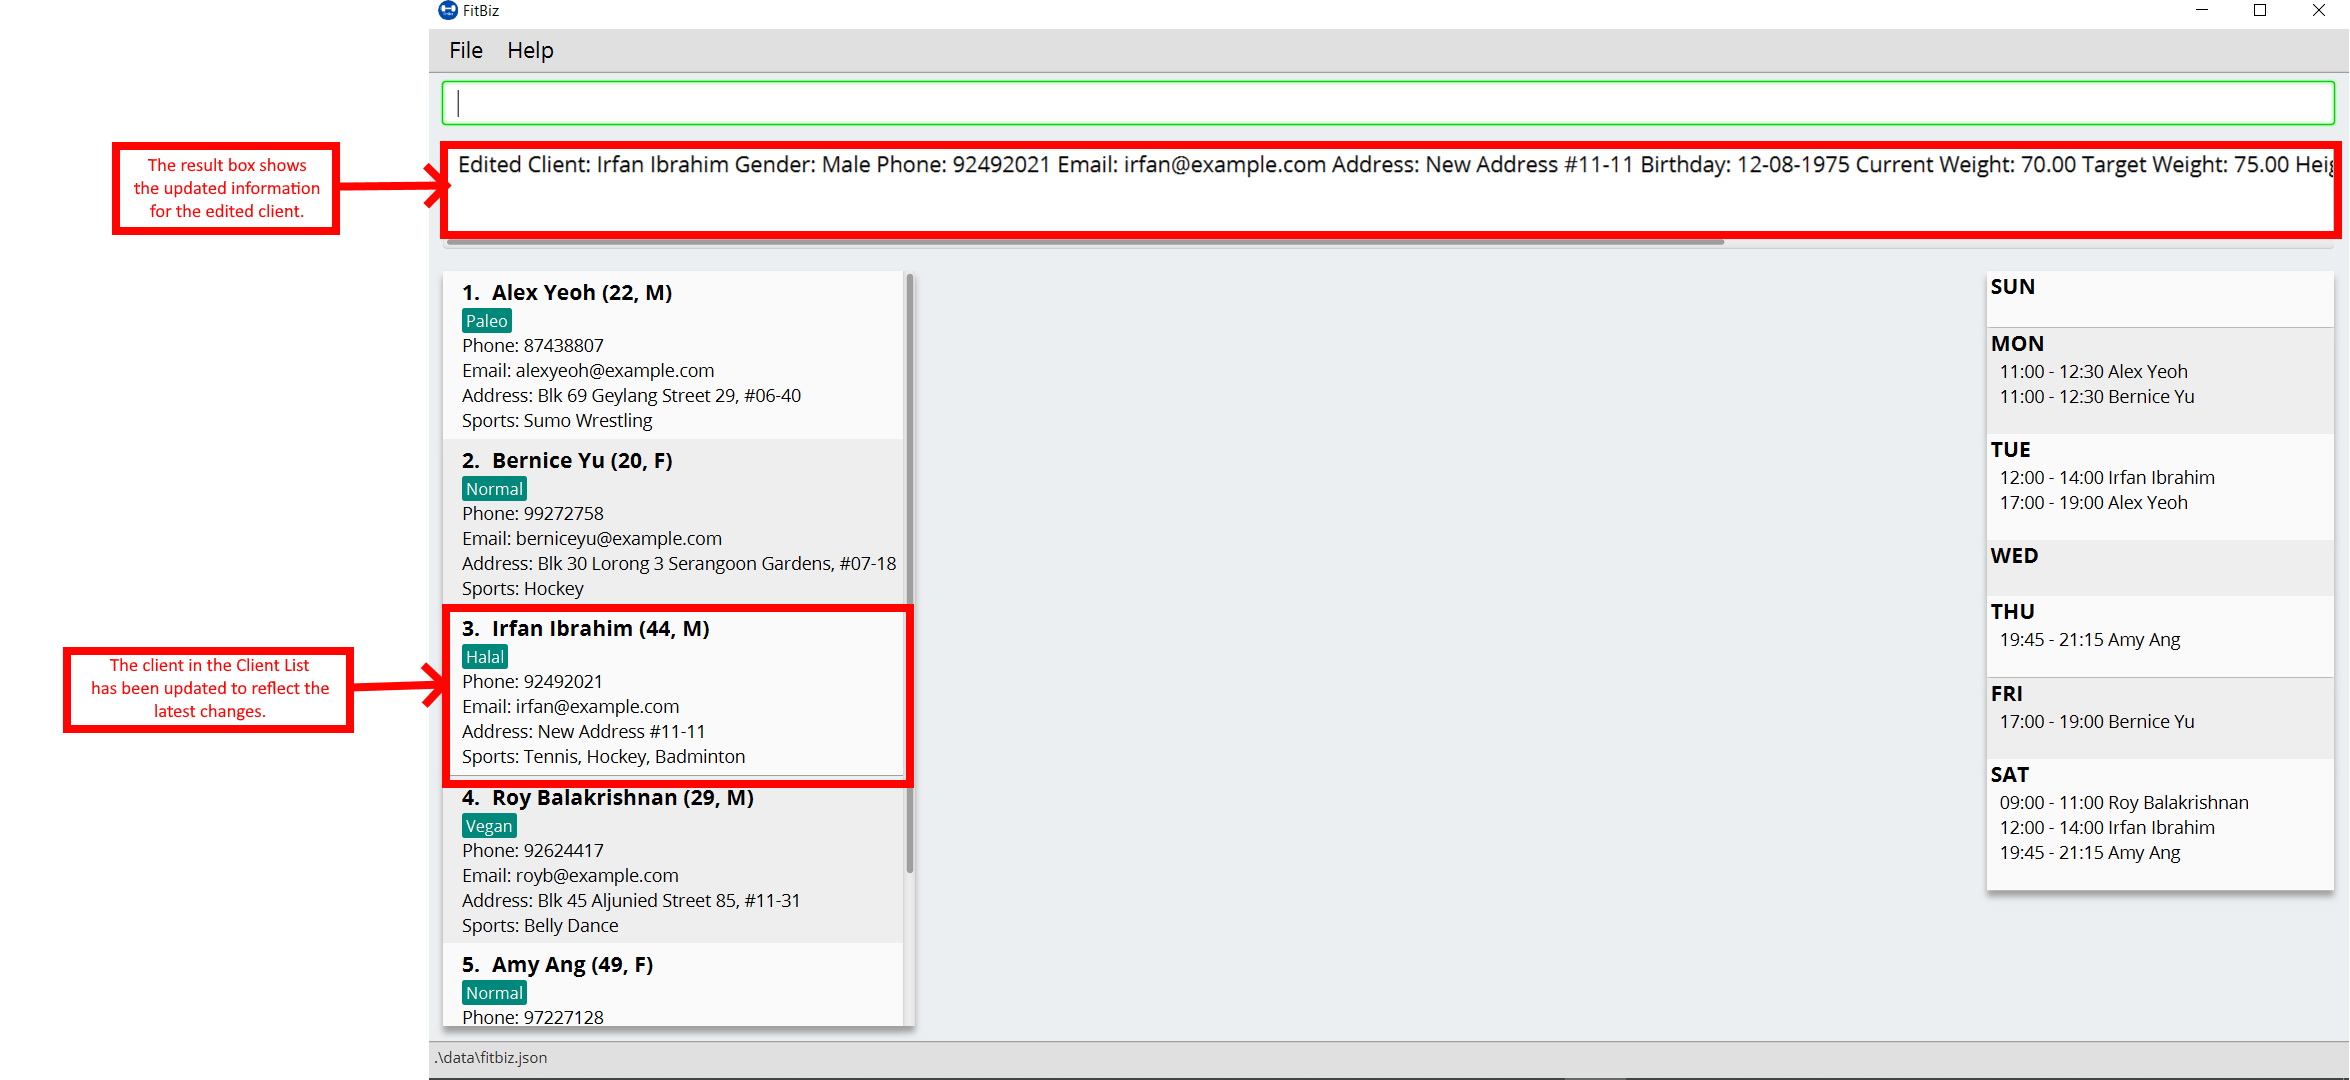
Let’s say you want to edit the address and assign 3 sports (Tennis, Hockey, Badminton) to client Irfan Ibrahim. From the Client List, you can see that his client INDEX is 3.
Next, you can enter the command edit-c 3 a/New Address #123456 s/Tennis s/Hockey s/Badminton in the Command Box.
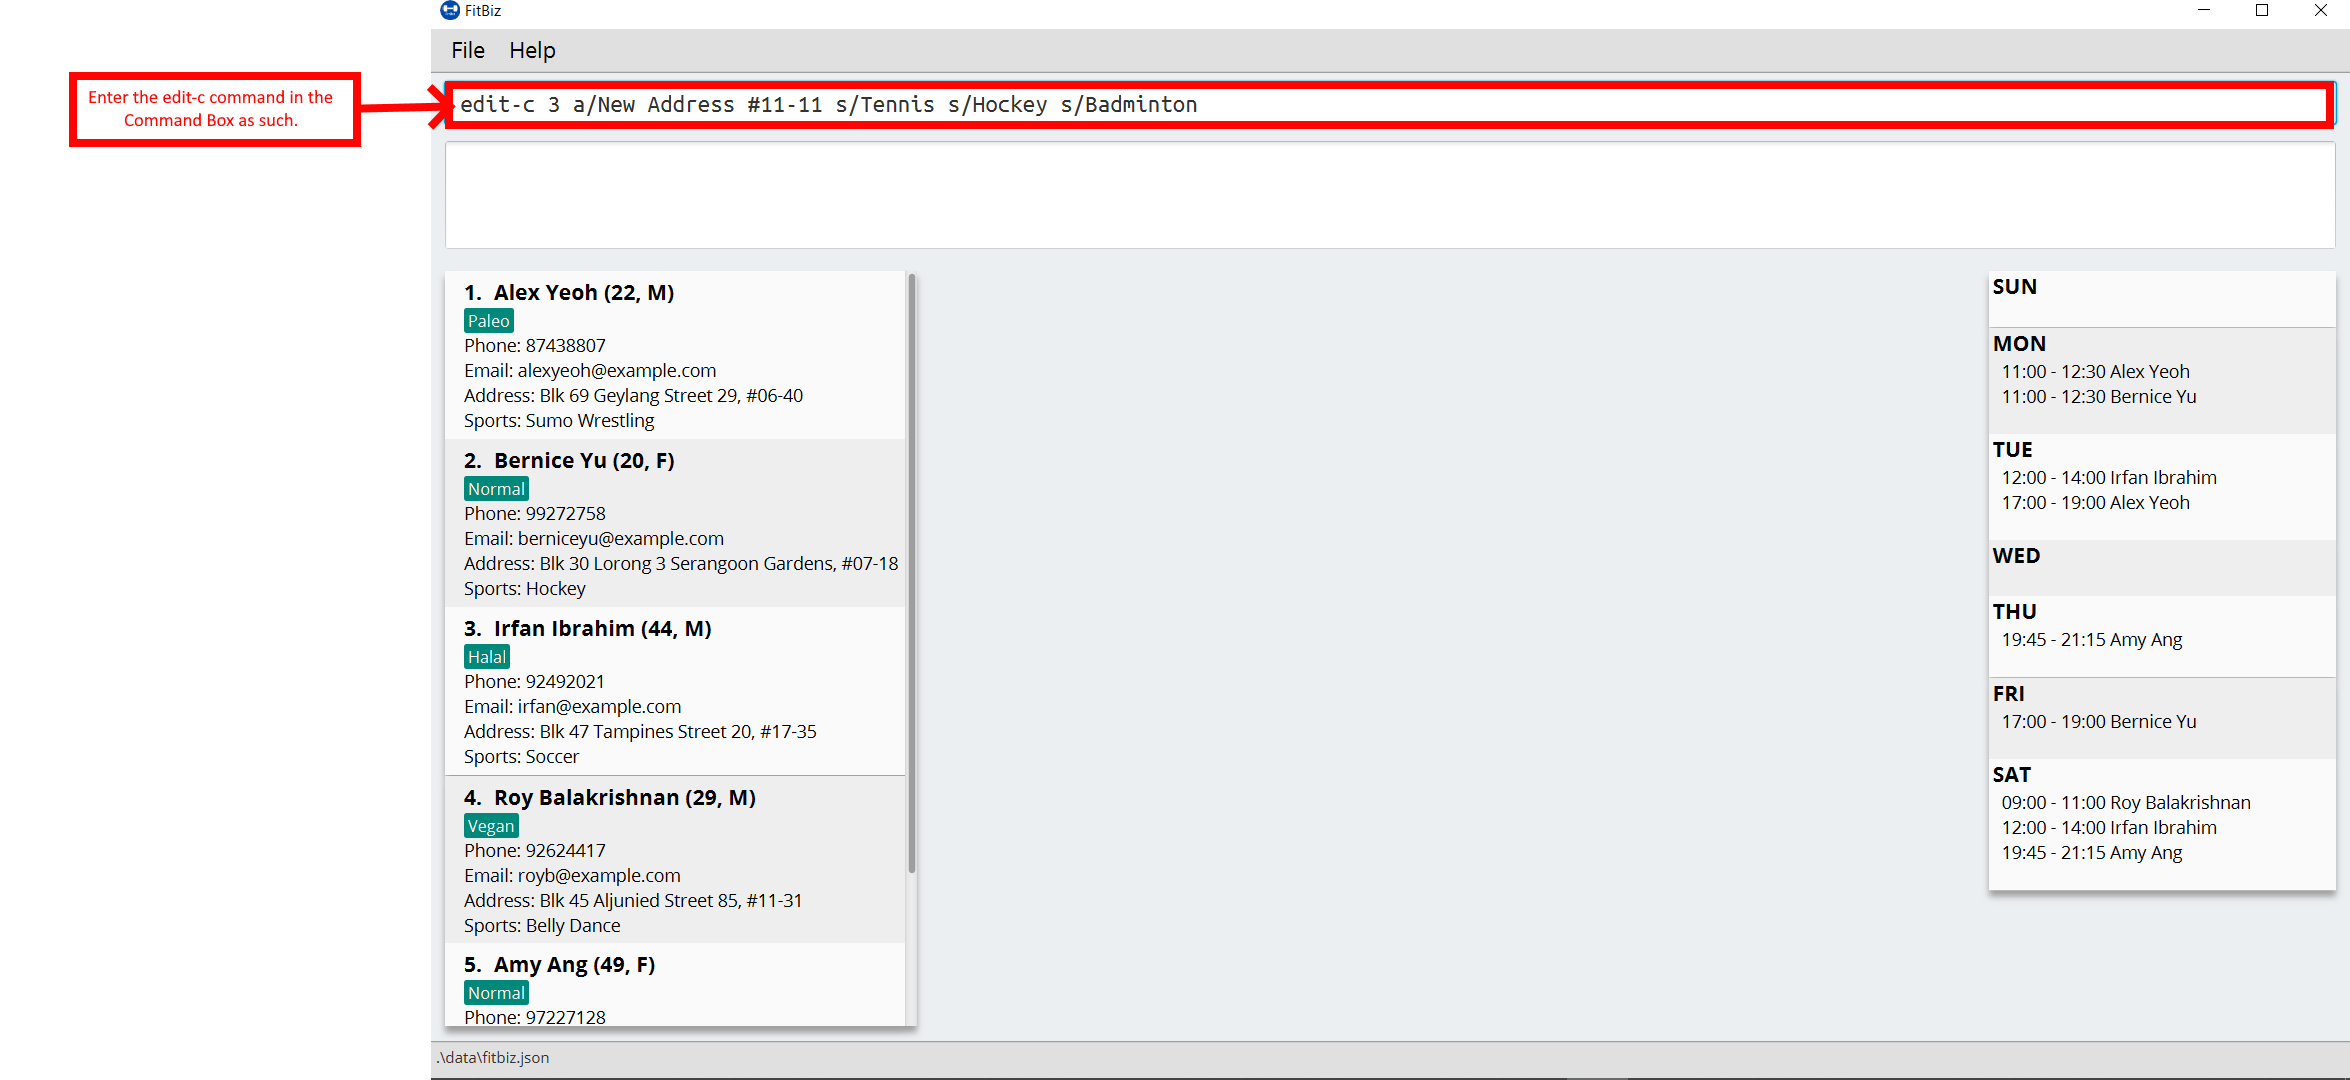
Enter the command, and you should see that the Result Box displays the edited client’s information, and that the Client List has updated Irfan Ibrahim to show the new changes.
3.5.3. Common Errors/Problems
You might face some errors or difficulties when you use edit-e. In this section, you will be able to understand these errors and resolve them.
Result box not displaying updated client’s information
When you use edit-c, instead of seeing the updated client’s information in the Result Box, you might sometimes encounter an error message informing you about the specifications for the format of the command. This error message varies according to the mistake detected in the parameters given. For simplicity, let’s look at one example scenario.
Let’s say you attempt to edit the email of Irfan Ibrahim and happen to give an incorrect format of the email that does not follow the rules given in the parameters table above for EMAIL. Consider the following command: edit-c 3 e/invalidEmail.
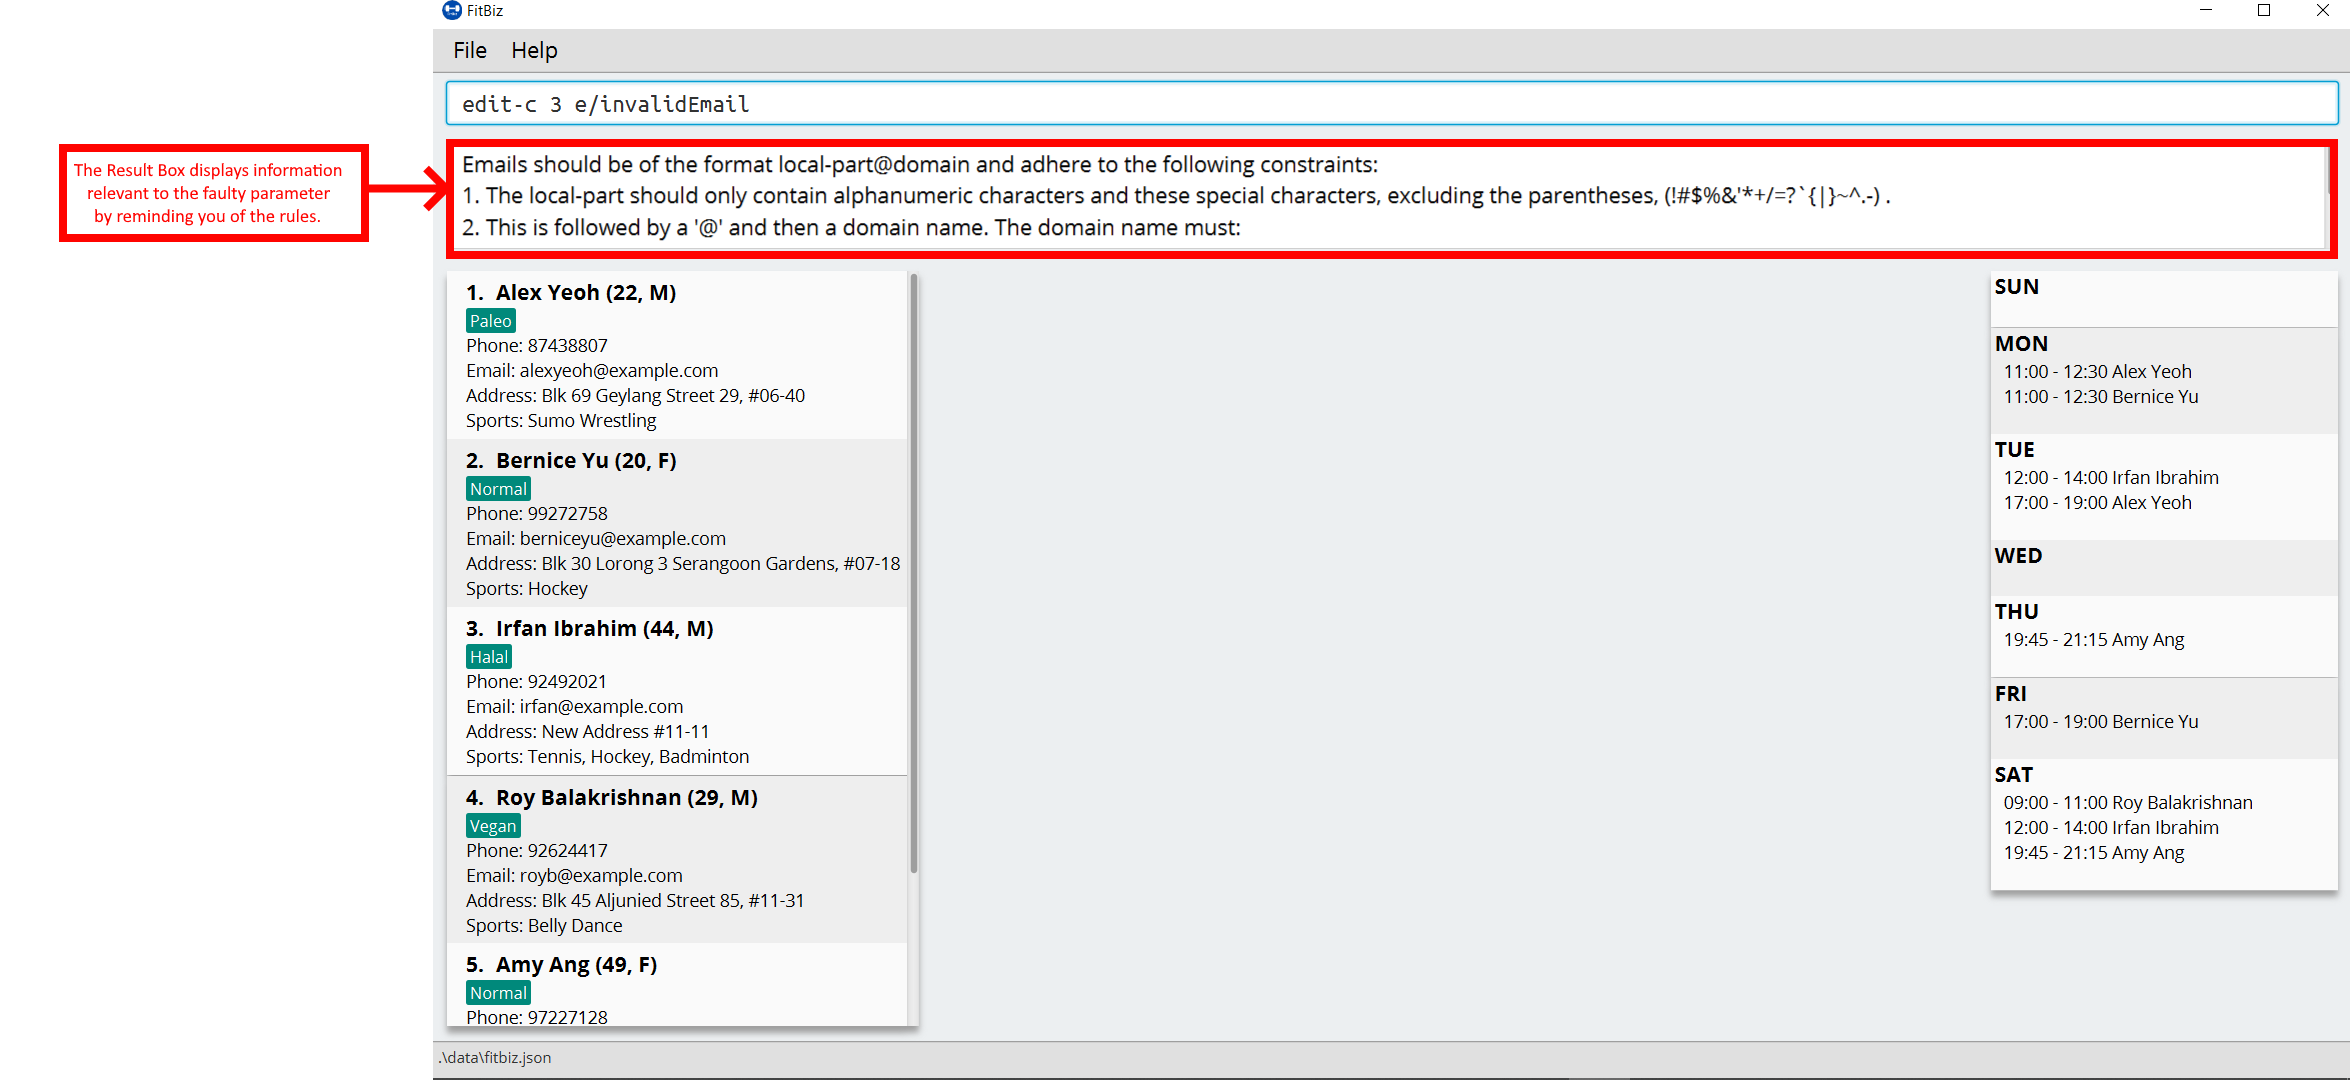
As seen above, the EMAIL is of the wrong format as it does not include the @ symbol and not of the xxx@yyy format.
In the example above, the EMAIL field was faulty. This behaviour of FitBiz also applies to other faulty parameters for the edit-c command, where FitBiz will display information relevant to the faulty parameter, to help you troubleshoot and correct your input.
3.6. Delete a client: delete-c --- Li Zi Ying
You find that your client list contains a client who is no longer working with you and you would like to remove his details from your client list. delete-c allows you to delete the client at the specified index from your list of clients.
Format: delete-c INDEX
3.6.1. Parameters
This section acts as a summary of the important things to note when using delete-c including their parameters.
| Parameters | Important points to note |
|---|---|
|
|
3.6.2. Examples
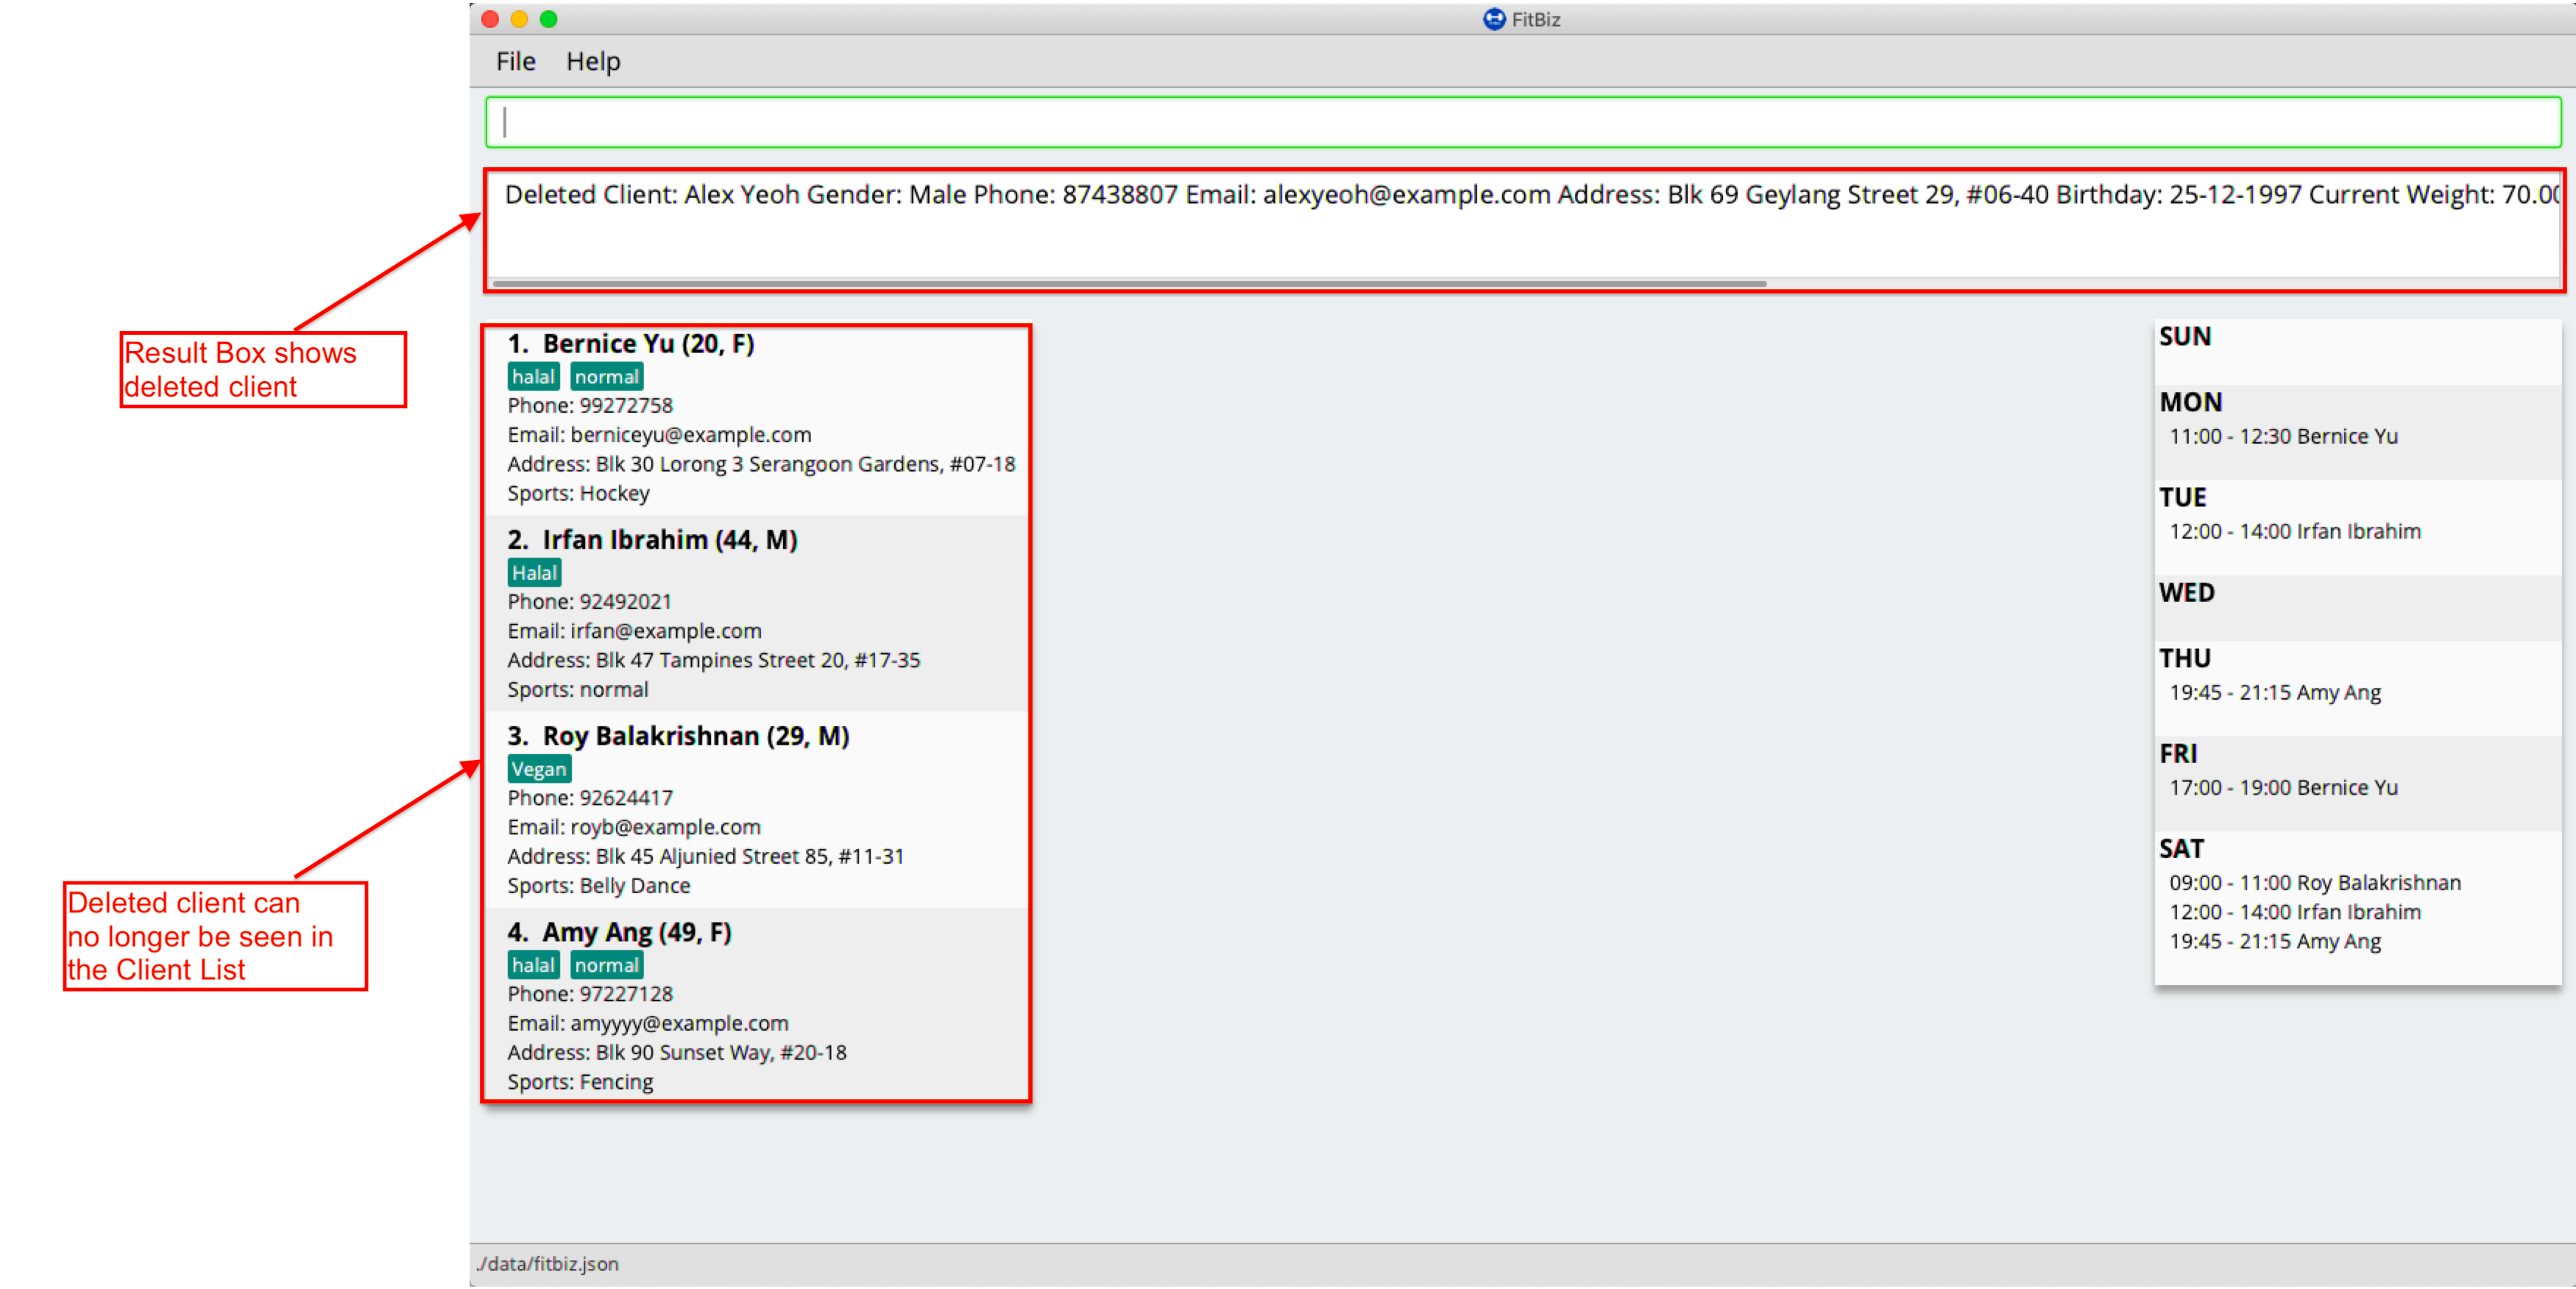
Let’s say that you want to delete the client named "Alex Yeoh" in client list. You can simply use the delete-c command as shown.
-
Type
delete-c 1into the Command Box and pressEnterto execute it.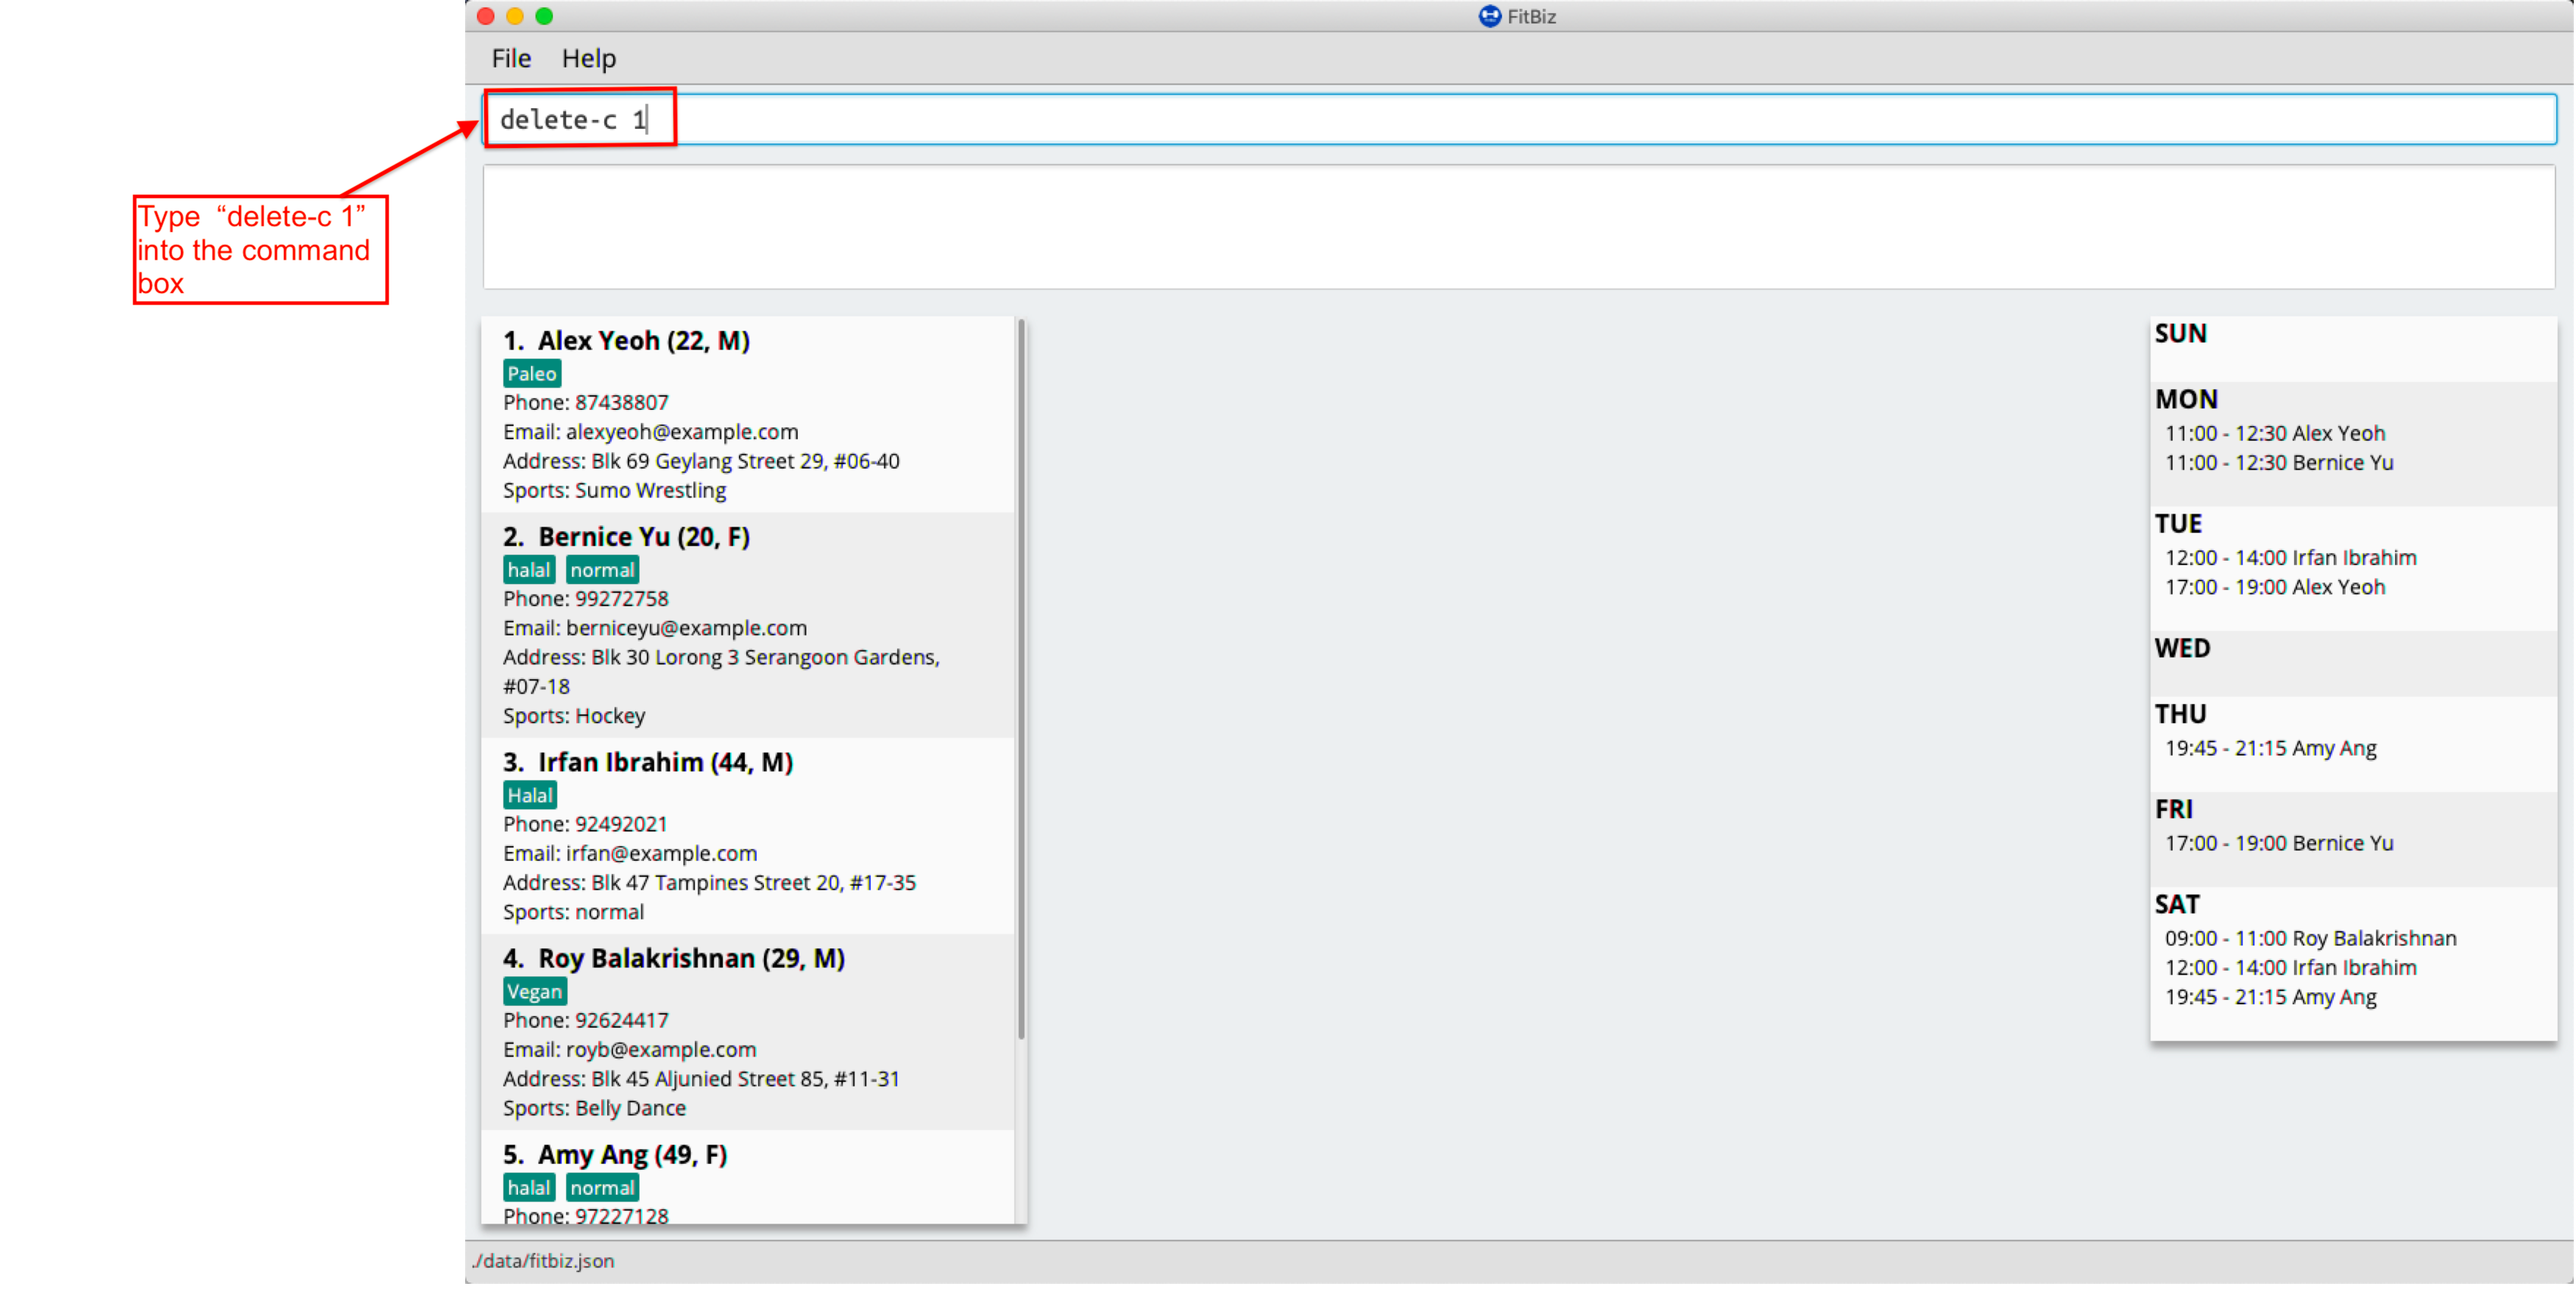
-
Result Box will display the message of the details of the deleted client. You can now see that the Client List no longer contains the deleted client.
3.6.3. Common errors/problems
You might face some errors or difficulties when you use delete-c. In this section, you will be able to understand these errors and resolve them.
No index specified
If you type in delete-c without specifying the INDEX, no client will be deleted and an error message will be shown.
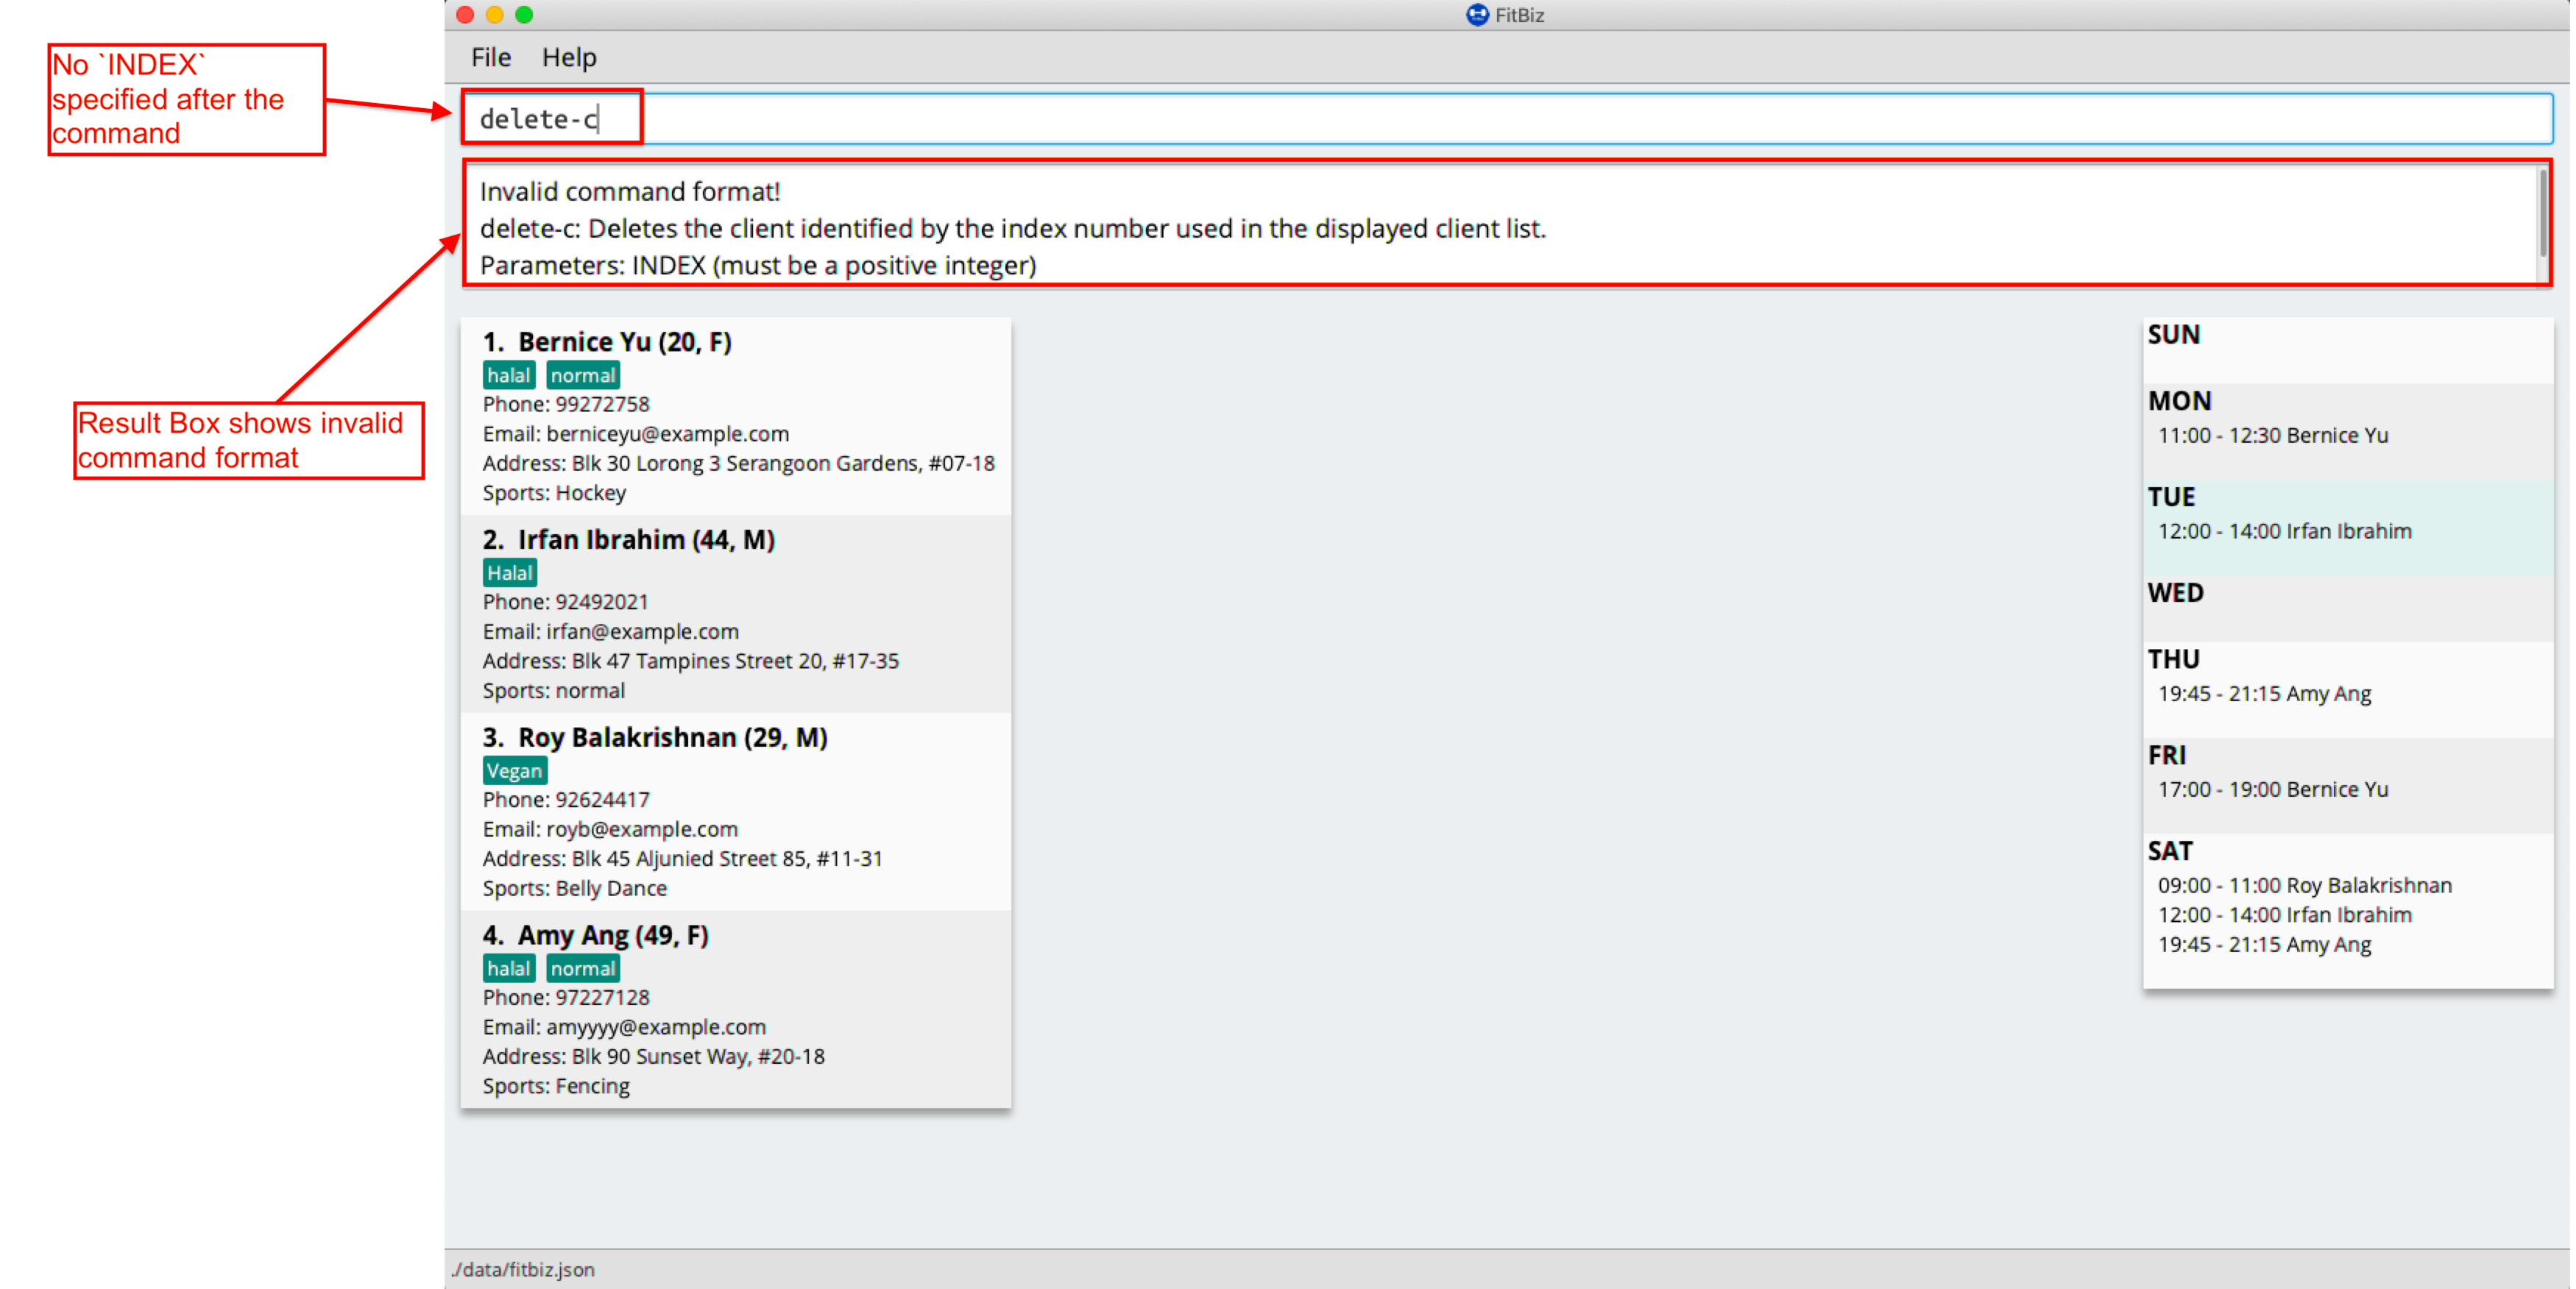
This happens because there is no INDEX specified. To correct this, you have to enter a valid INDEX after delete-c.
Index out of range
If you key in an INDEX that is out of range, that is if there are only 4 clients in the list but you try to key in delete-c 5, no client will be deleted and an error message will be shown.

To correct this, you have to enter a valid INDEX that is not more than the number of clients in the client list.
3.7. View a client profile: view-c --- Li Zi Ying
You might want to view the complete information of a certain client in your client list. This complete information includes the client’s full details, their exercise table and personal best table. view-c INDEX shows all available information of the client at the specified index.
Format: view-c INDEX
3.7.1. Parameters
This section acts as a summary of the important things to note when using view-c including their parameters.
| Parameters | Important points to note |
|---|---|
|
|
3.7.2. Examples
Let’s say that you want to view the details of the client named "Alex Yeoh" in client list. You can simply use the view-c command as shown.
-
Type
view-c 1into the Command Box and pressEnterto execute it.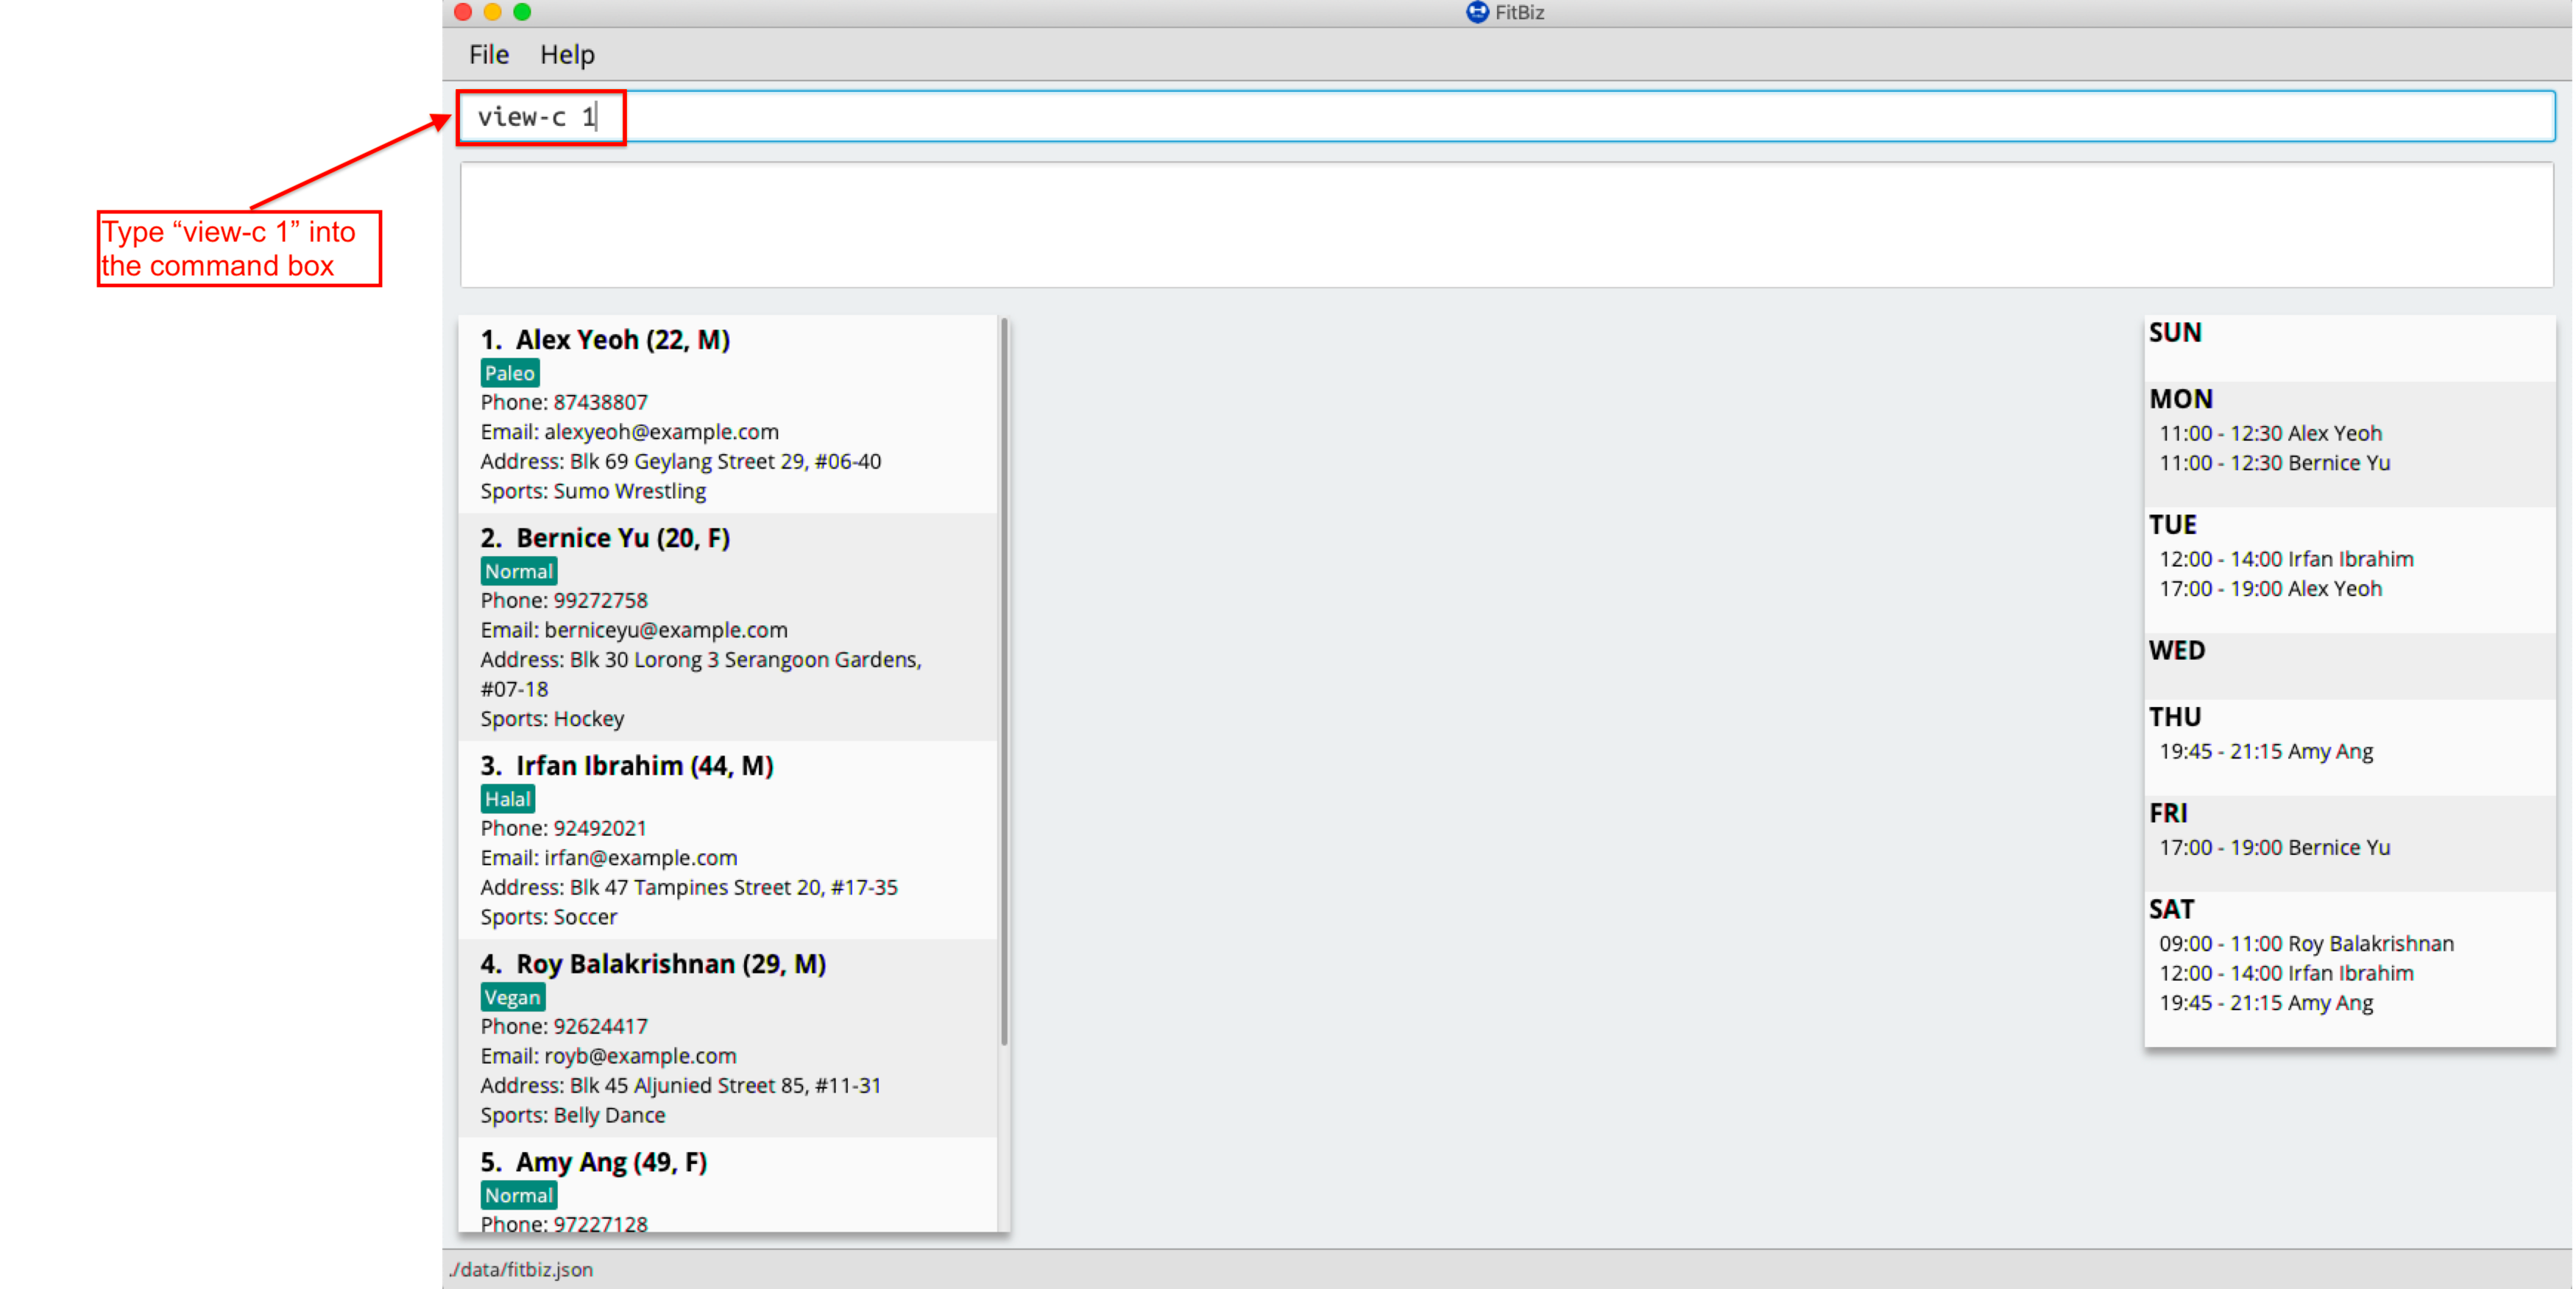
-
Result Box will display the message telling you the client currently in view. You can now see that the Client View is now populated with the client’s details, the exercise table and the personal best table.
3.7.3. Common errors/problems
You might face some errors or difficulties when you use view-c. In this section, you will be able to understand these errors and resolve them.
No index specified
If you type in view-c without specifying the INDEX, no client will be viewed and an error message will be shown.
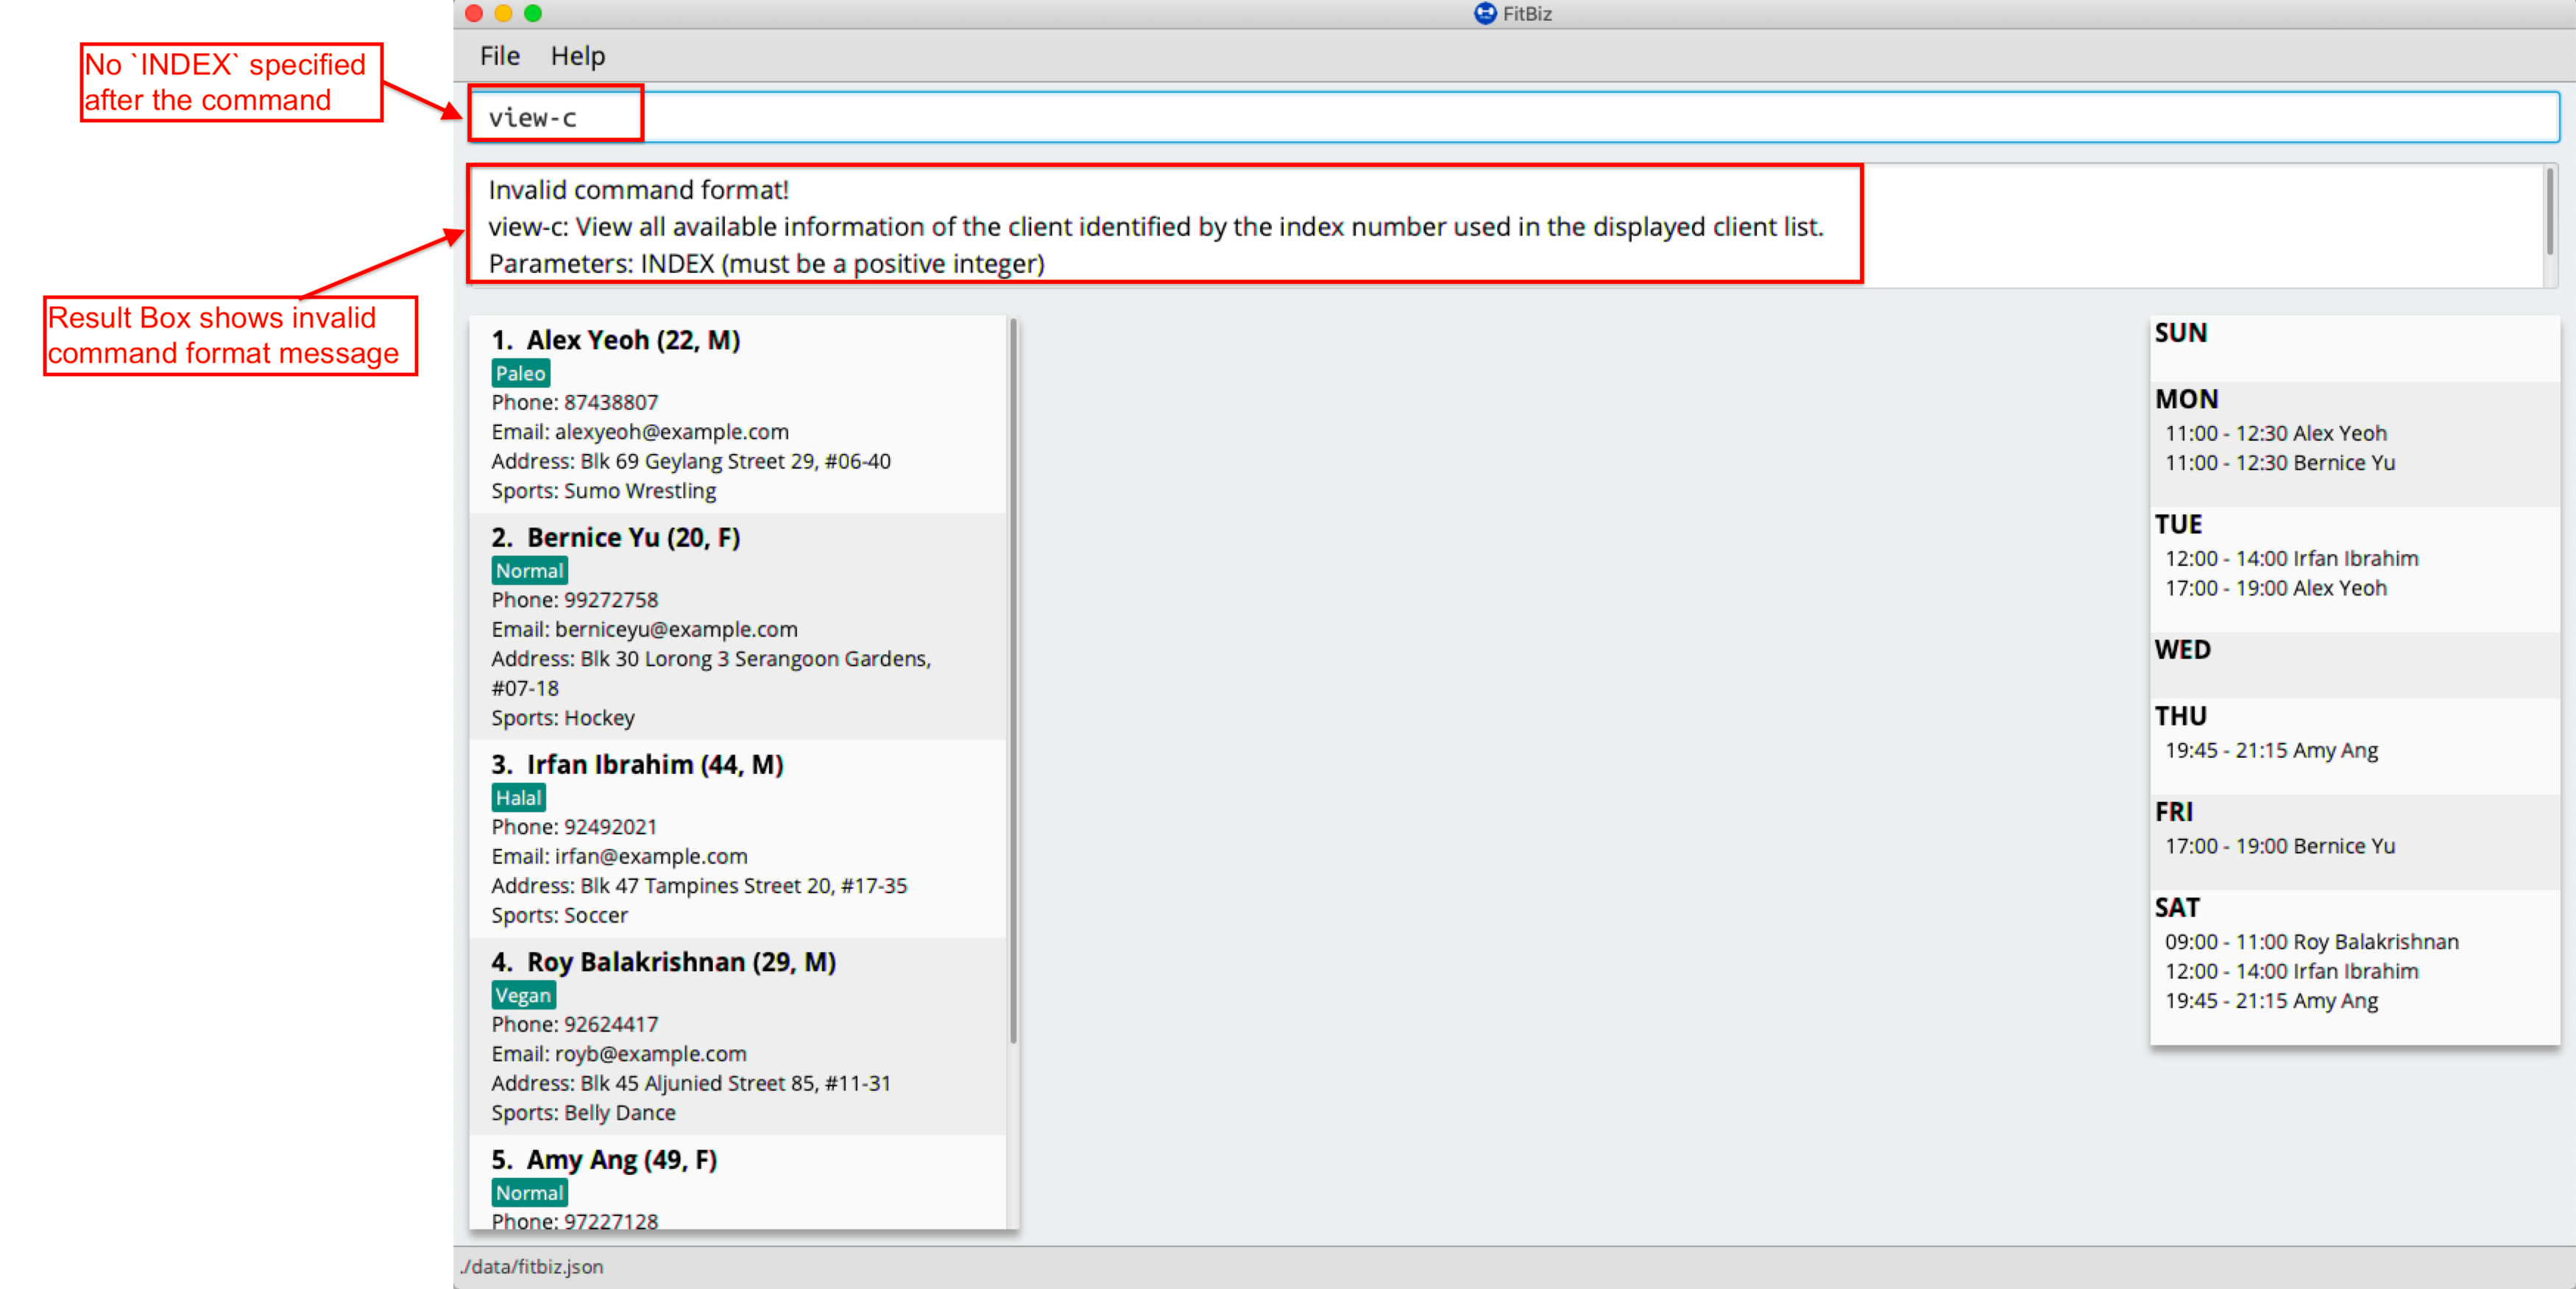
This happens because there is no INDEX specified. To correct this, you have to enter a valid INDEX after view-c.
Index out of range
If you key in an INDEX that is out of range, that is if there are only 5 clients in the list but you try to key in view-c 10, no client will be viewed and an error message will be shown.
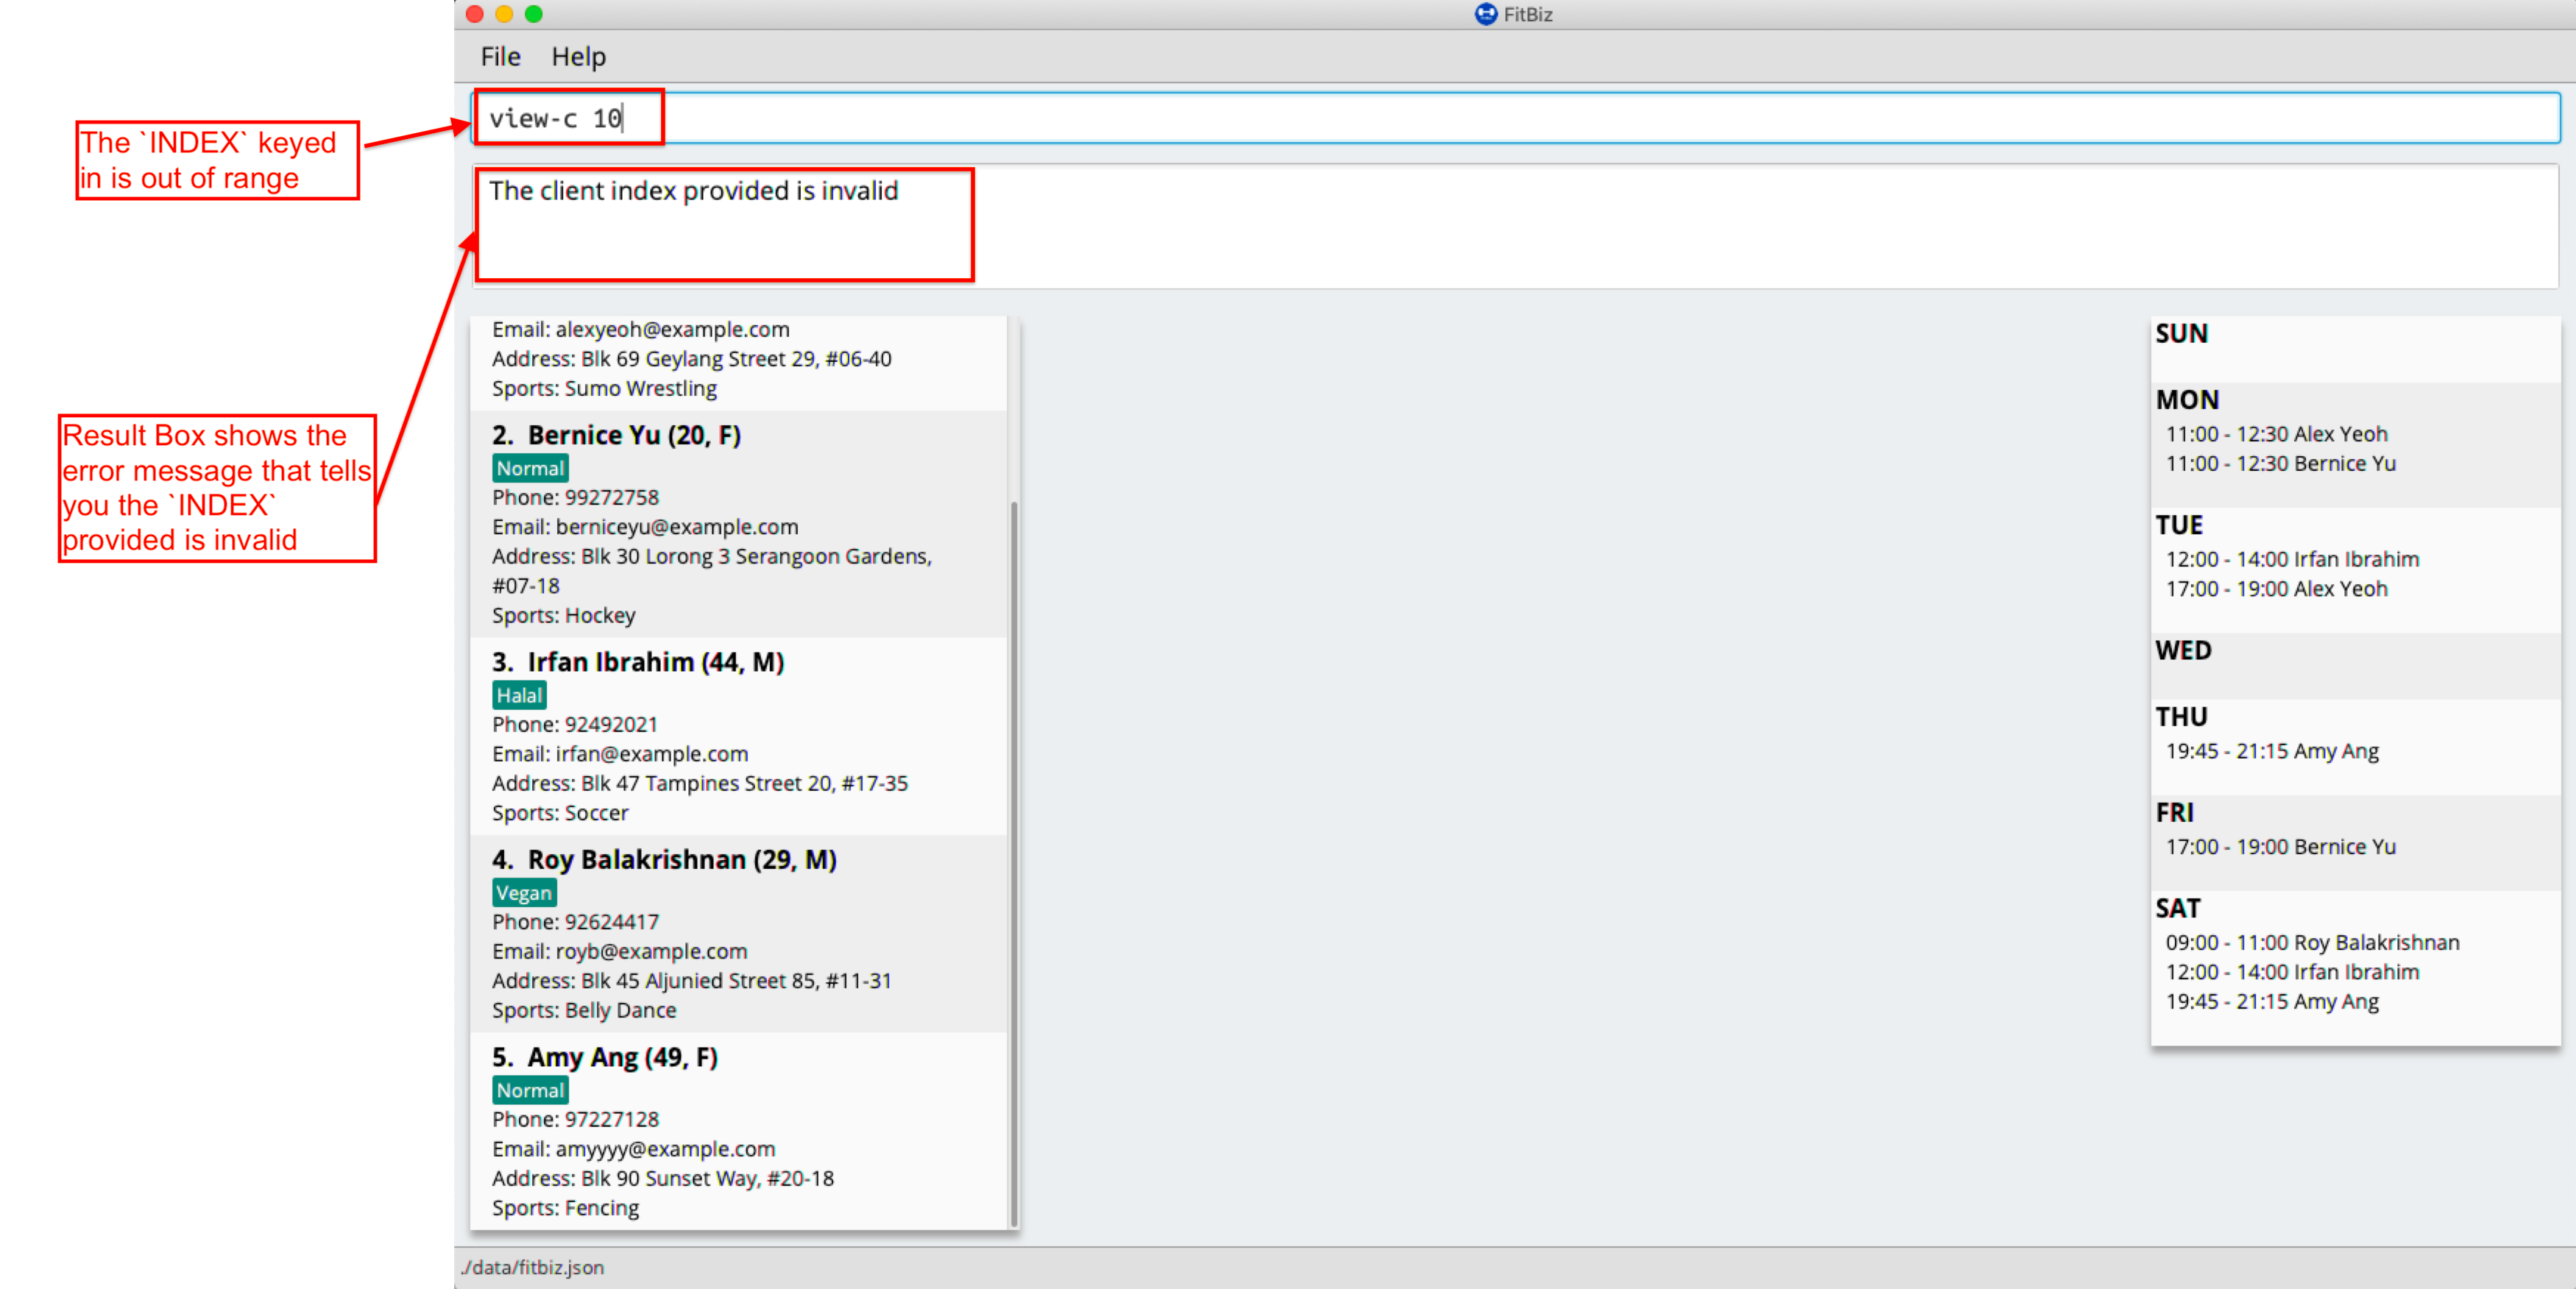
To correct this, you have to enter a valid INDEX that is not more than the number of clients in the client list.
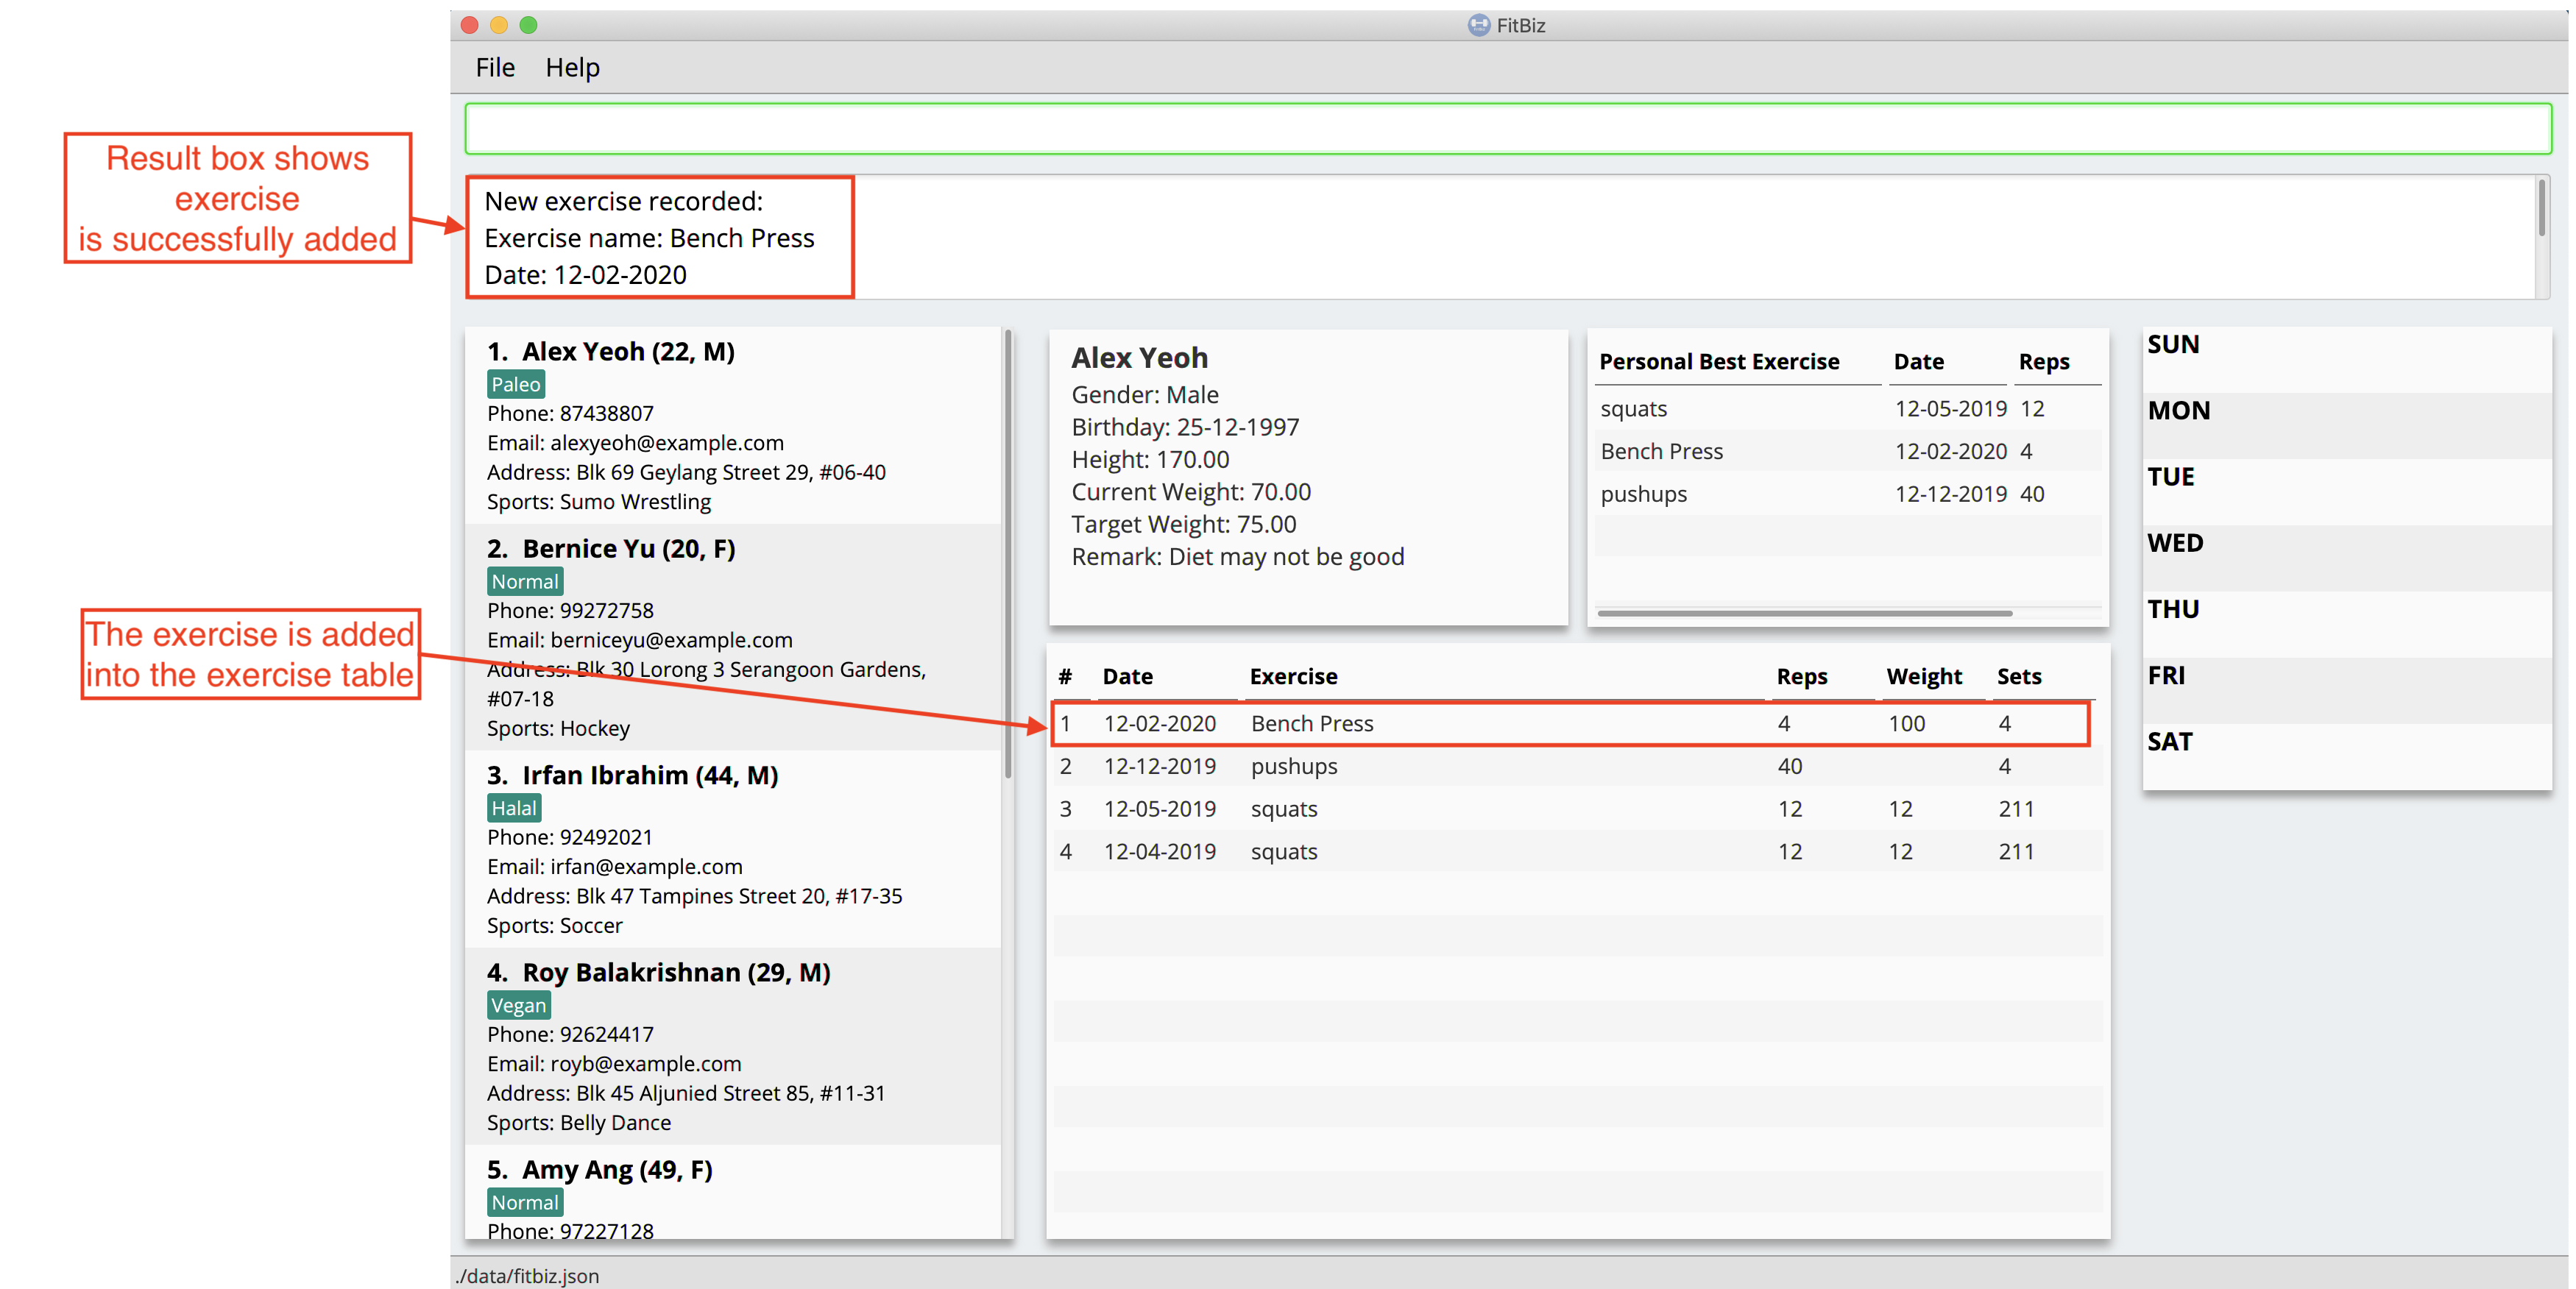
3.8. Add a client’s exercise: add-e --- YongJie
add-e allows you to record an exercise done by the client that you are currently viewing. You will be able to see the exercises recorded and their information in the Exercise Table.
Format: add-e n/EXERCISE_NAME d/DATE [ew/EXERCISE_WEIGHT] [reps/REPS] [sets/SETS]
3.8.1. Parameters
This section acts as a summary of the important things to note when using add-e including their parameters. The square bracket shows that it is optional and your command will still execute even if you do not enter them.
| Parameters | Important points to note |
|---|---|
|
* Substitute * * |
|
* Substitute * * * The range of |
|
* Substitute * * Range for |
|
* Substitute * * Range for |
|
* Substitute * * Range for |
3.8.2. Example
Let’s say that you want to add an exercise with the following details:
Name: Bench Press |
You can use the add-e command to add the exercise as shown.
-
View the client that you want to add the exercise to. For information on how to view the client, you can refer to the
view-csection. For this example, we will add the exercise to the first client in the list,Alex Yeoh. After you enteredview-c 1, you will seeAlex Yeohdetailed information and a table of his recorded exercises.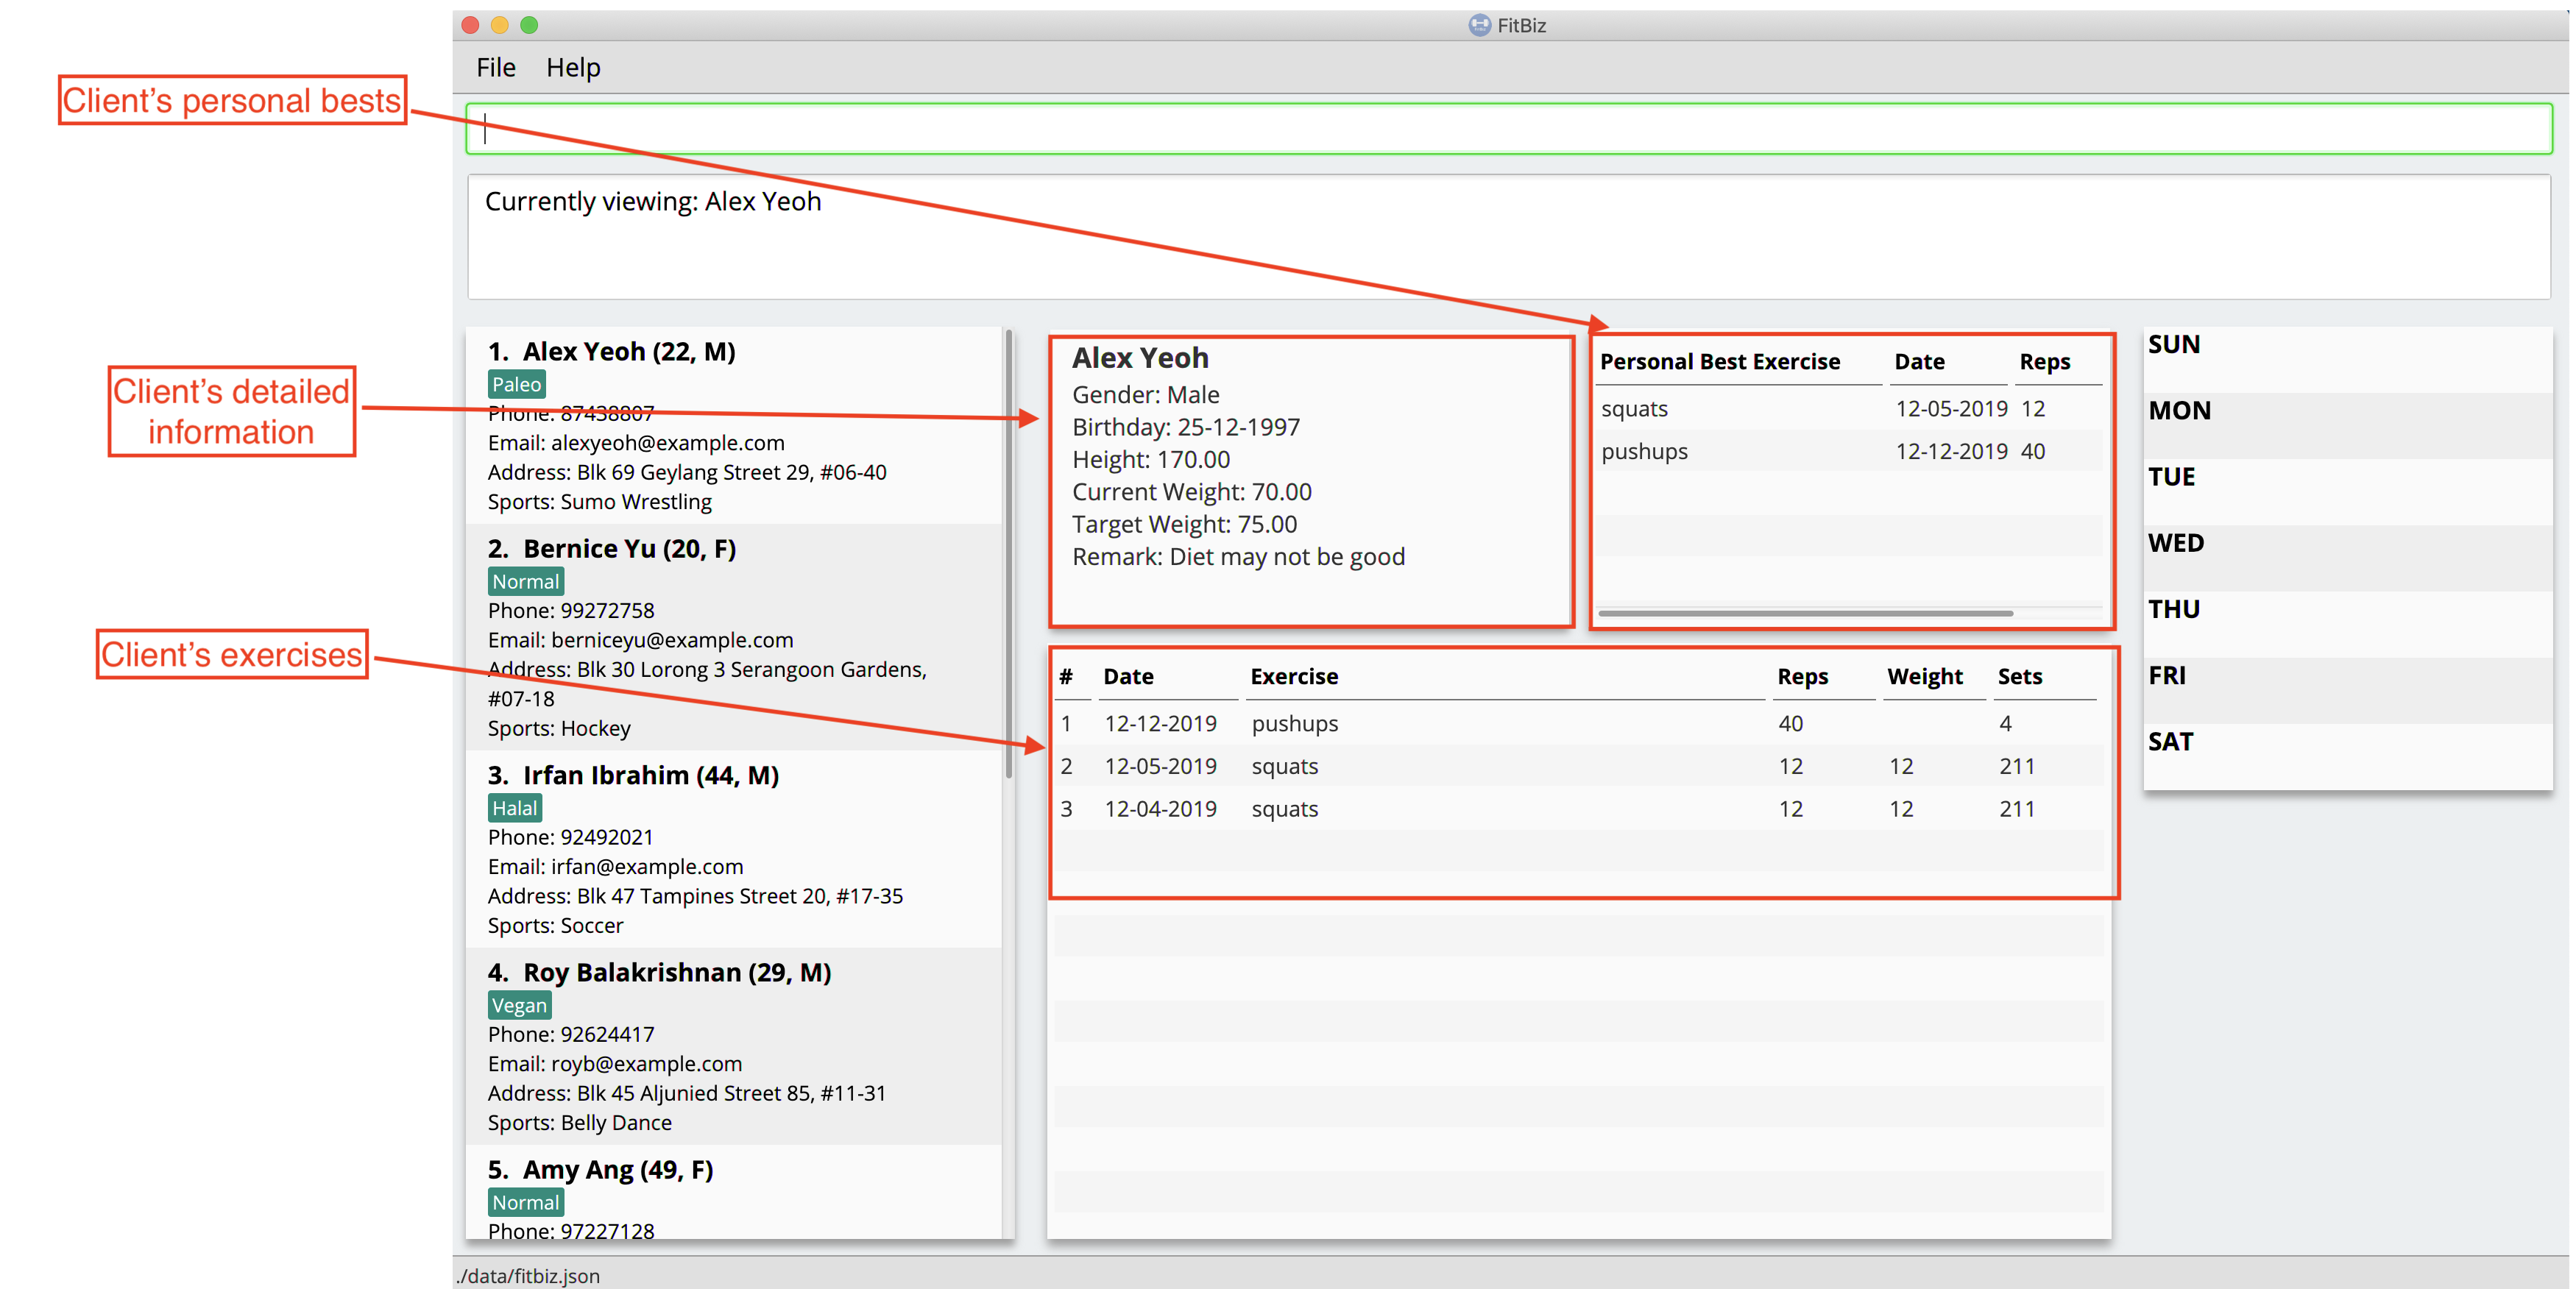
-
Now type the information of the exercise, matching each detail of the exercise to the parameter. In this case, you will have to type
add-e n/Bench press d/12-02-2020 reps/4 ew/100 sets/4into Command Box. Press enter to execute it. To recap,The name of the exercise after
n/
The date of the exercise afterd/
The reps of the exercise afterreps/
The weight of the exercise afterew/
The sets of the exercise aftersets/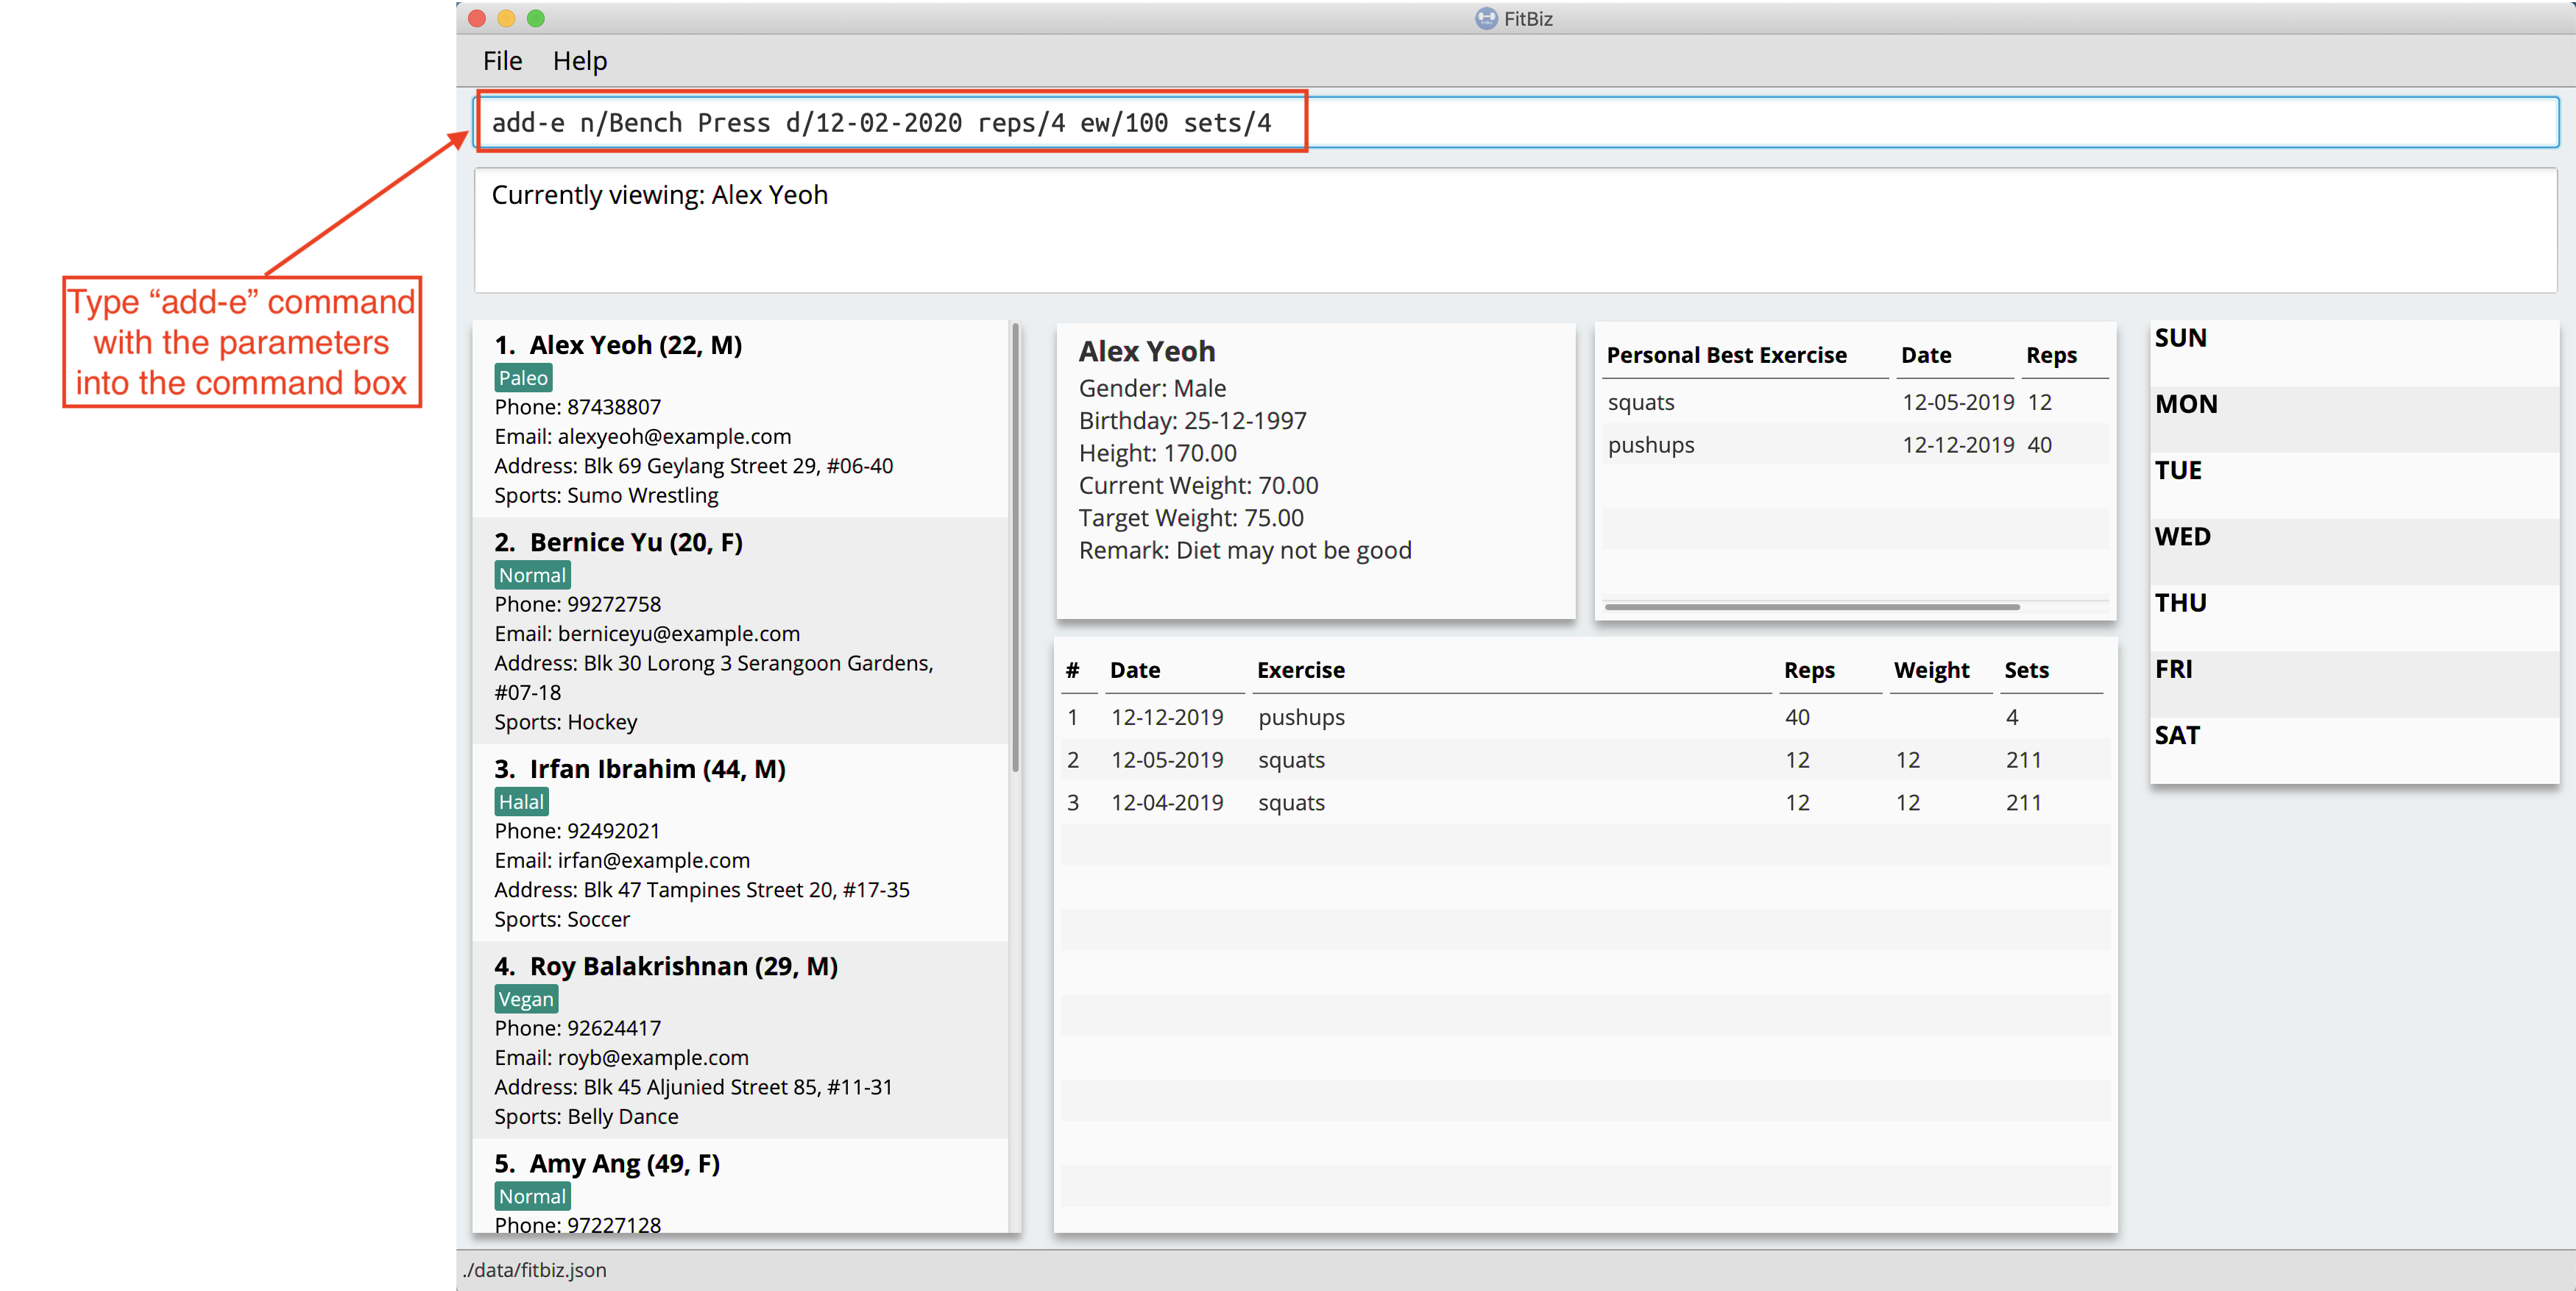
-
After it has been successfully entered, Result Box will display the recorded exercise. You will also be able to see the recorded exercise in the Exercise Table.
3.8.3. Common errors / problems
You might face some errors or difficulties when you use add-e. In this section, you will be able to understand these errors and resolve them.
Duplicate exercises
You might wonder why the application shows you a duplicate exercise error when the details of the exercises you entered are different. It is likely that only the sets differ between the two exercises. The example below might help you understand better.
You might have the following exercise in Exercise Table.

If you were to enter add-e n/Bench Press d/12-02-2020 reps/4 ew/100 sets/2 into Command Box, the only information that is different is the number of sets.
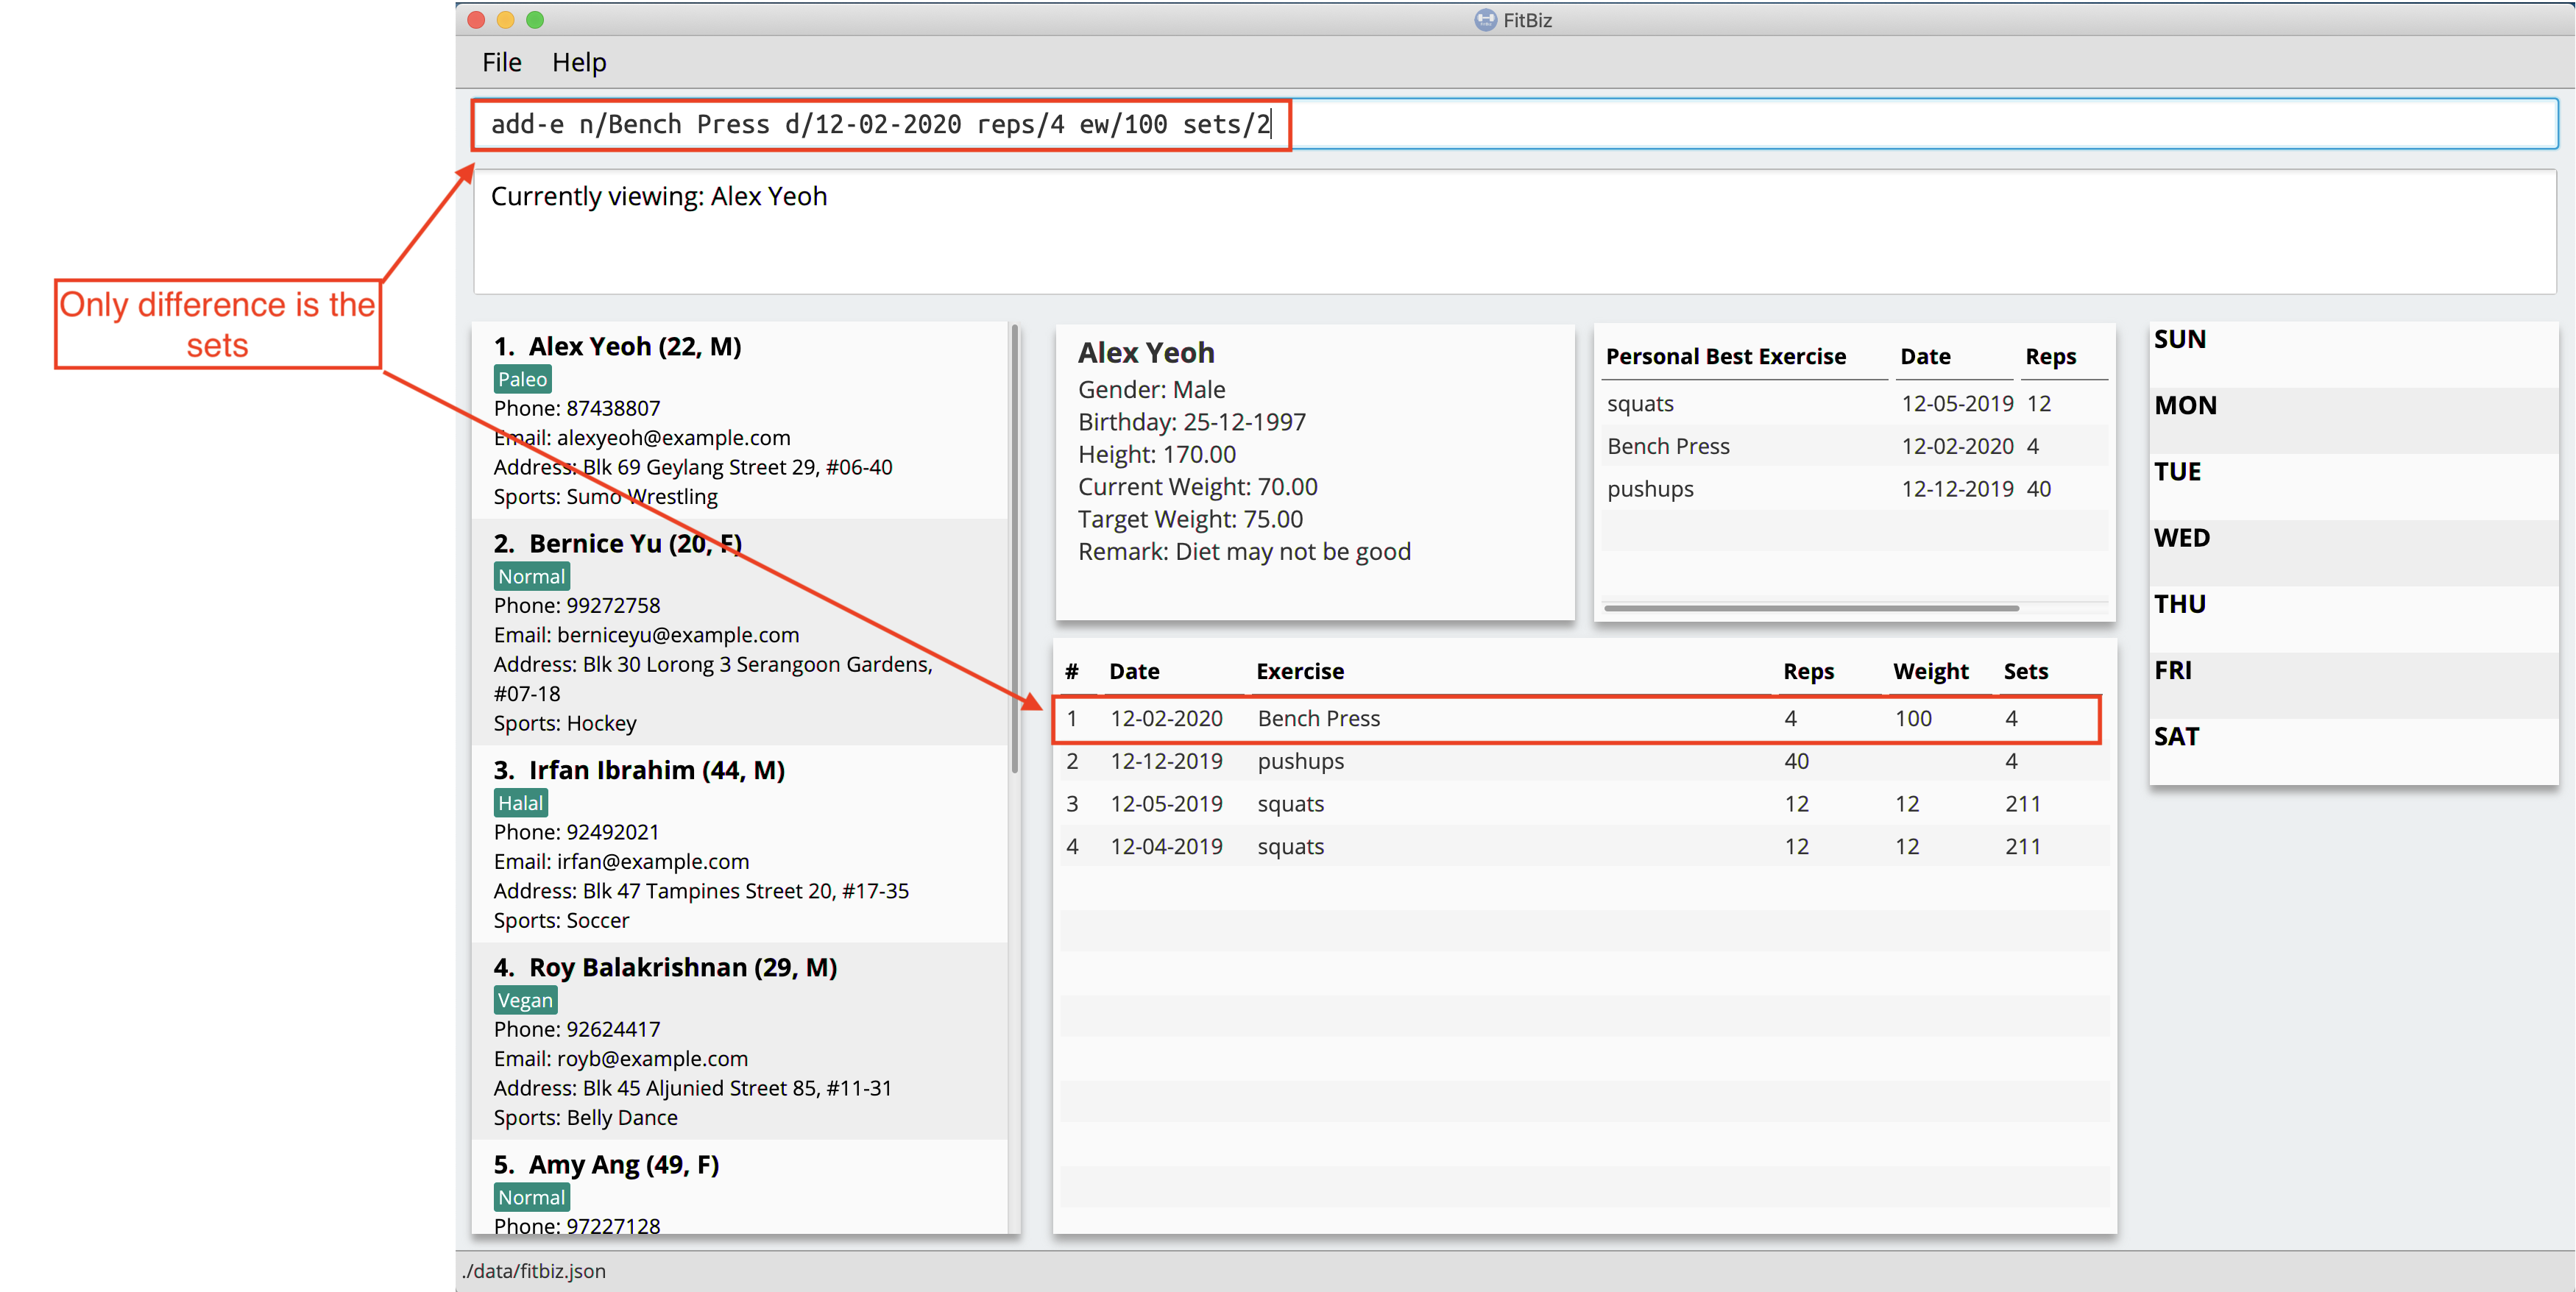
Result Box will show that you have a duplicate exercise.
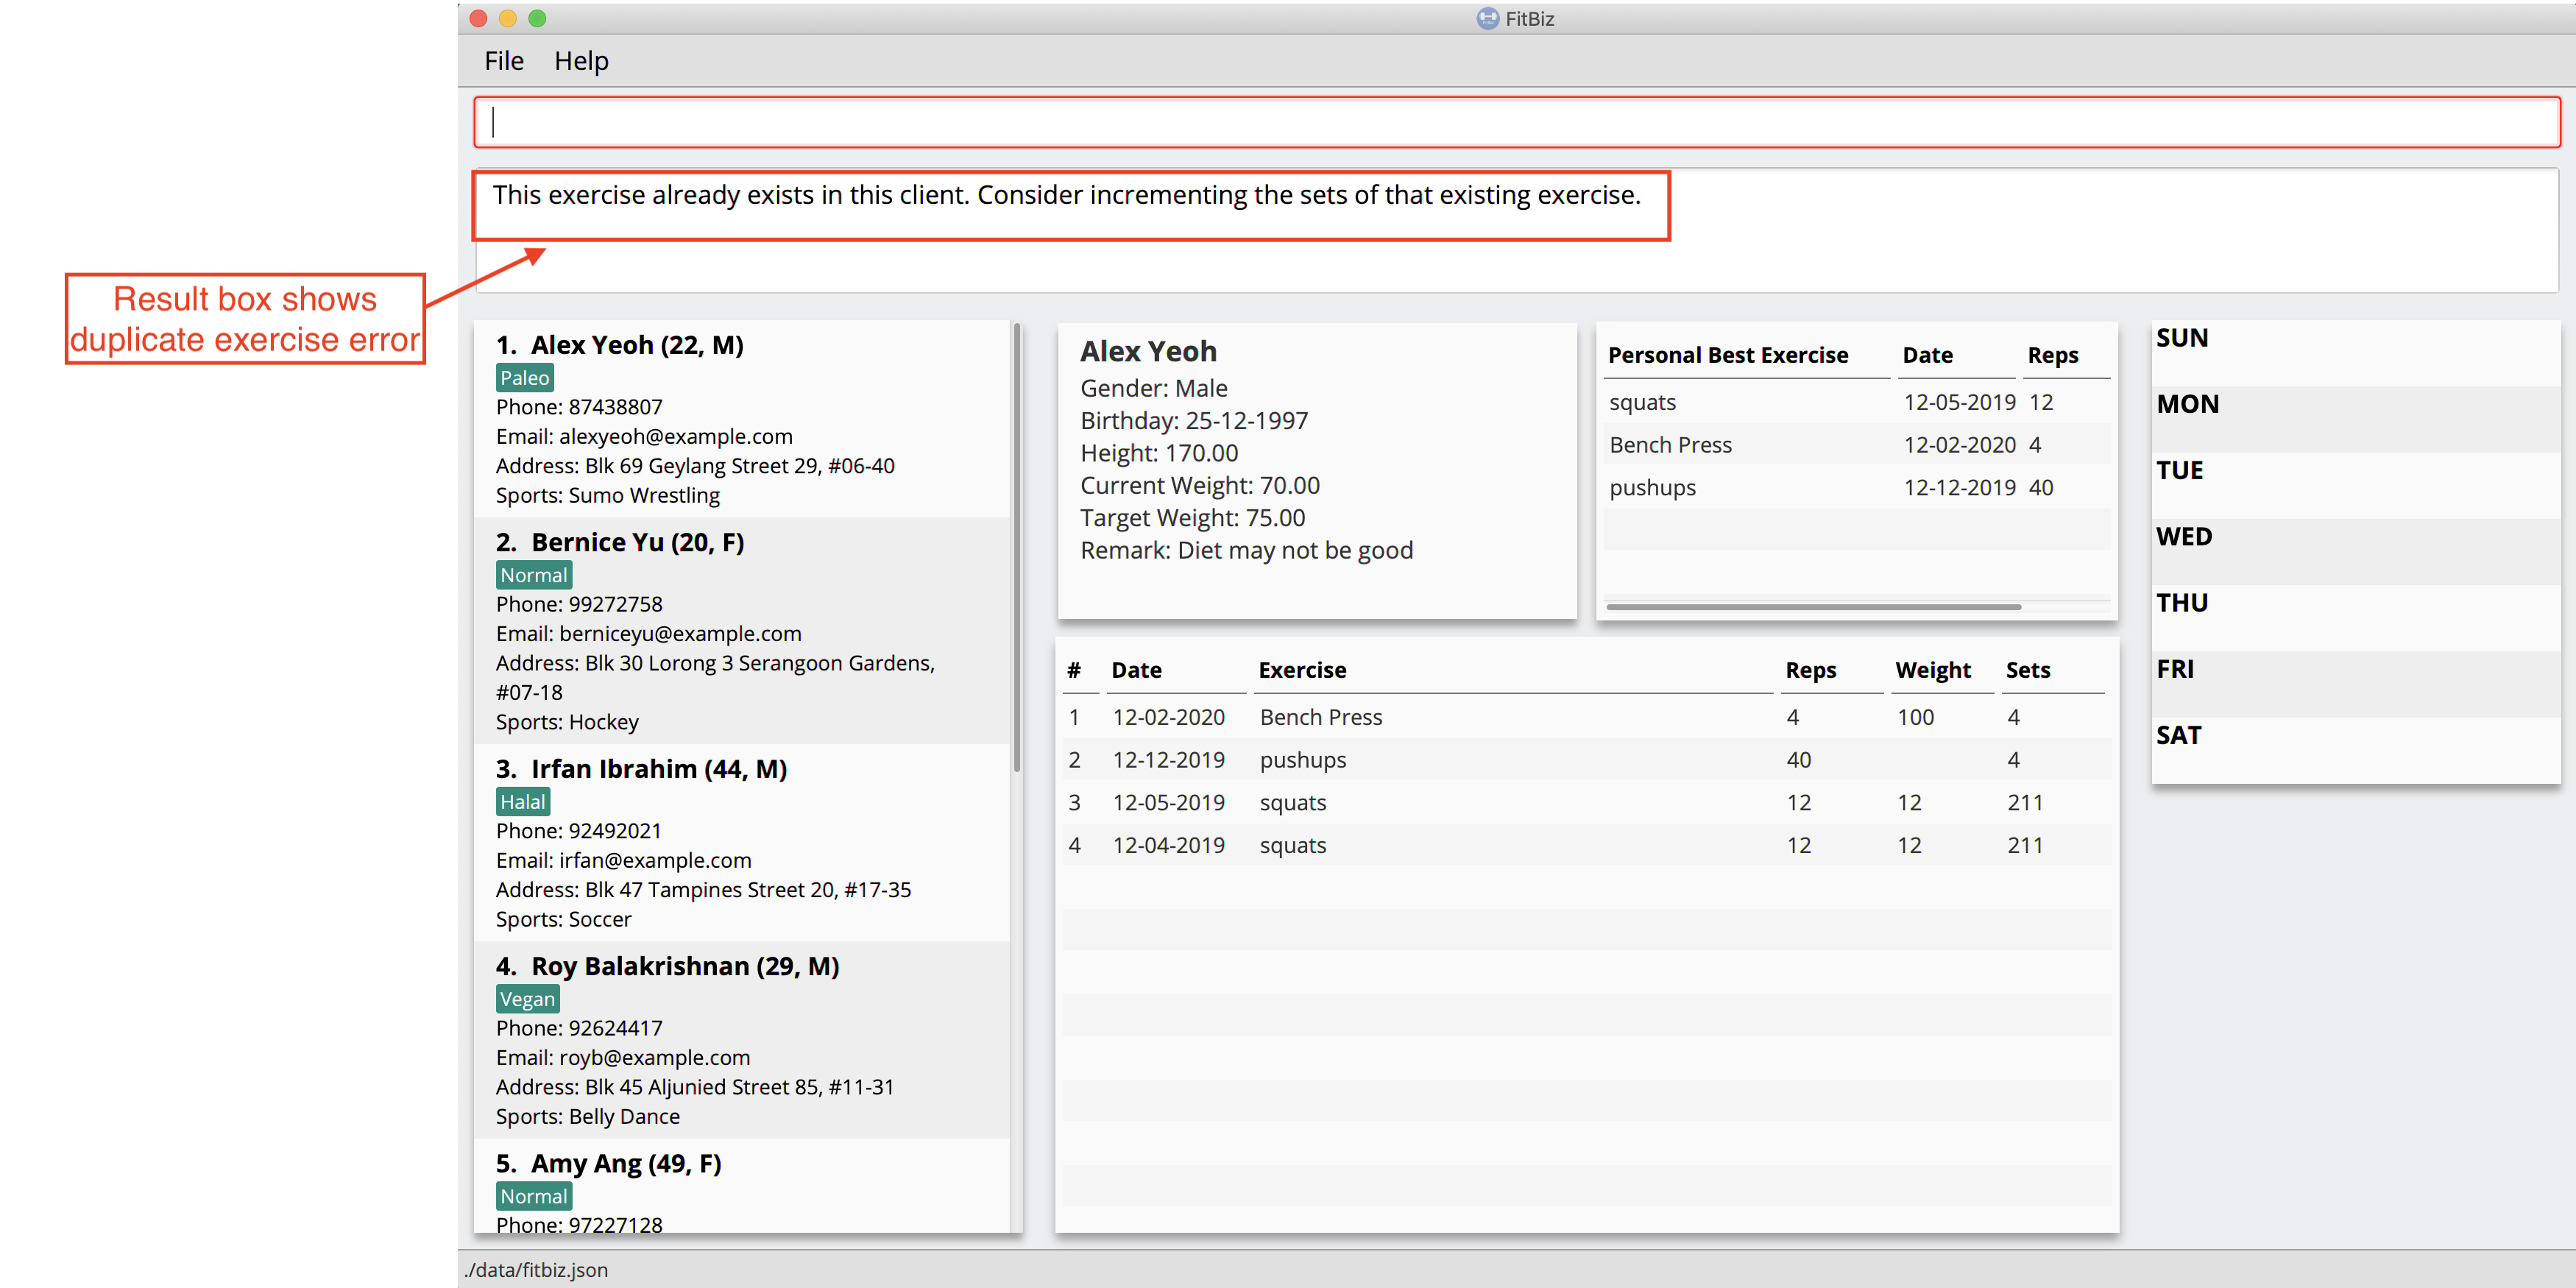
To solve this, we suggest incrementing the sets of the existing exercise by using the edit-e command. This will help to keep your exercises consolidated and the table compact. For information on using edit-e, you may want to refer to the next section Edit a client’s exercise: edit-e.
3.9. Edit a client’s exercise: edit-e --- YongJie
edits-e allows edit an existing exercise done by the client that you are currently viewing. You will be able to see the updated exercise in Exercise Table.
Format: edit-e INDEX [n/EXERCISE_NAME] [d/DATE] [ew/EXERCISE_WEIGHT] [reps/REPS] [sets/SETS]
3.9.1. Parameters
This section acts as a summary of the important things to note when using edit-e including their parameters. The square bracket shows that it is optional and your command will still execute even if you do not enter them. However, at least one of them have to be specified.
| Parameters | Important points to note |
|---|---|
|
* Substitute * |
|
* Substitute * * |
|
* Substitute * * * The range of |
|
* Substitute * * Range for |
|
* Substitute * * Range for |
|
* Substitute * * Range for |
3.9.2. Example
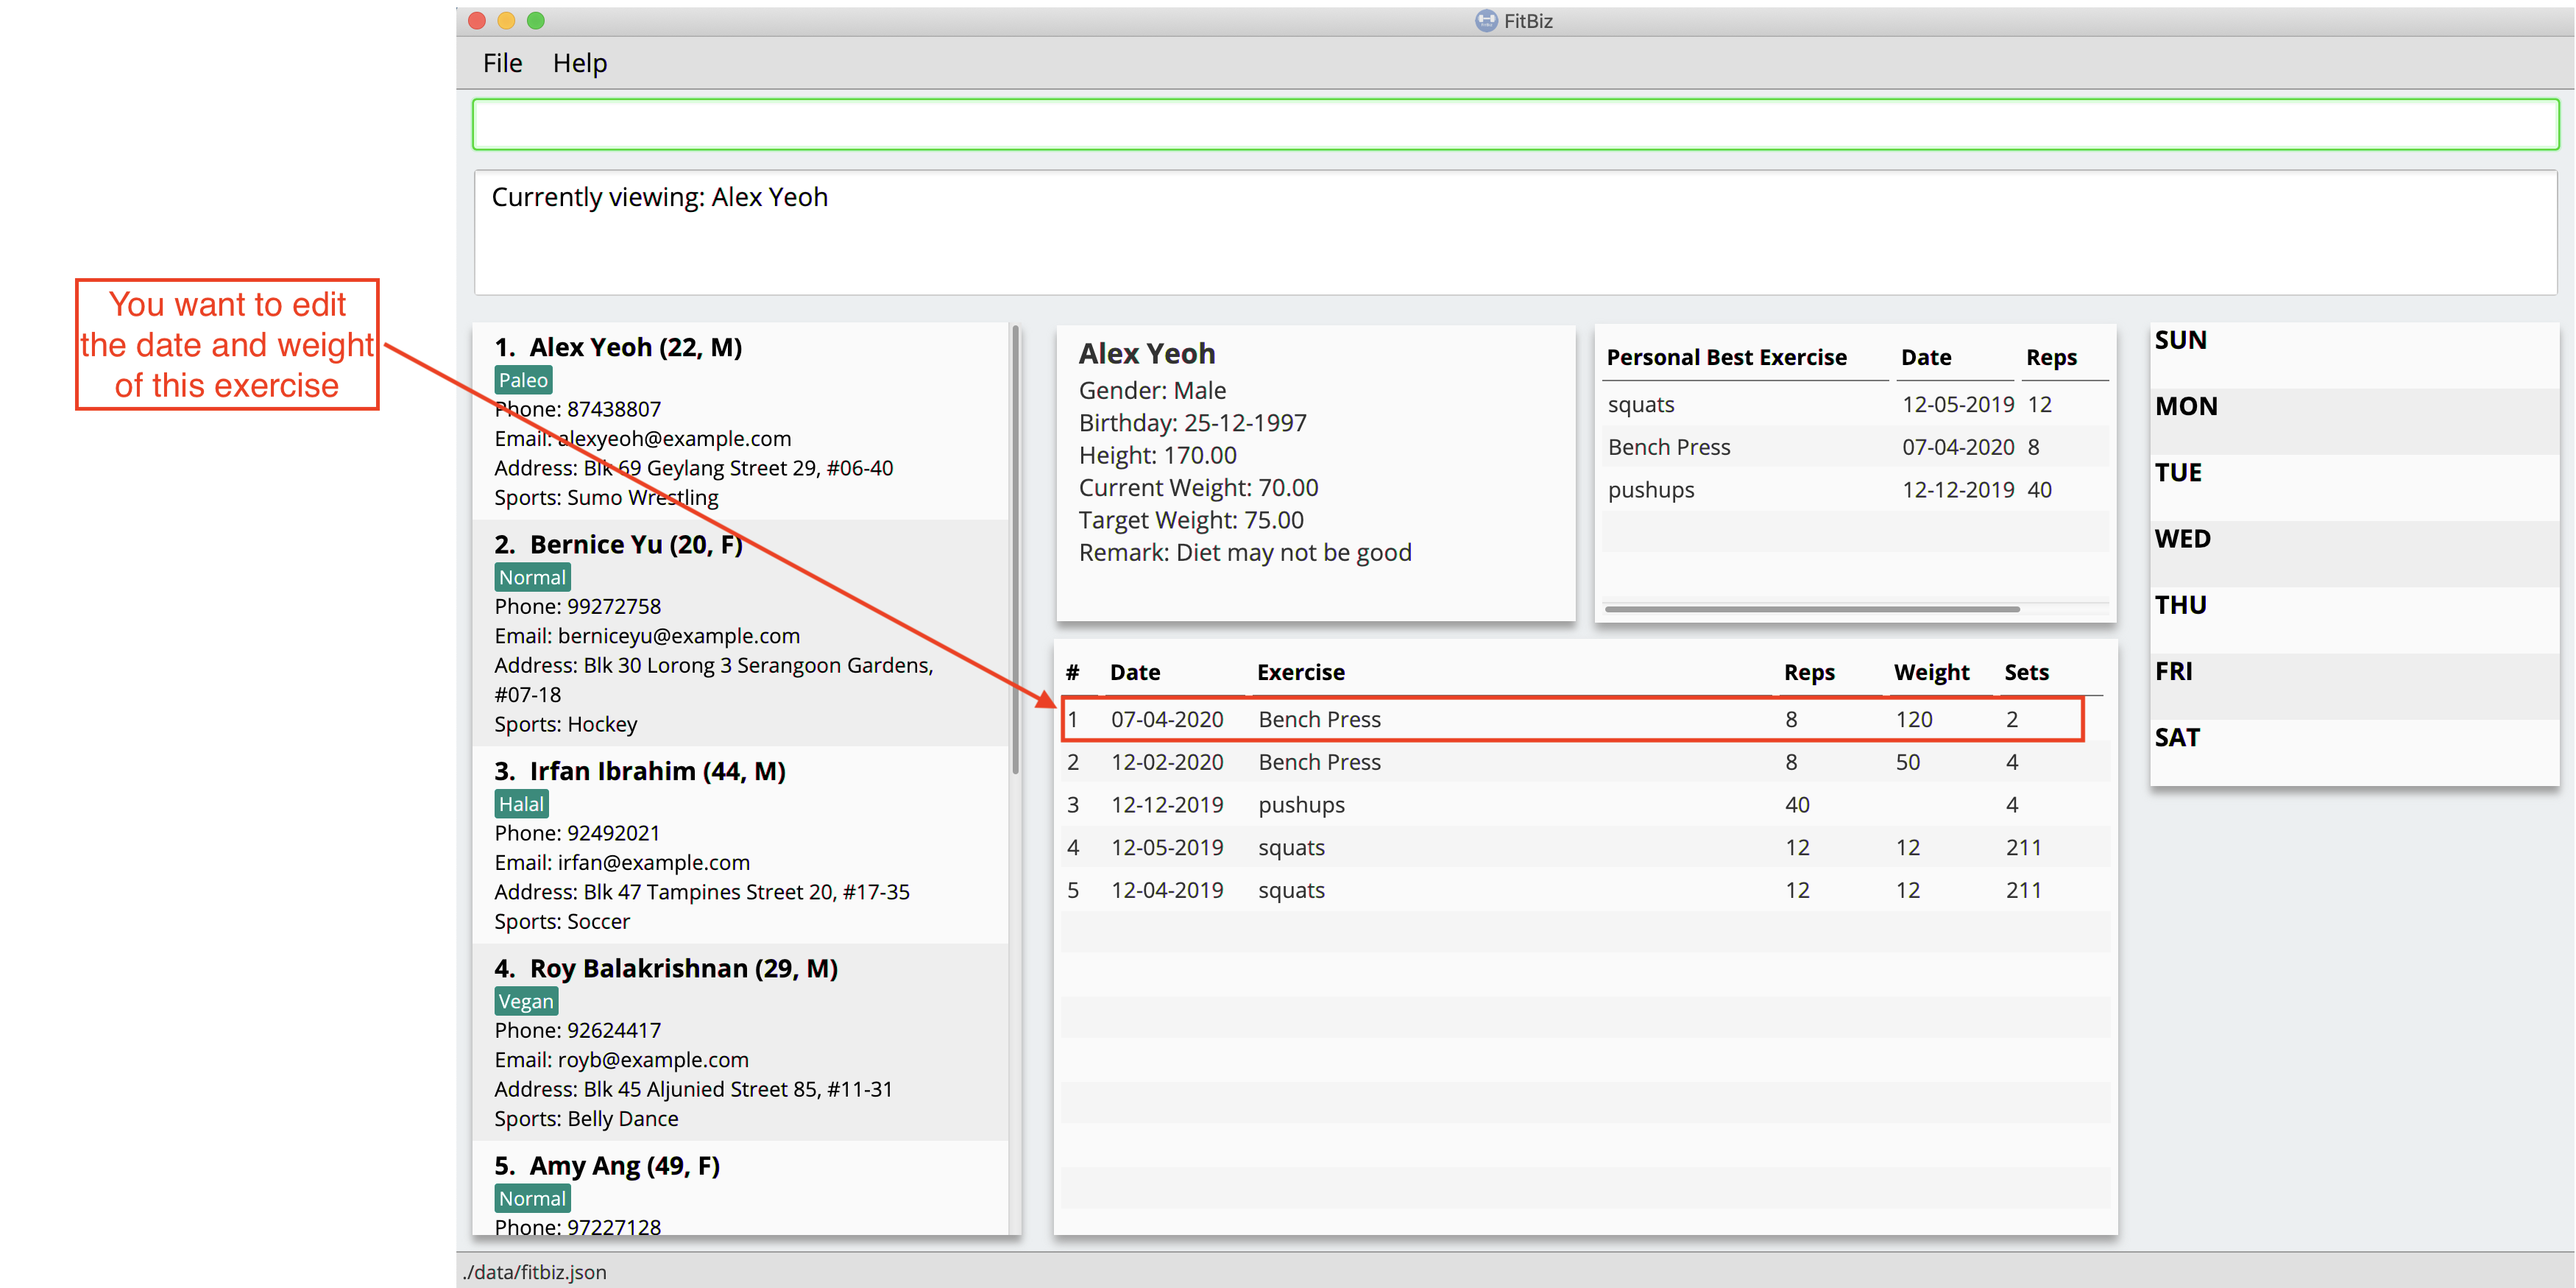
Let’s say that you want to edit an exercise done by the client you are currently viewing. The exercise that you want to edit is the one highlighted in the photo below.
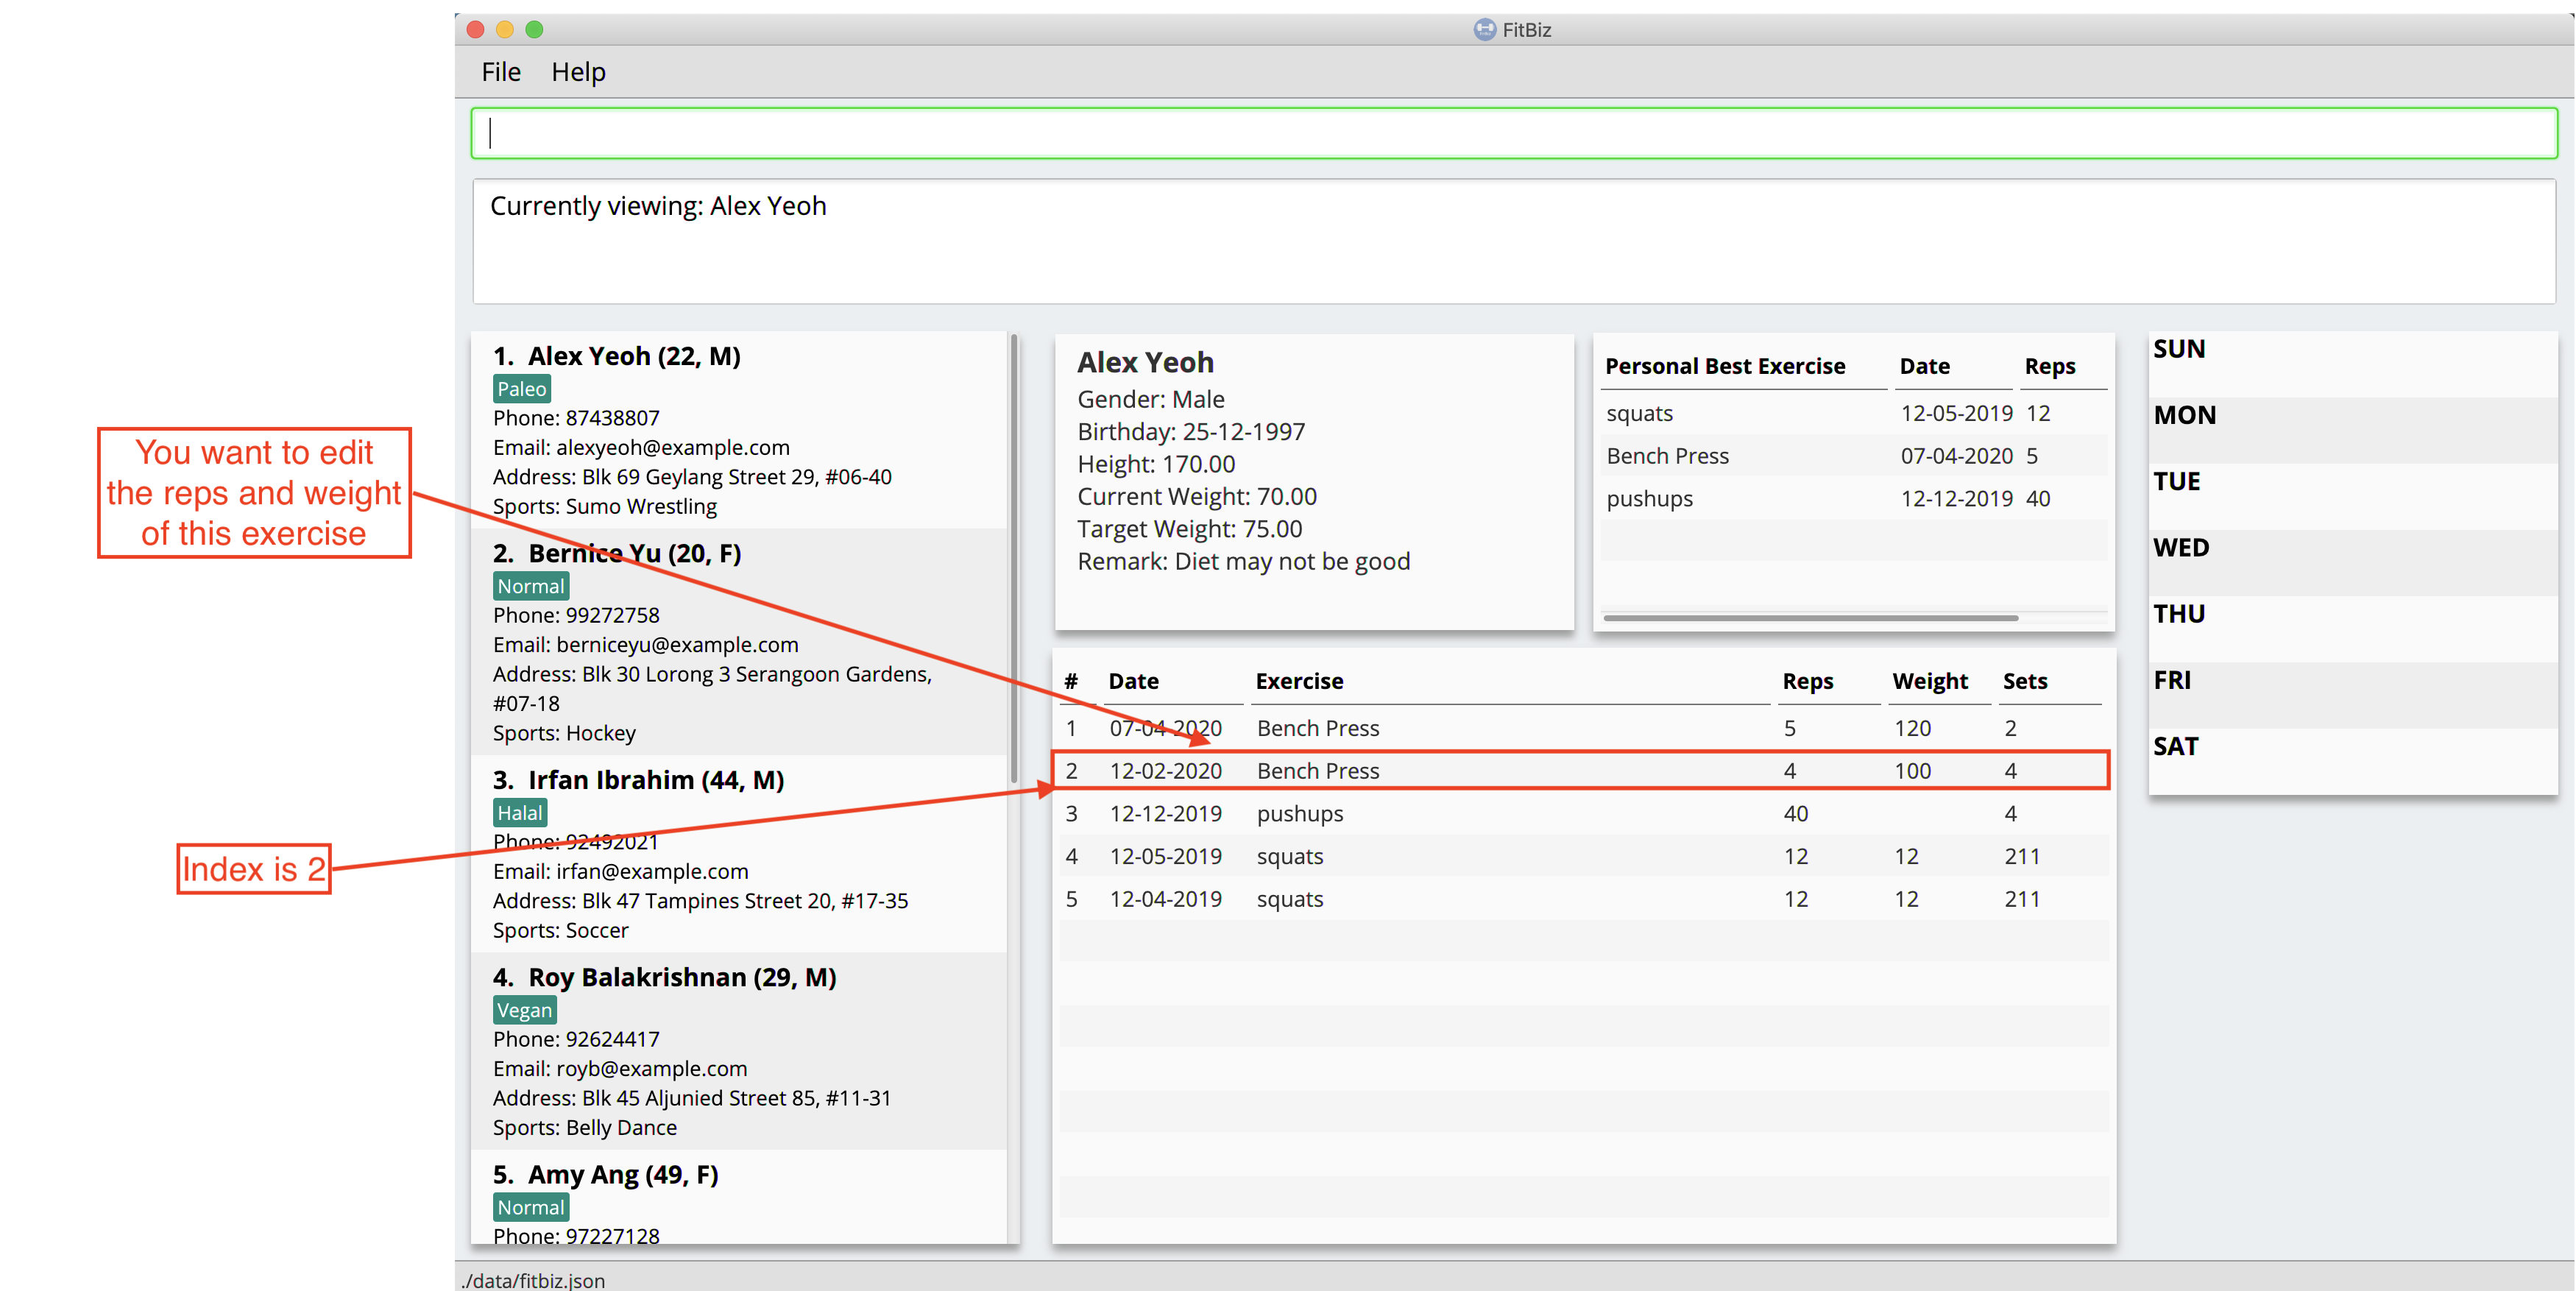
The exercise, "Bench Press", currently is 4 reps and weight of 100. However, they might be entered wrongly and you want to change the values. You can use the edit-e command to edit the exercise as shown.
-
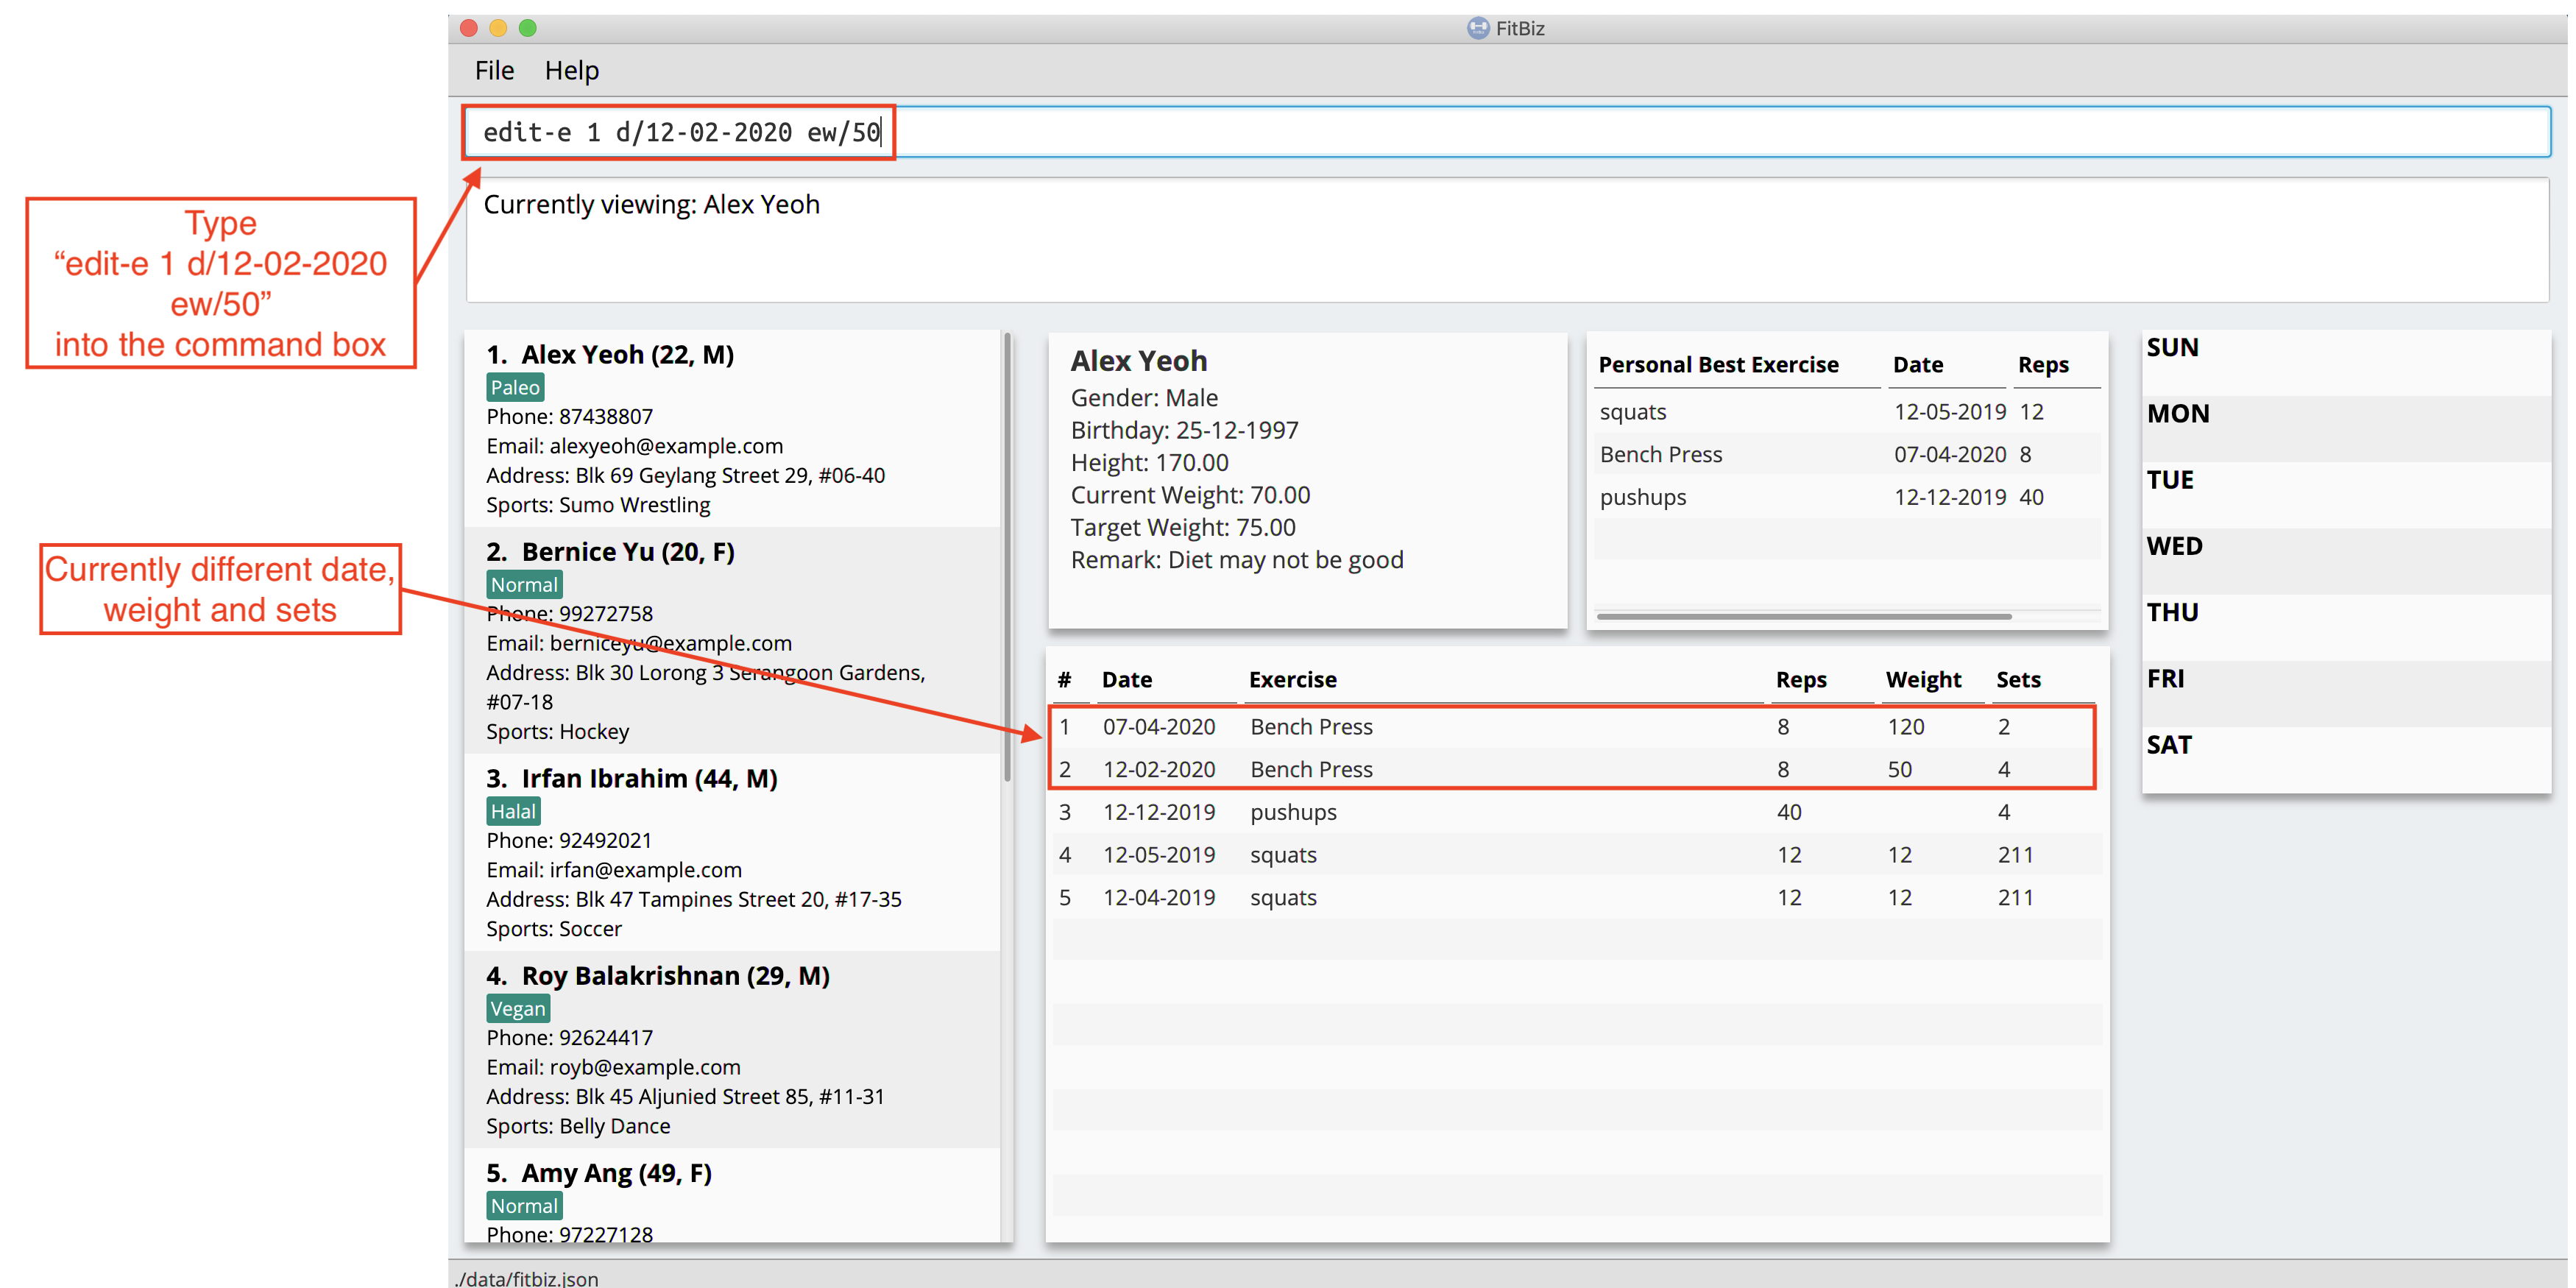
Identify the index of the exercise in Exercise Table. From the photo above, the index is 2. Type
edit-e 2 reps/8 ew/50into Command Box. Press enter to execute it. To recap,The reps of the exercise after
reps/
The weight of the exercise afterew/
-
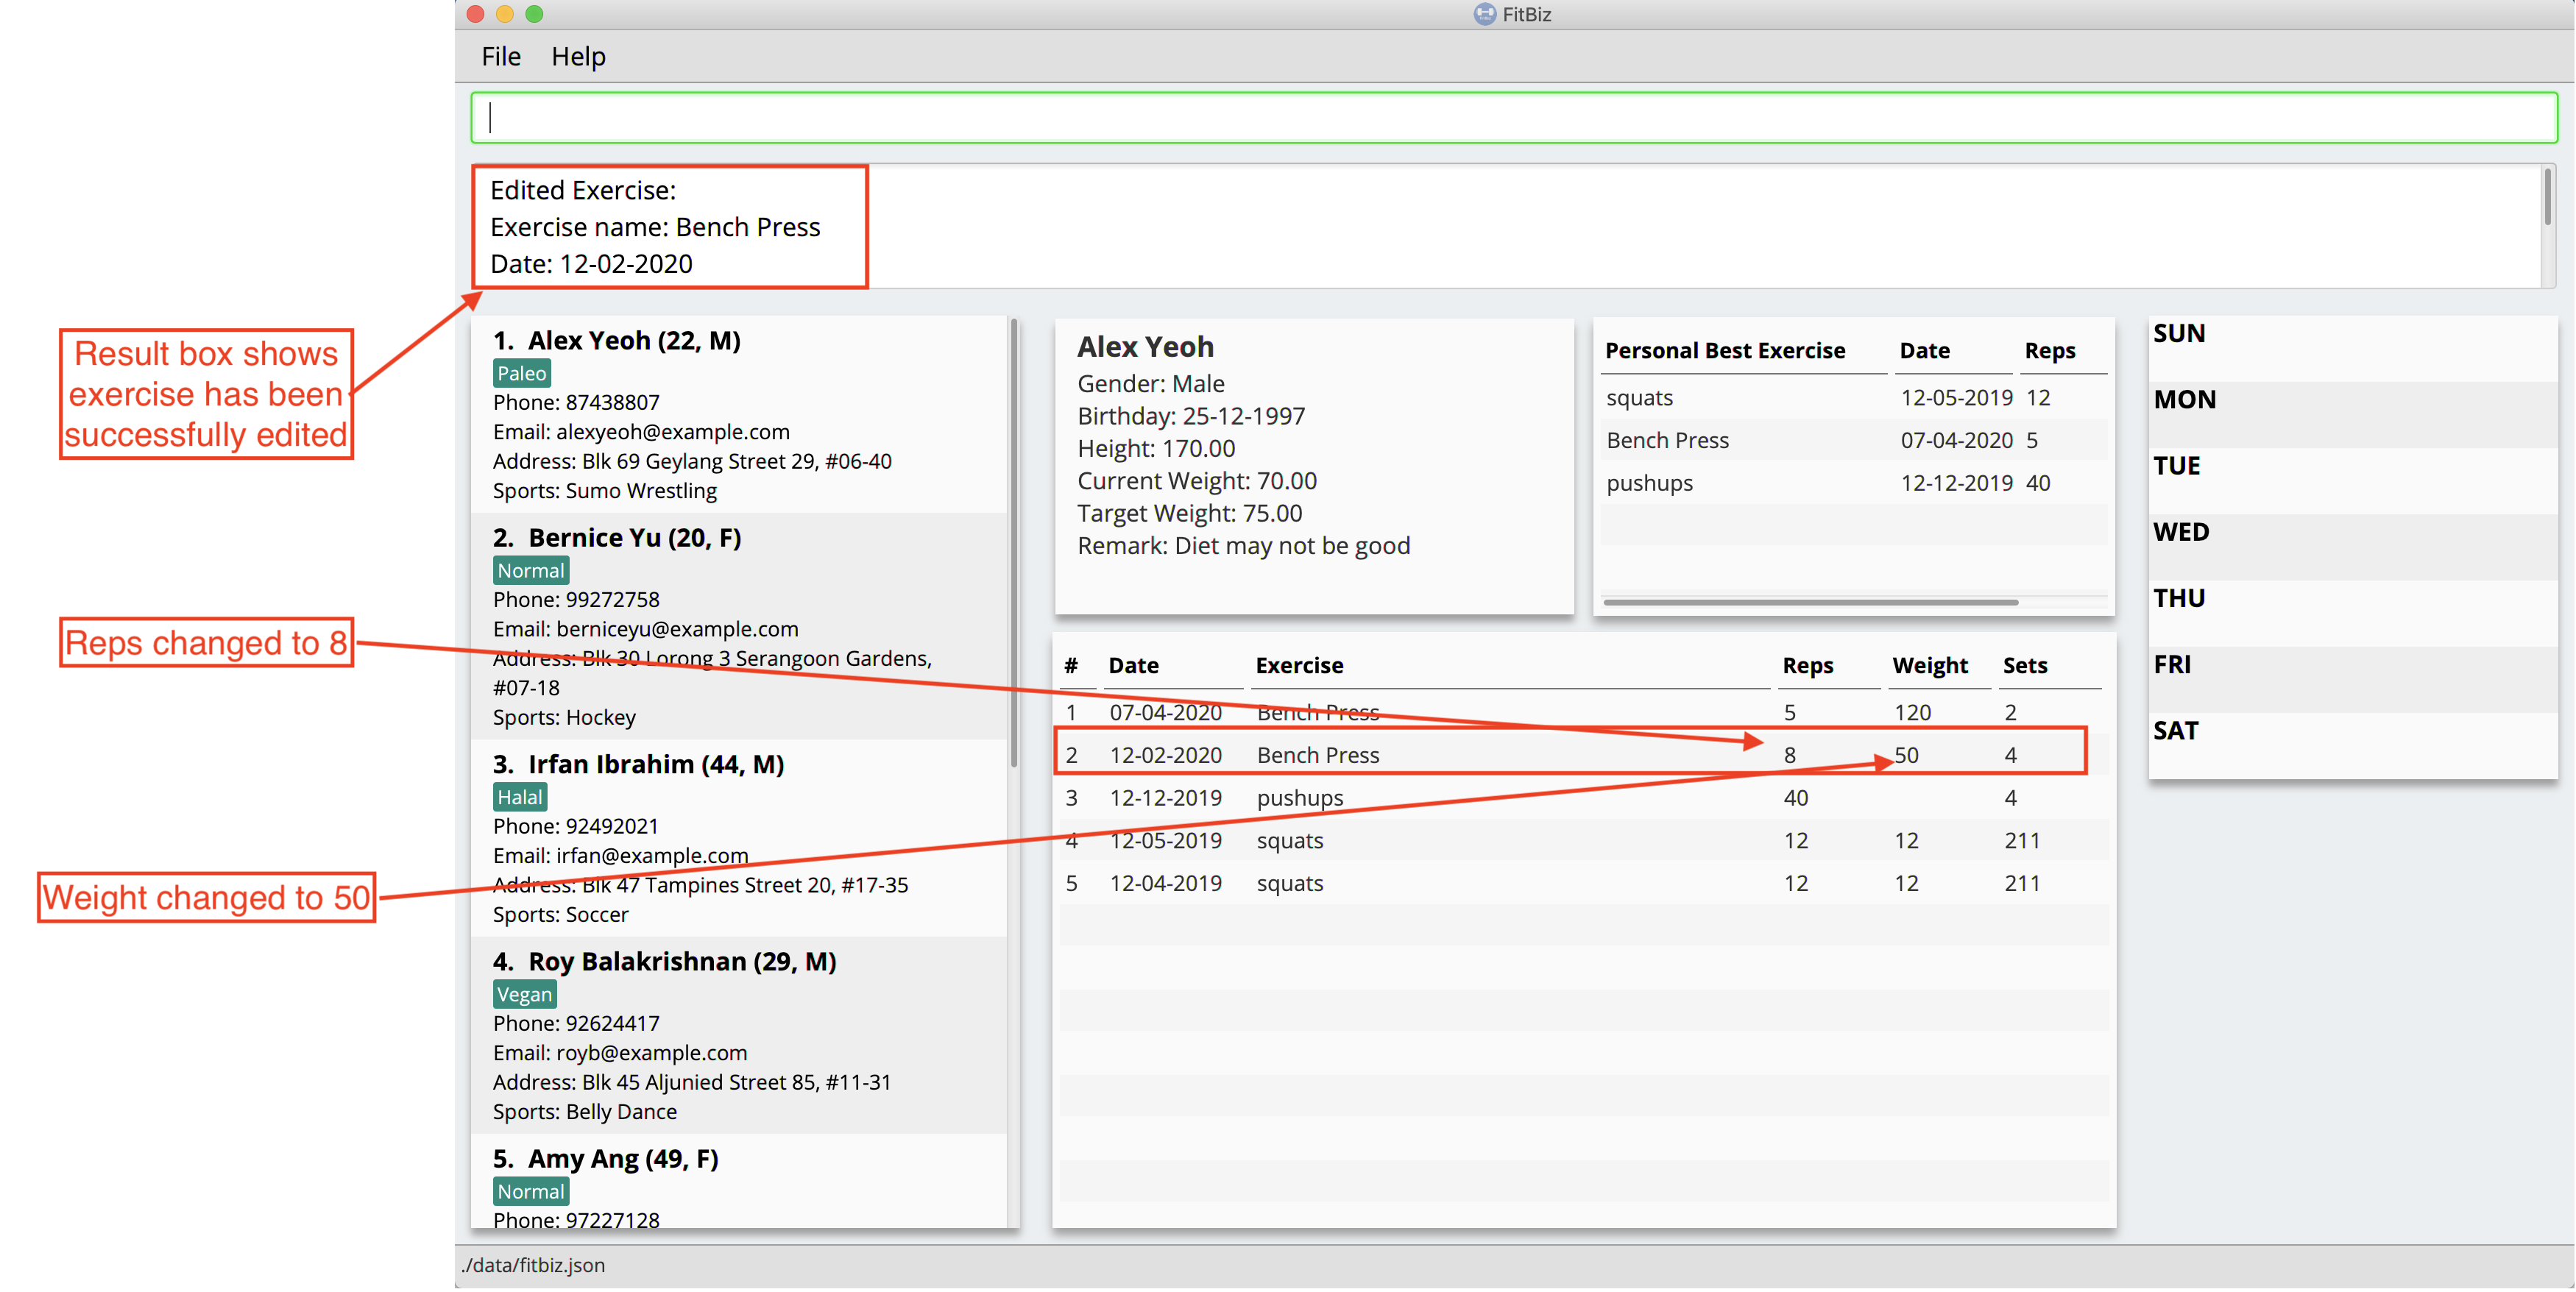
After it has been successfully entered, Result Box will display a success message that the exercise has been edited. You will also be able to see the edited exercise in Exercise Table.
3.9.3. Common errors / problems
You might face some errors or difficulties when you use edit-e. In this section, you will be able to understand these errors and resolve them.
Duplicate exercises
You might wonder why the application shows you a duplicate exercise error when you do not have a duplicate of the edited exercise. It is likely that only the sets differ between the two exercises. The example below might help you understand better.
You might have the following exercise in Exercise Table.
If you were to enter edit-e 2 n/Bench Press d/12-02-2020 reps/4 ew/100 sets/2 into Command Box, the only information that is different is the number of sets.
Result Box will show that you have a duplicate exercise.
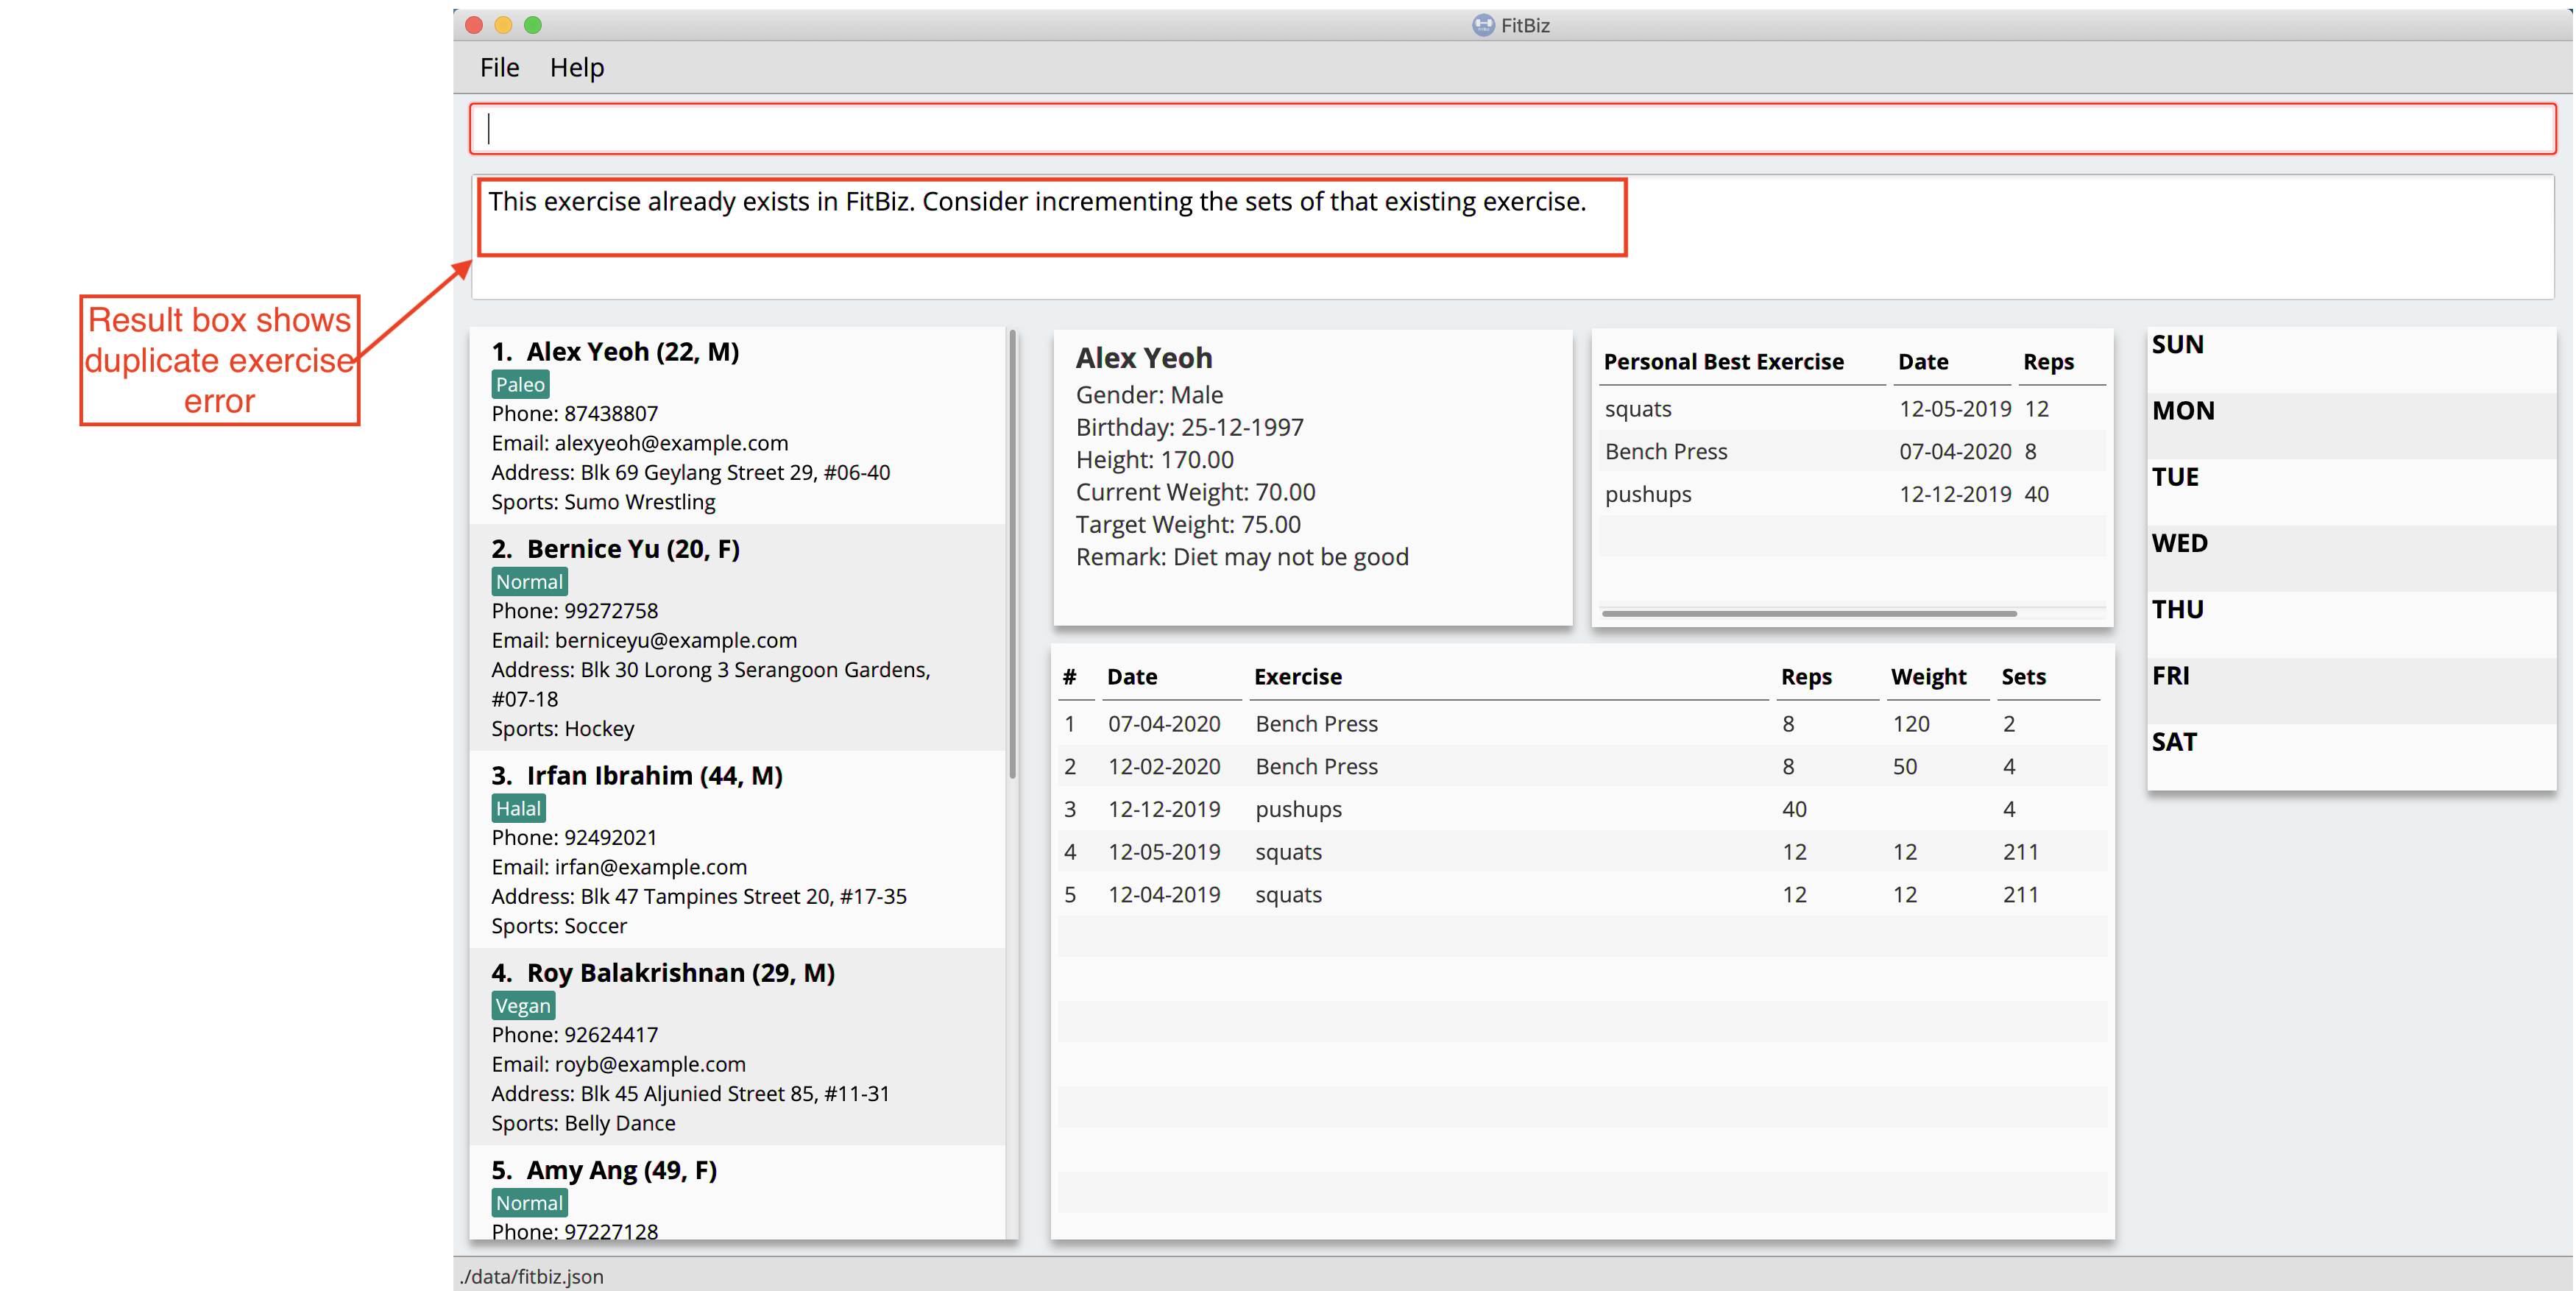
To solve this, we suggest you delete the exercise you want to edit and increment the sets of the existing exercise by using the edit-e command. This will help to keep your exercises consolidated and the table compact.
3.10. Delete a client’s exercise: delete-e --- Aaron Choo
delete-e allows you to delete a previously recorded exercise of the client currently in view.
Format: delete-e INDEX
| This command can only be used when you have a client in view; make sure you know how to view a client first. Refer to [view-c-command] for more information. |
| Deleting an exercise from FitBiz is permanent and cannot be undone. |
3.10.1. Parameters
| Parameters | Important points to note |
|---|---|
|
Substitute Must be a positive integer (eg. 1, 2, 3, …) |
3.10.2. Example
-
First, ensure that you are currently viewing a client by using the
view-ccommand: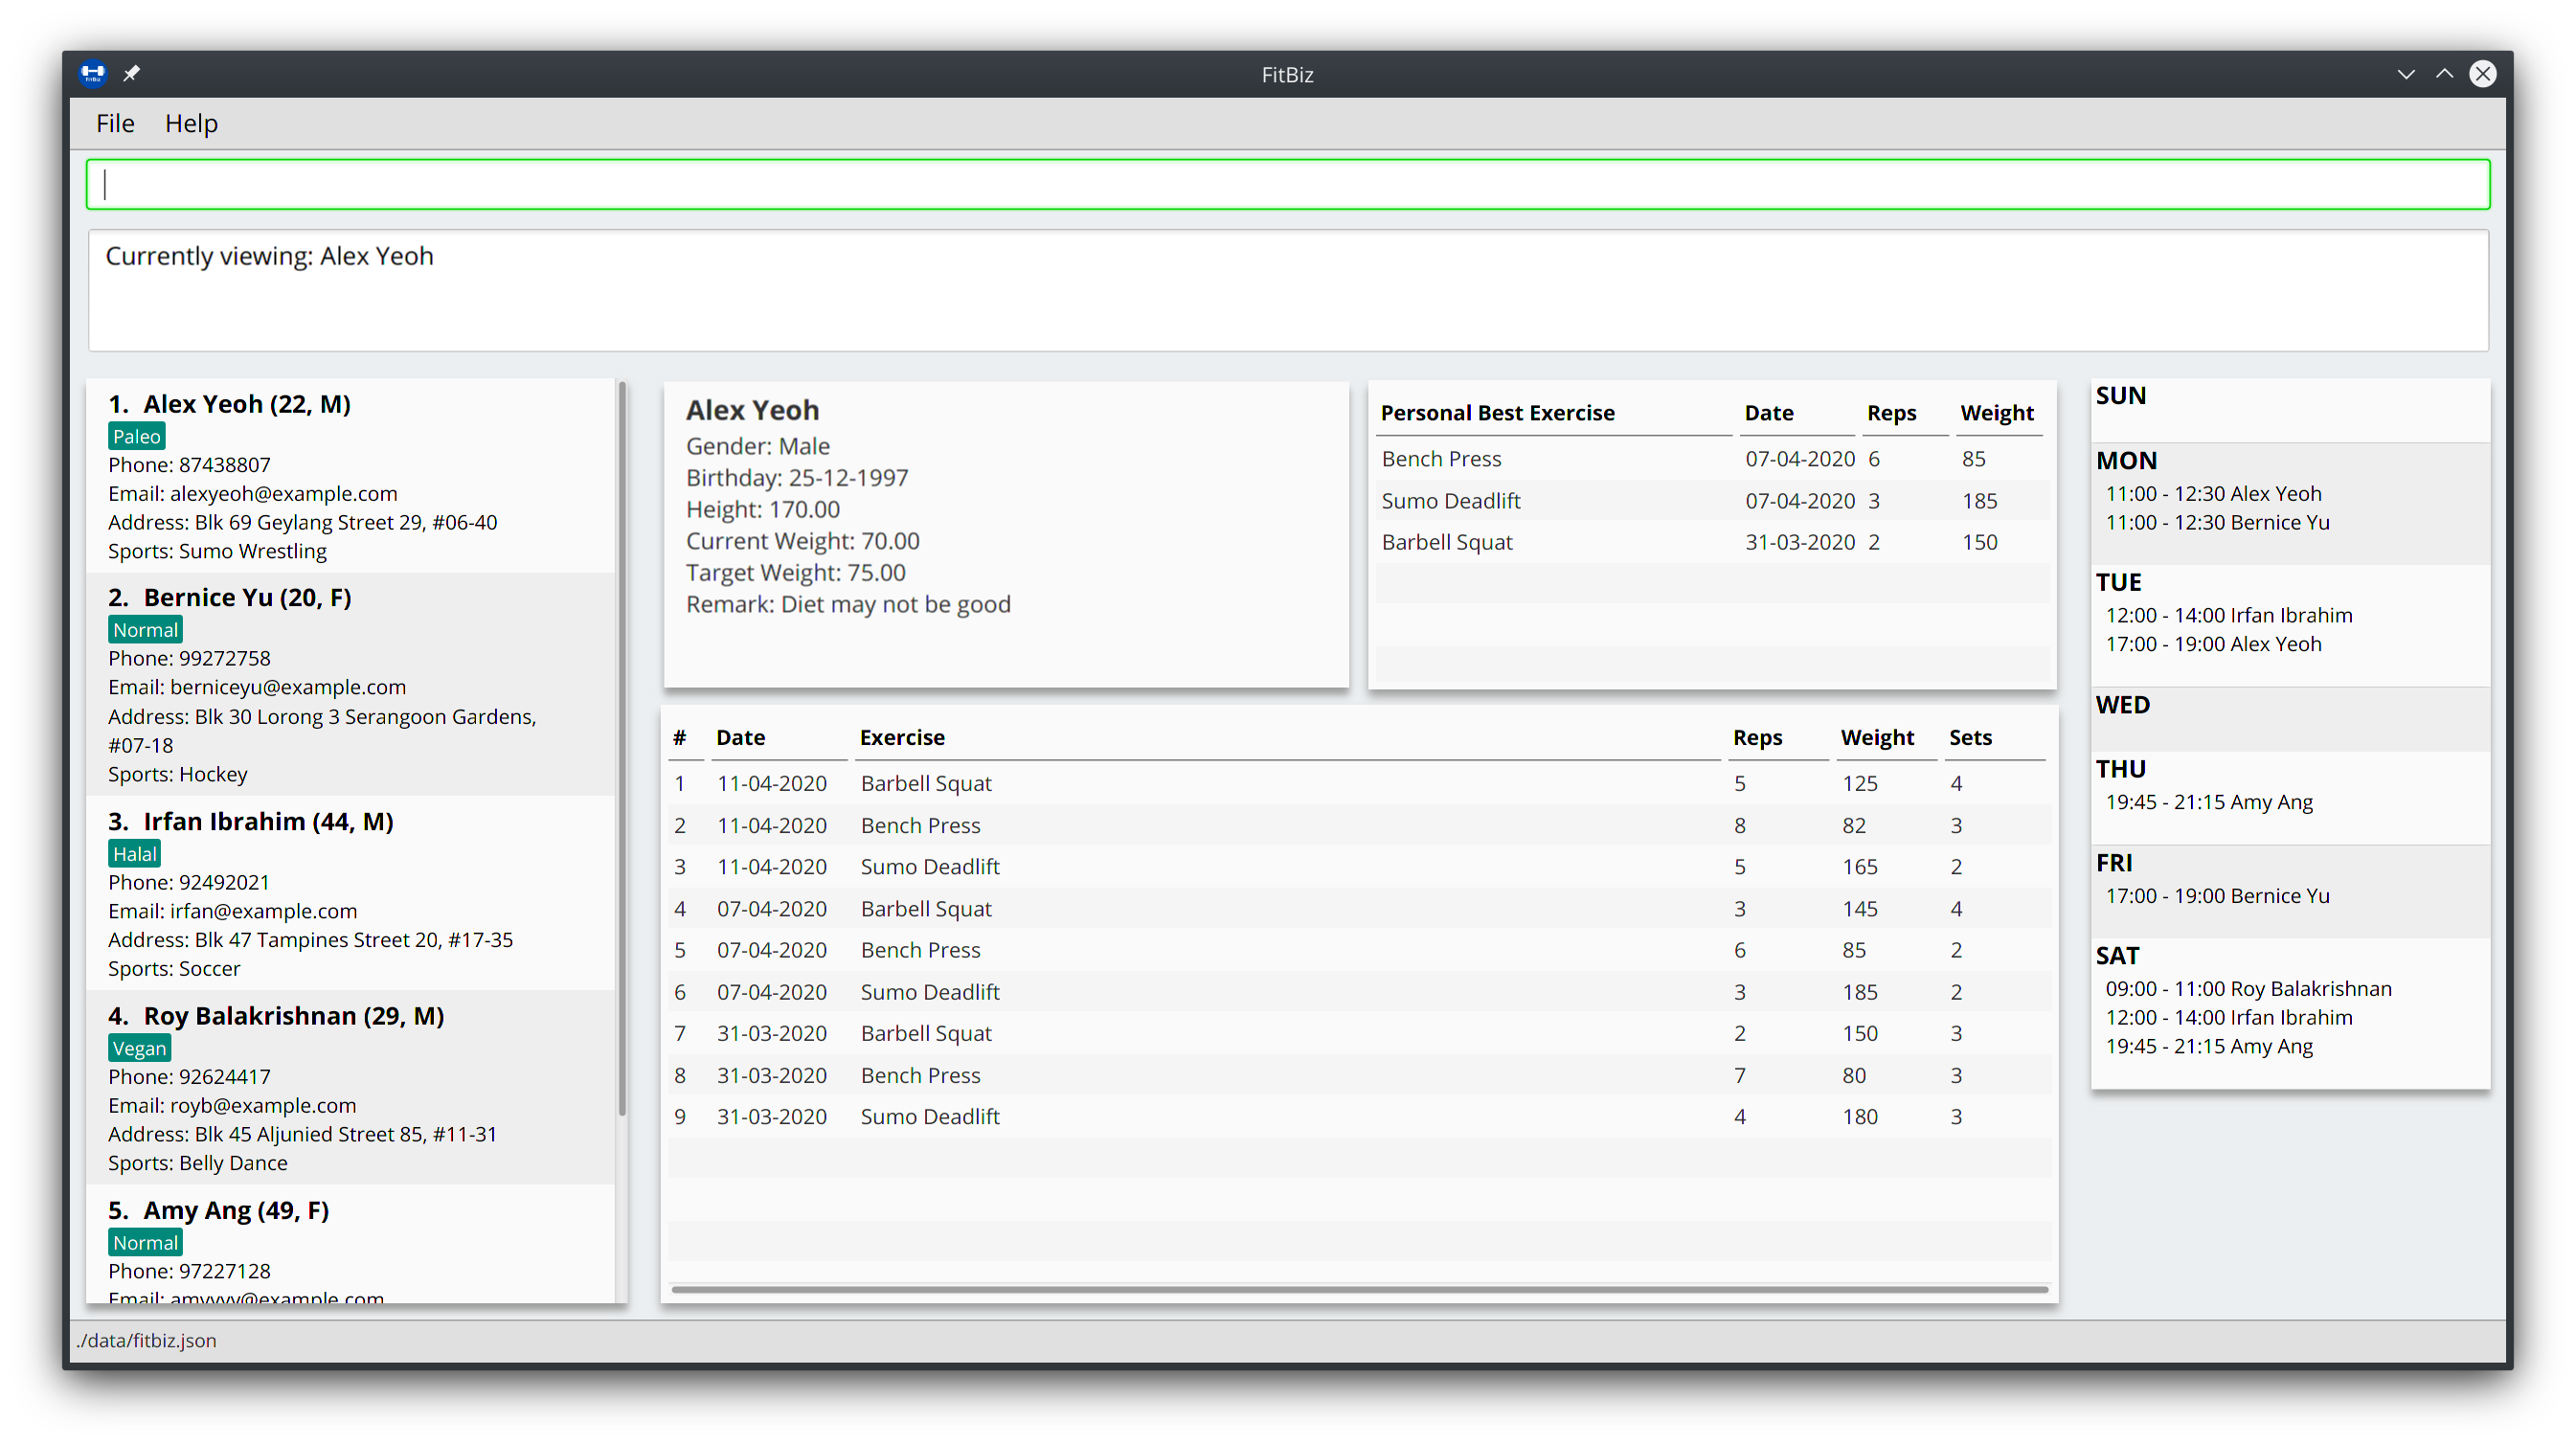
-
Say for example that you want to delete the fifth exercise found on the Exercise Table (the one named "Bench Press" done on "07-04-2020"), simply enter
delete-e 5: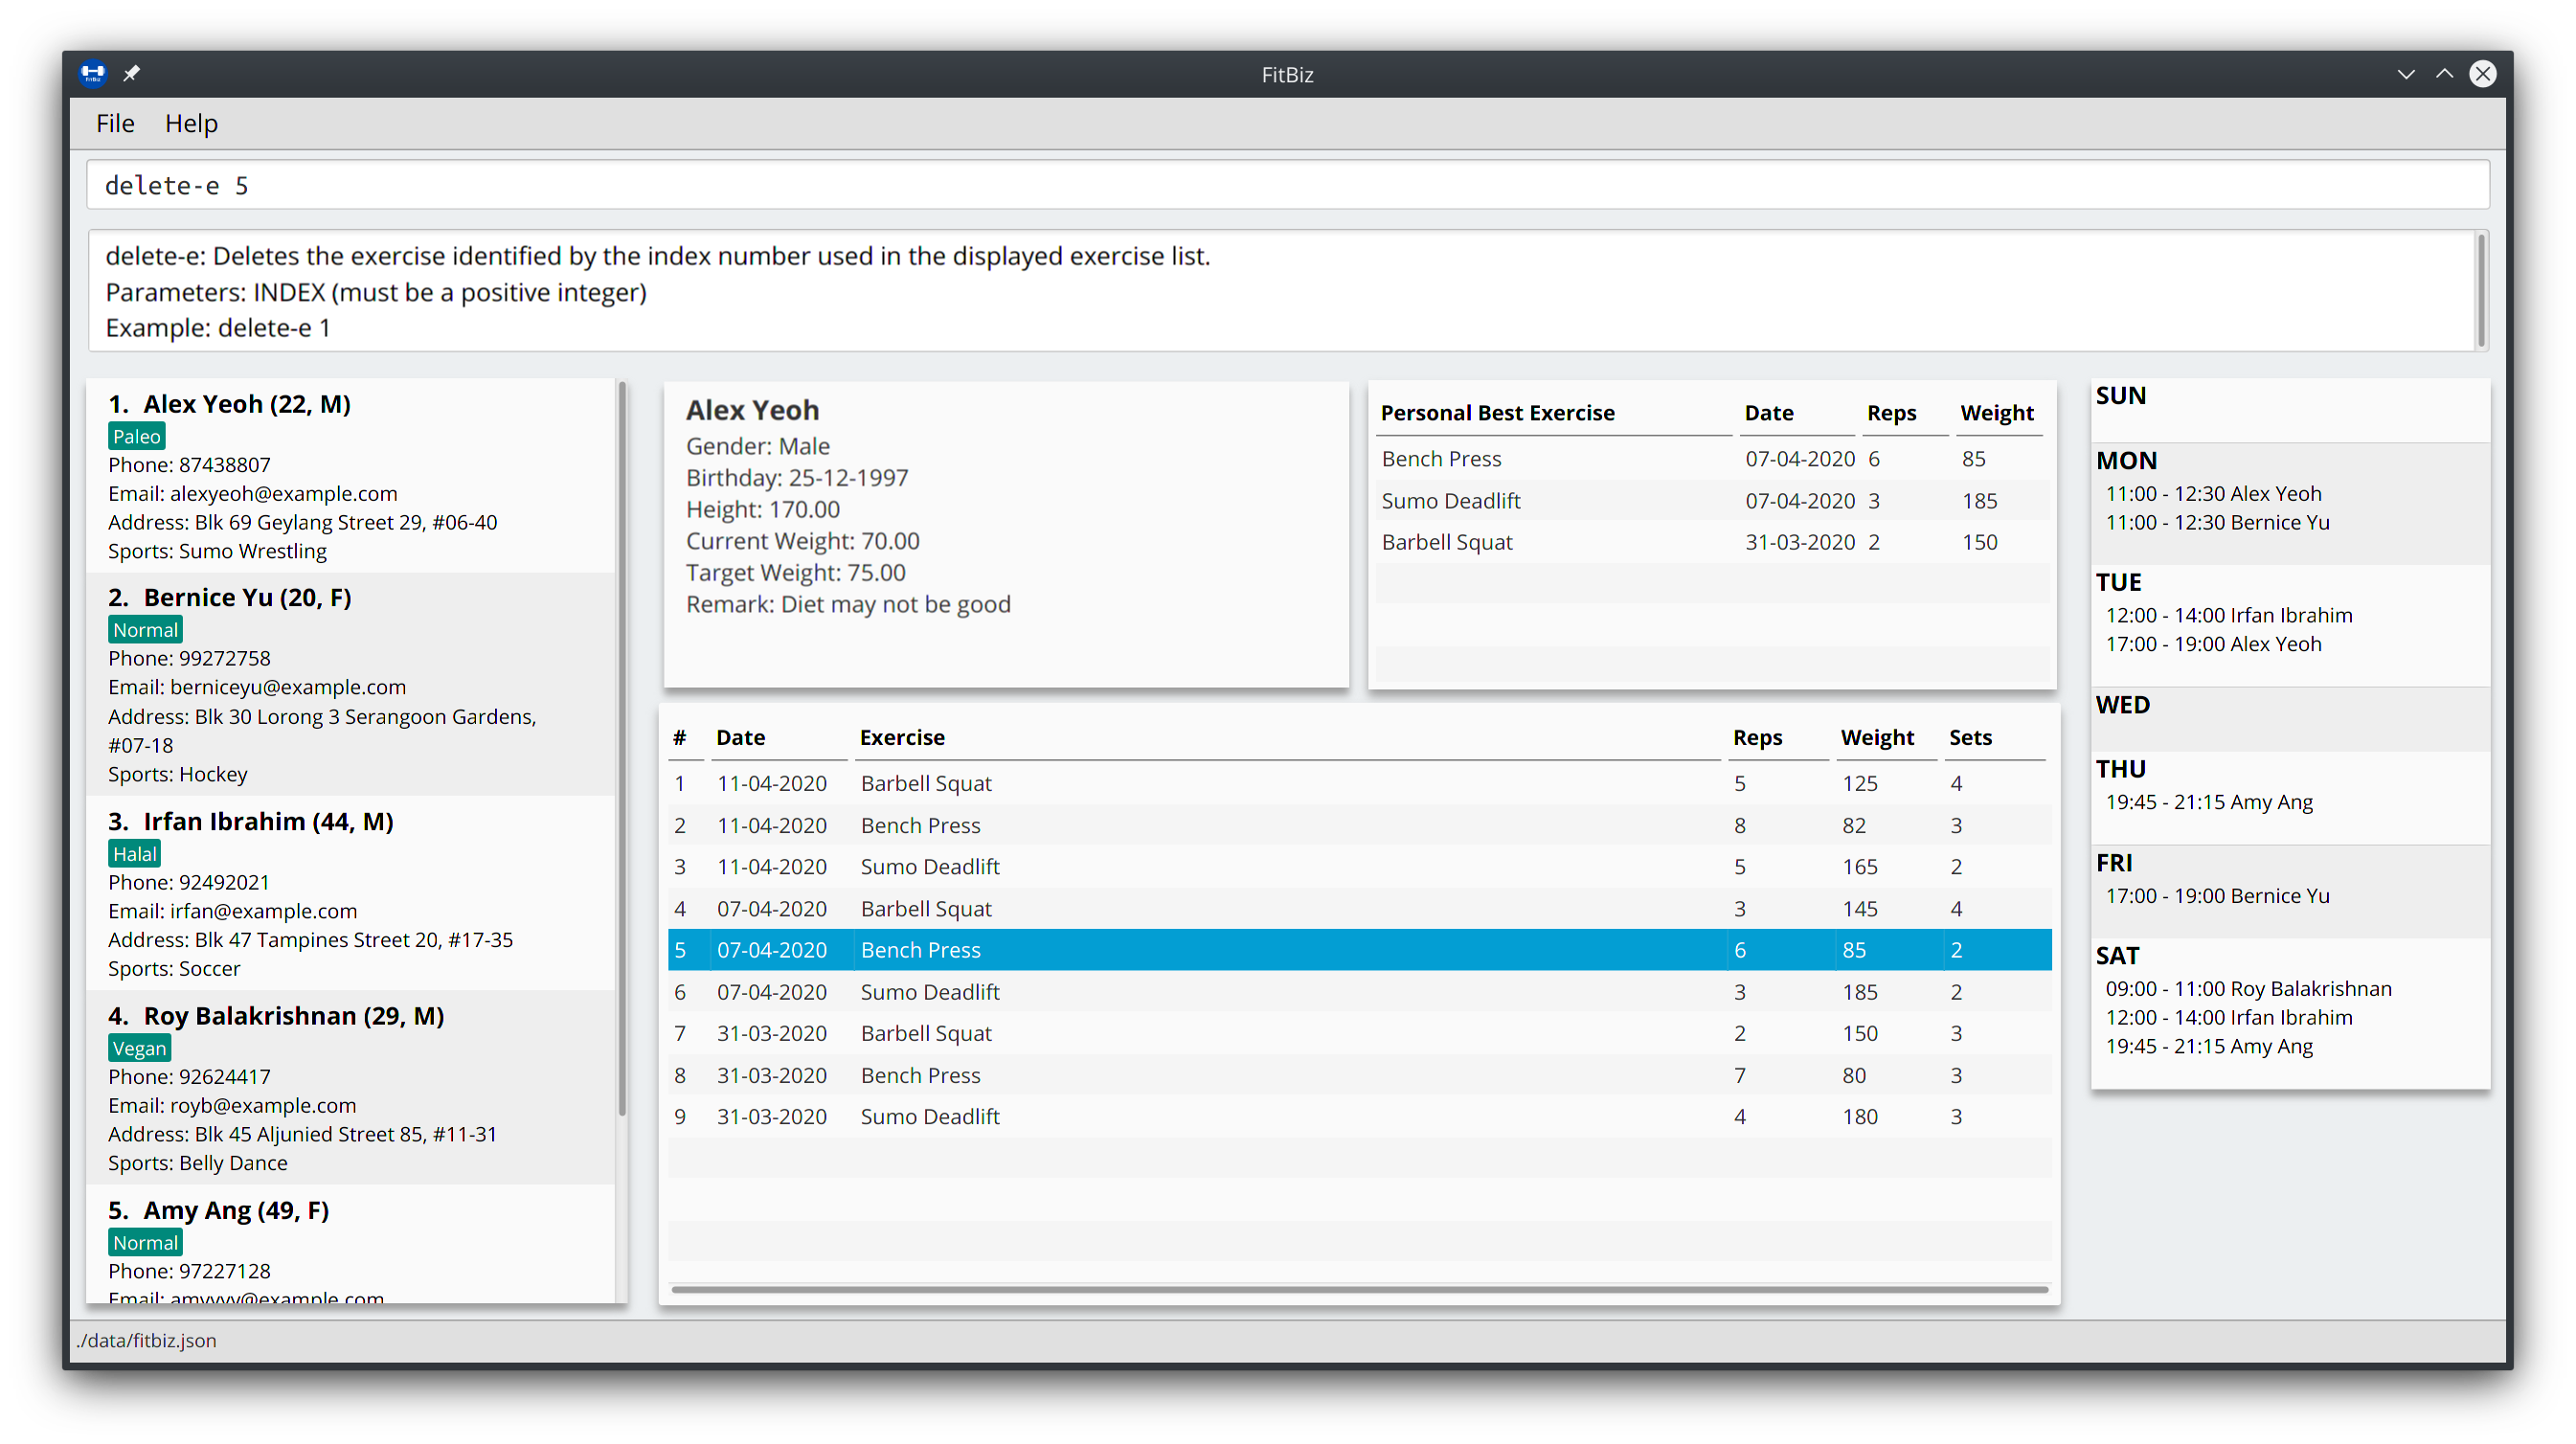
-
After the command has been successfully executed, the specified exercise should have been deleted. Notice also, in the Personal Best Table that the personal best for "Bench Press" has also been automatically updated to reflect this change:

3.10.3. Common errors/problems
If you find that you are unable to execute this command successfully, there are a few things you can check:
-
Ensure that you are currently viewing a client using the
view-ccommand. If you are indeed viewing a client, the Client View should not be empty. -
Ensure that you actually have exercises to delete and that the
INDEXspecified is correct. If the client does indeed have recorded exercises, the Exercise Table should not be empty.
3.11. Schedule trainings for a client: schedule ---Ng Ming Liang
Schedule allows you to assign weekly schedule timings to a client. The schedule will be displayed on the right panel of FitBiz, with the timings as well as the client’s name. You can assign multiple schedules to a client at once, by adding more arguments following the command. All of the schedules from the current Client List will be displayed on the Schedule Panel.
Format: schedule INDEX sch/DAY-STARTTIME-ENDTIME [sch/DAY-STARTTIME-ENDTIME]…
The schedule command overwrites the client’s existing schedule with the new schedules given in the command.
|
3.11.1. Parameters
This section acts as a summary of the important things to note when using schedule. The square bracket shows that it is optional and your command will still execute even if you do not enter them.
| Parameters | Important points to note |
|---|---|
|
* Substitute * * |
|
* Substitute * * * |
|
* Substitute * * Range for * |
|
* Substitute * * Range for * |
3.11.2. Example
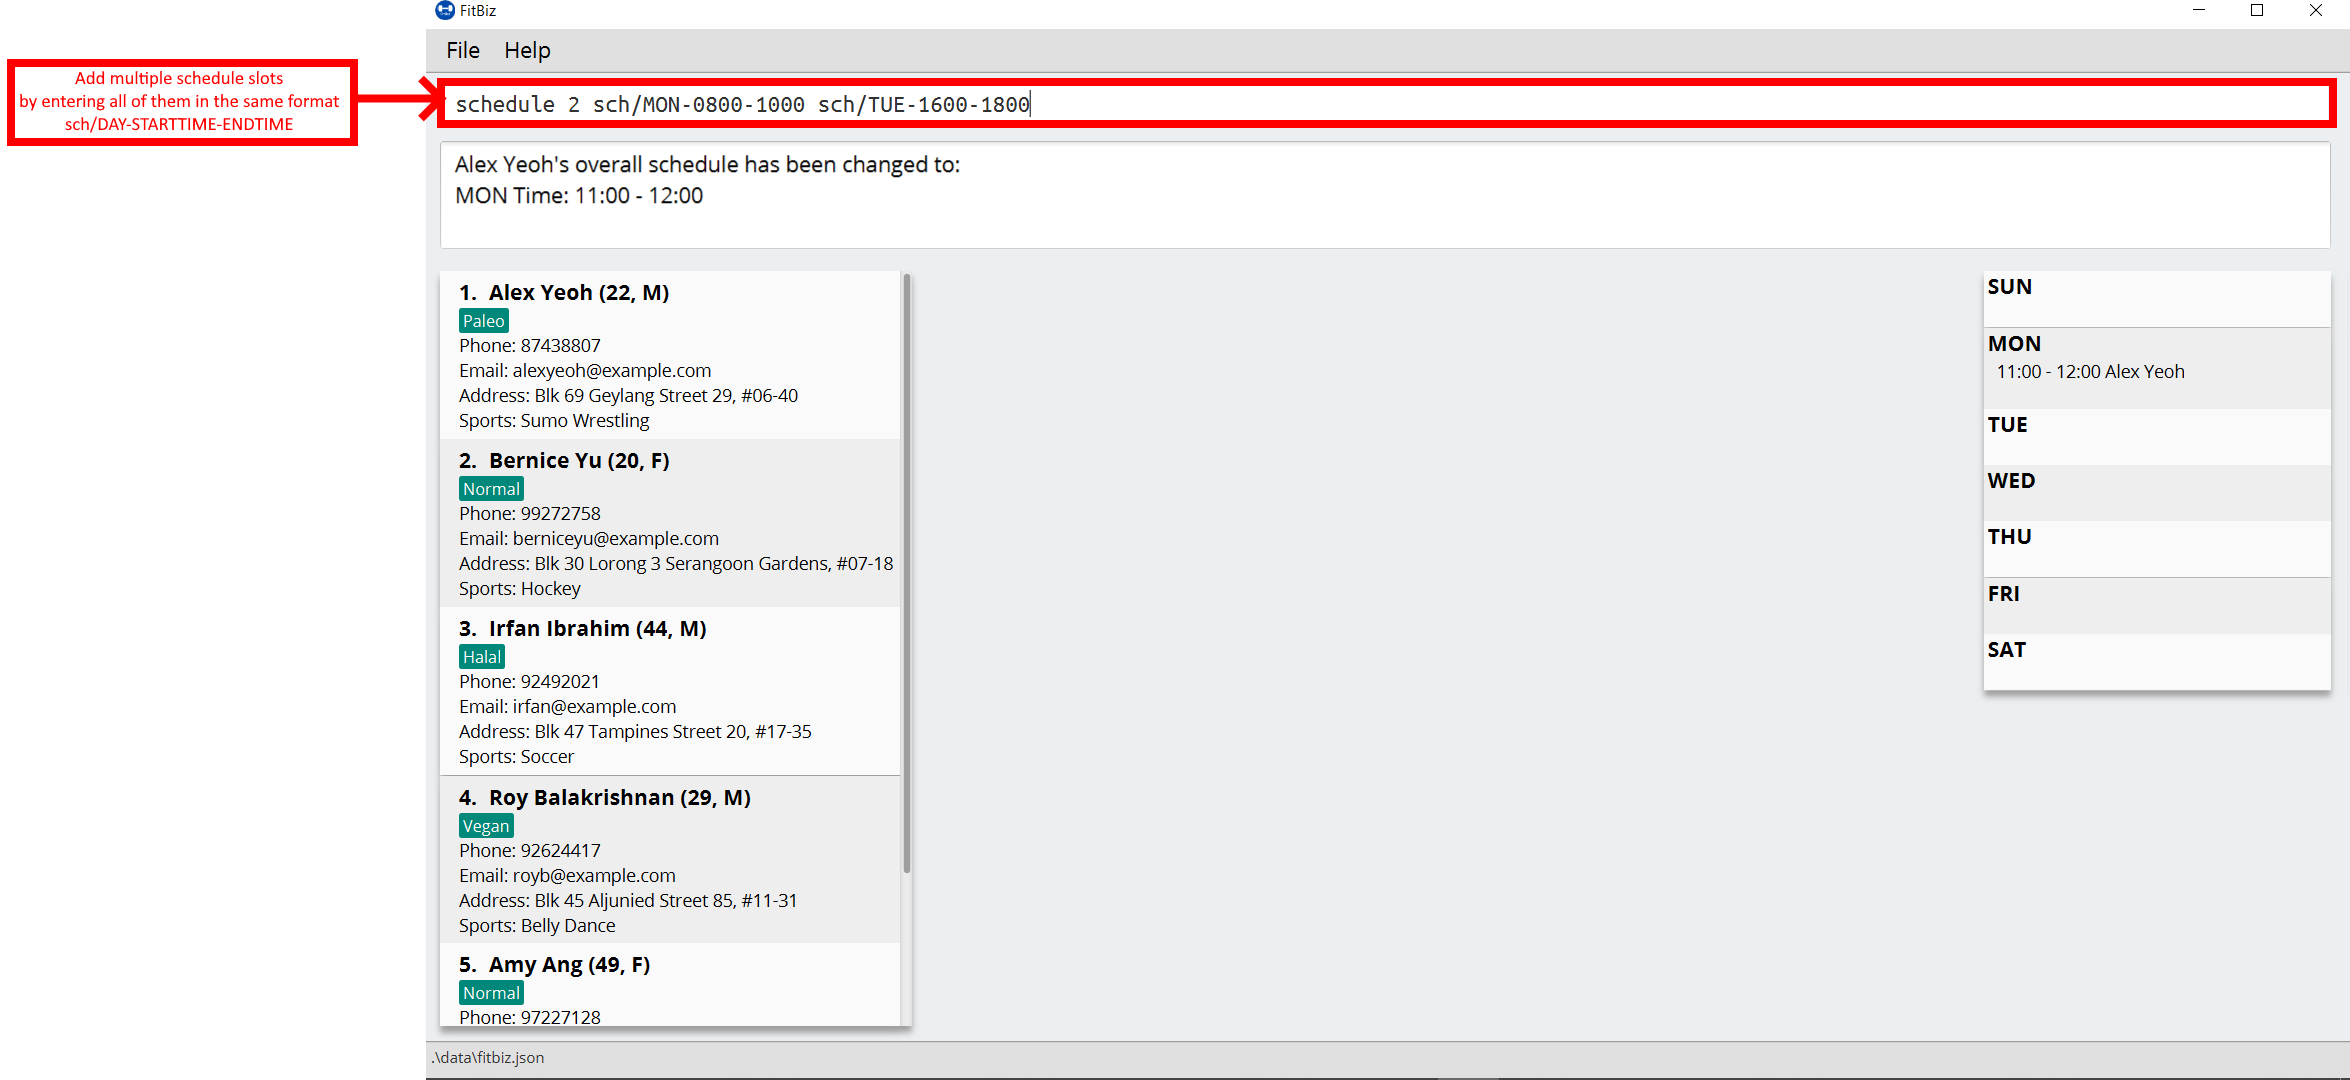
Let’s say you want to schedule a weekly Monday 11:00am to 12:00pm slot for your client Alex Yeoh. Alex Yeoh is the first client on your Client List.
You can see that Alex Yeoh’s client index is 1. Therefore, you can proceed to type the schedule command in the Command Box to assign a schedule slot to him.
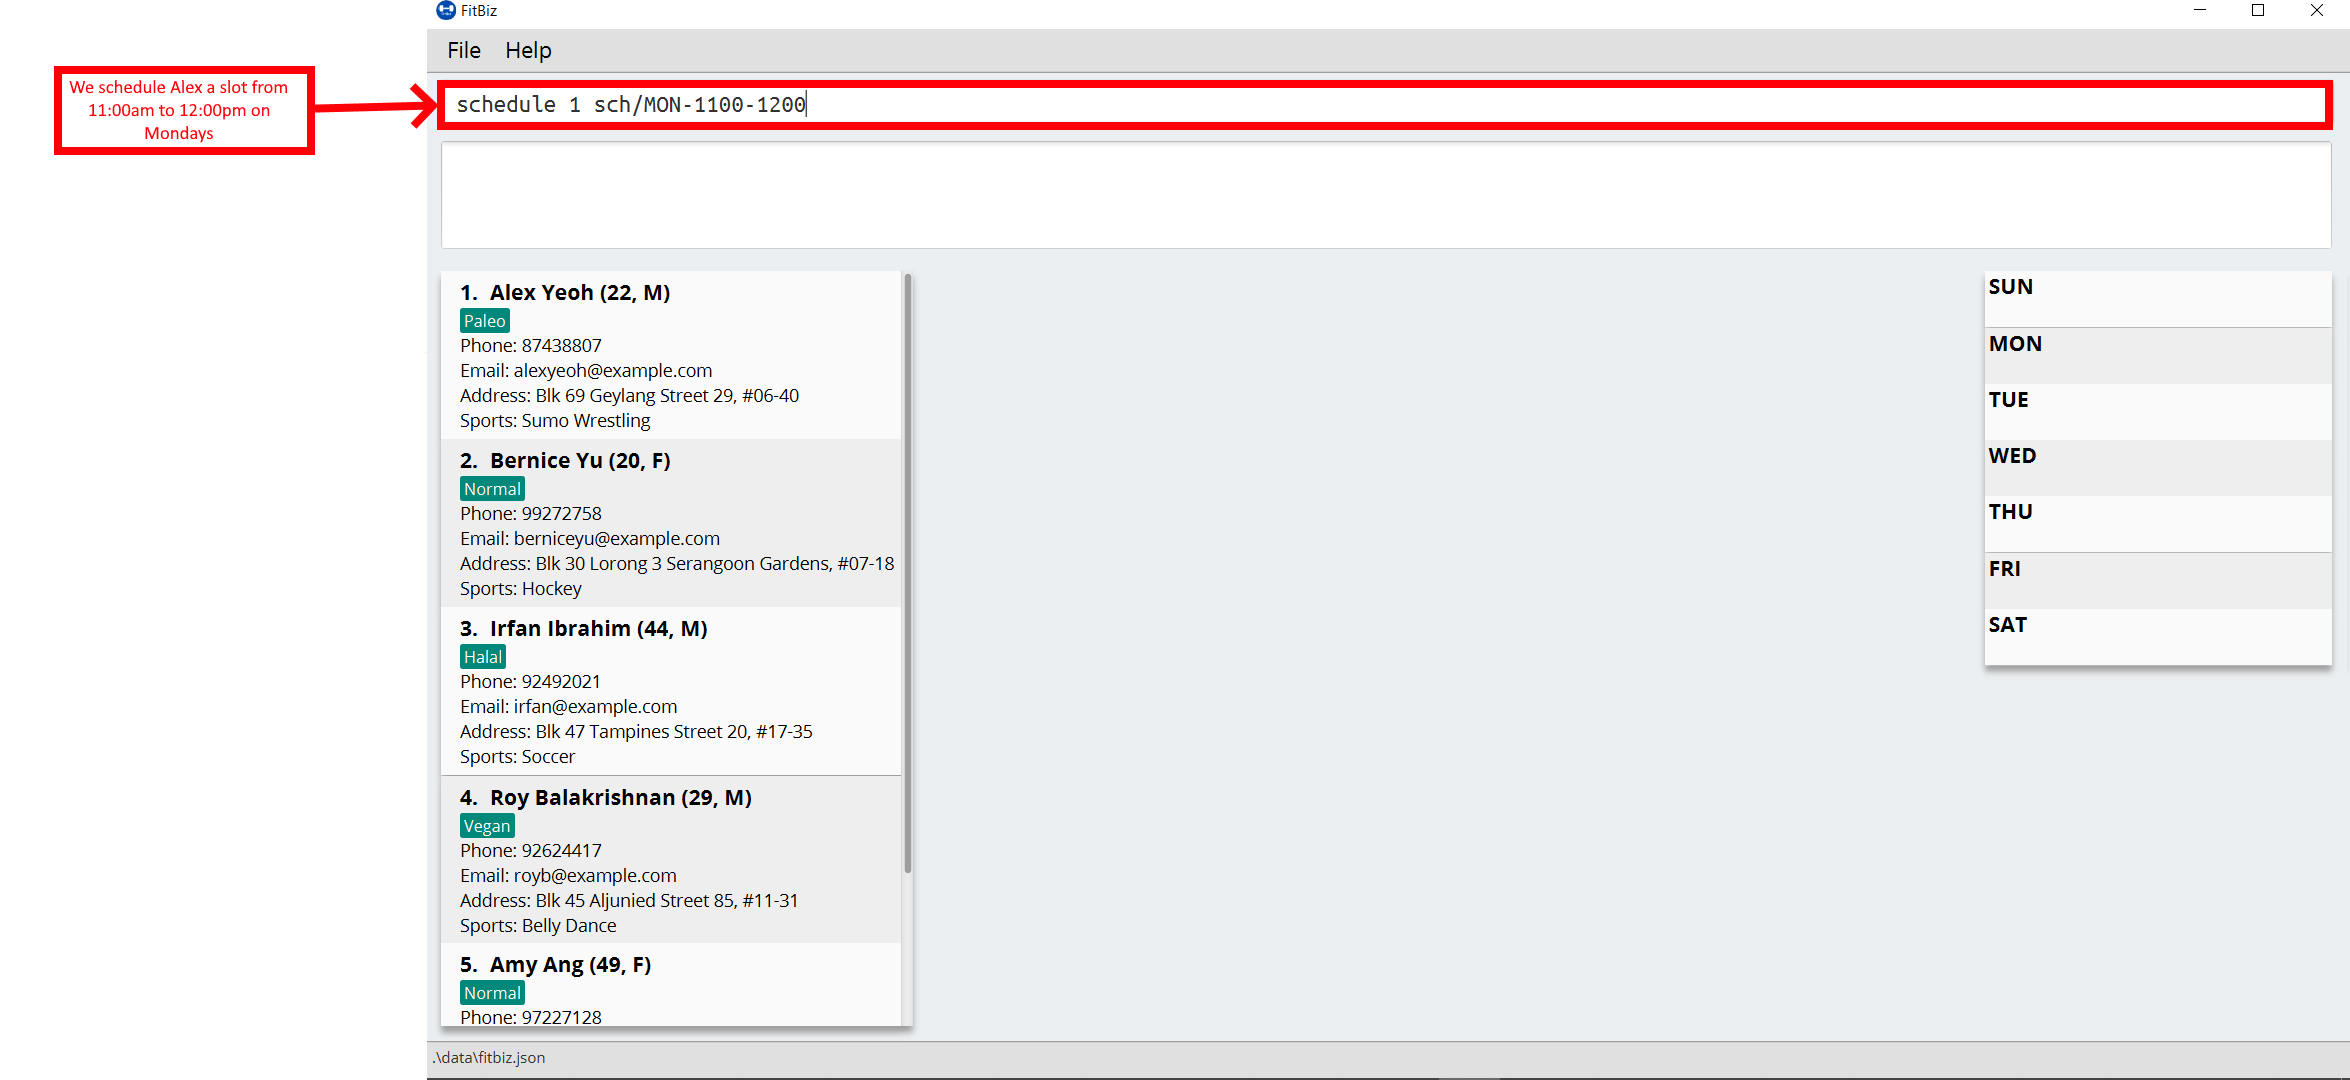
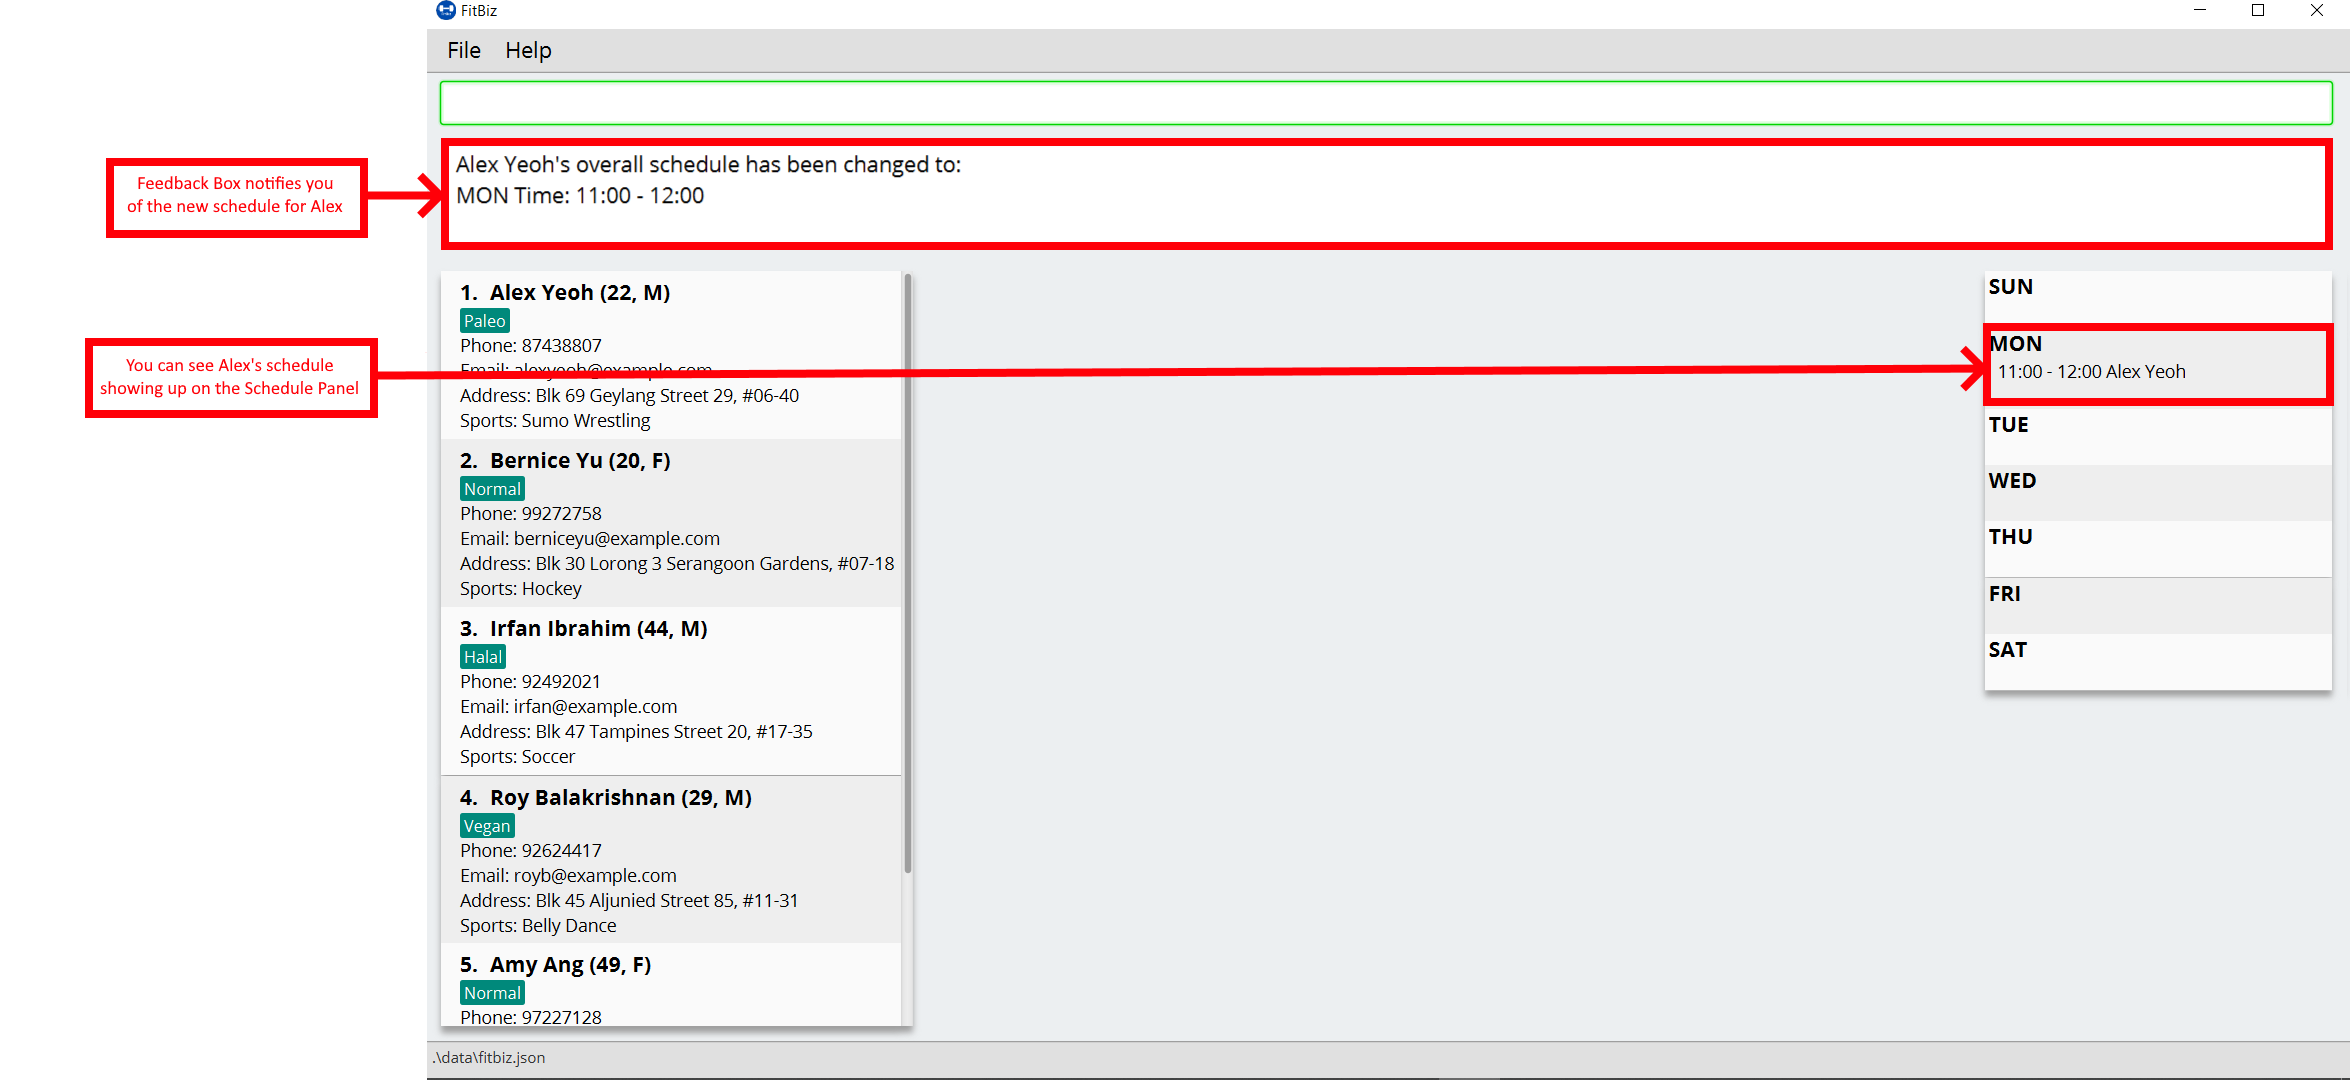
After you enter the command, you can see that the Result Box has notified you of the new overwritten schedule, and that Alex Yeoh’s schedule slot has appeared on the Schedule Panel on Monday.
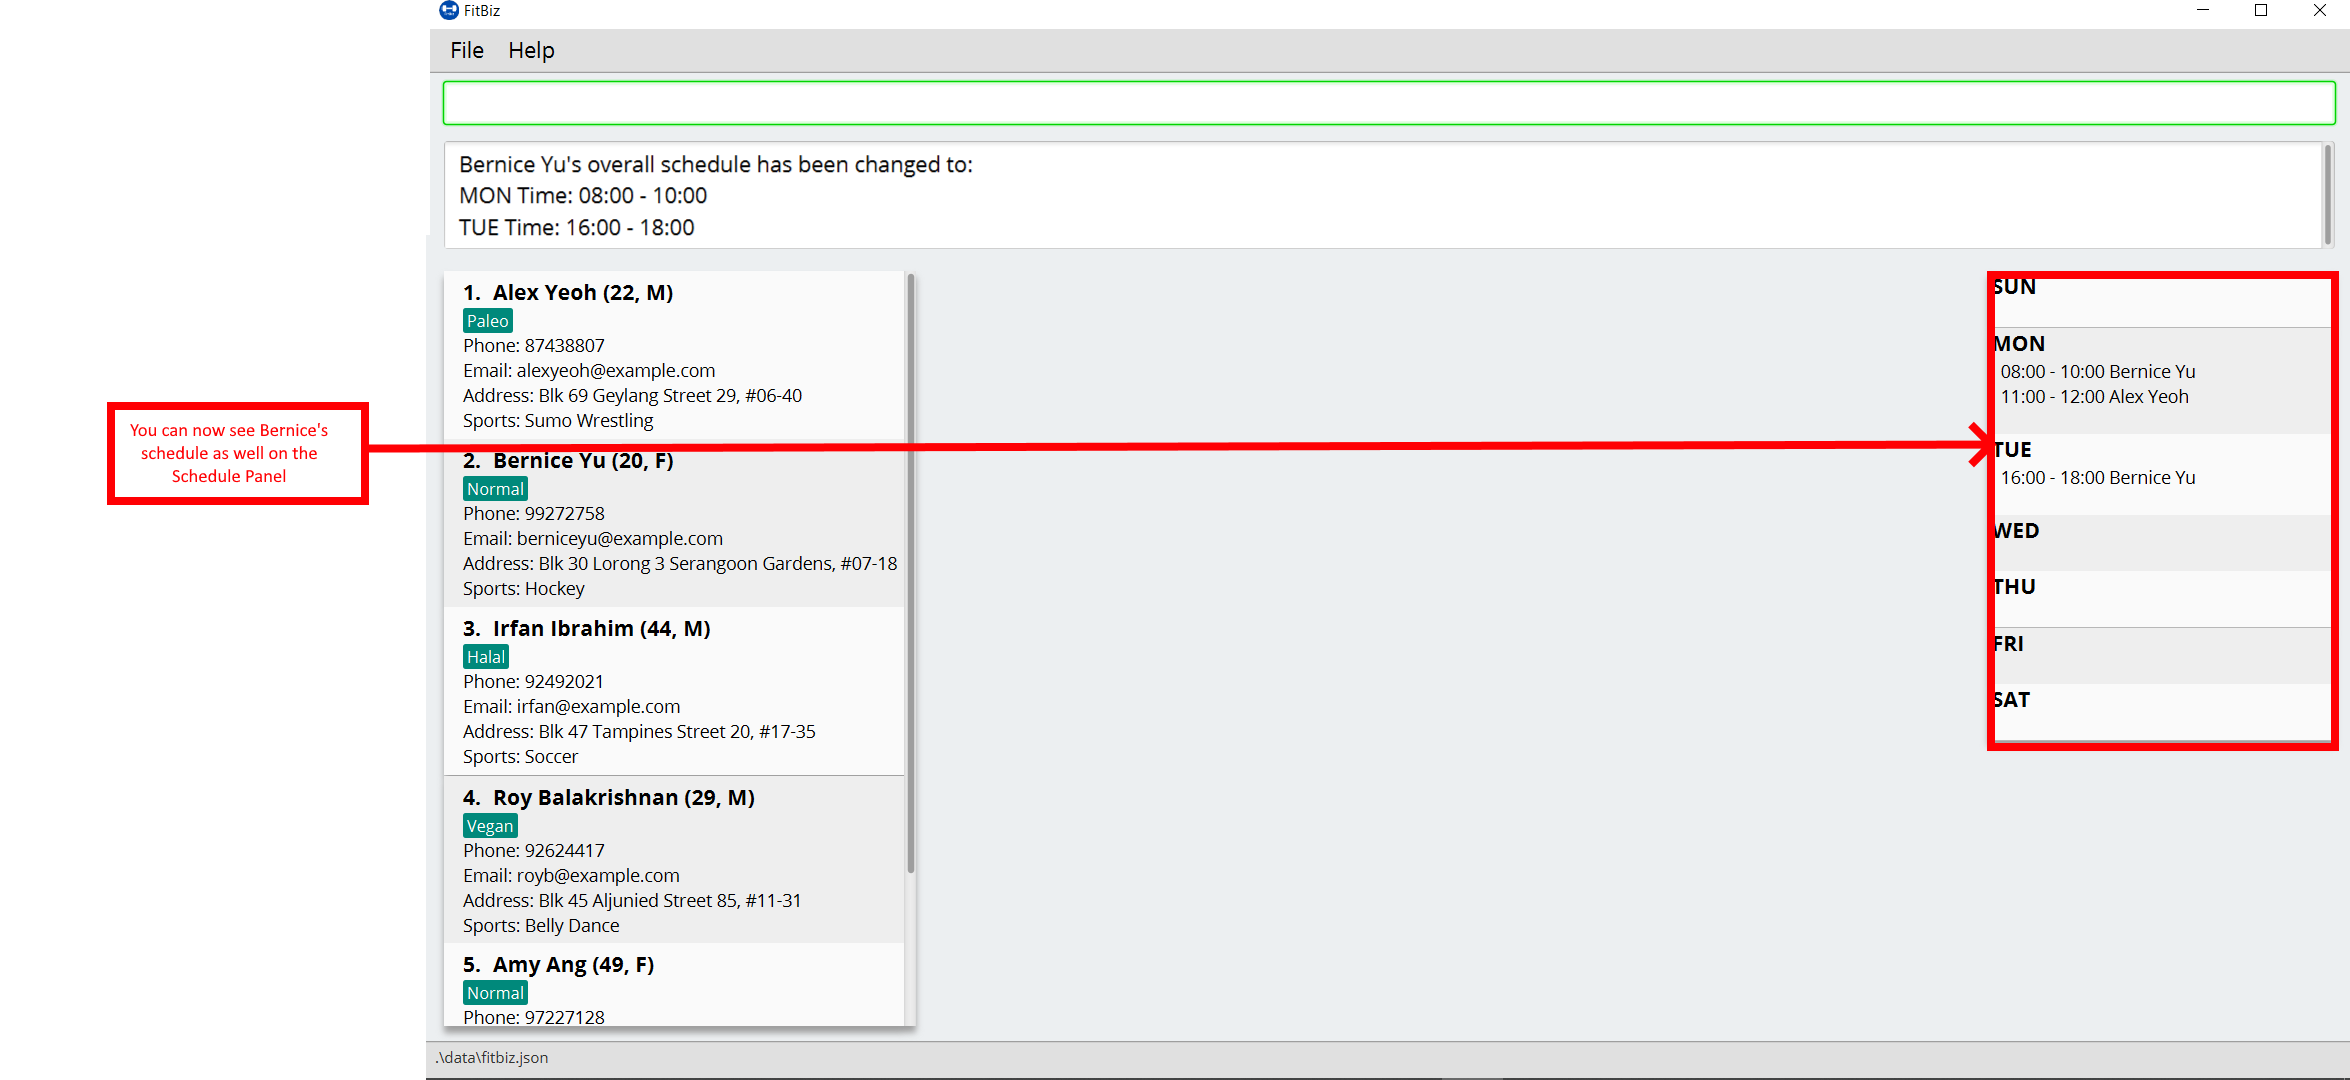
Now let’s say you want to add multiple schedules to Bernice Yu: Monday 8:00am to 10:00pm and Tuesday 4:00pm to 6:00pm. You can do that by adding both of these timings into the schedule command following the same format as above.
Now enter the command, and you’ll see that Bernice’s schedules also show up on the Schedule Panel.
Finally, let’s say Alex no longer has any schedule slots, and you want to clear it. Simply type in schedule 1 sch/ in the Command Box to clear his schedule, and you should see this.

3.11.3. Common Errors/Problems
You might face some errors or difficulties when you use schedule. In this section, you will be able to understand these errors and resolve them.
Overlapping schedules
You might encounter the message that "One or more of your input schedules have overlapping time periods. Please check again." This means that there is a overlapping time period between at least two of your input schedules. In this case as shown below, the first schedule sch/MON-1100-1200 conflicts with the second schedule sch/MON-1200-1300 because the end time of the first schedule overlaps with the start time of the second schedule.
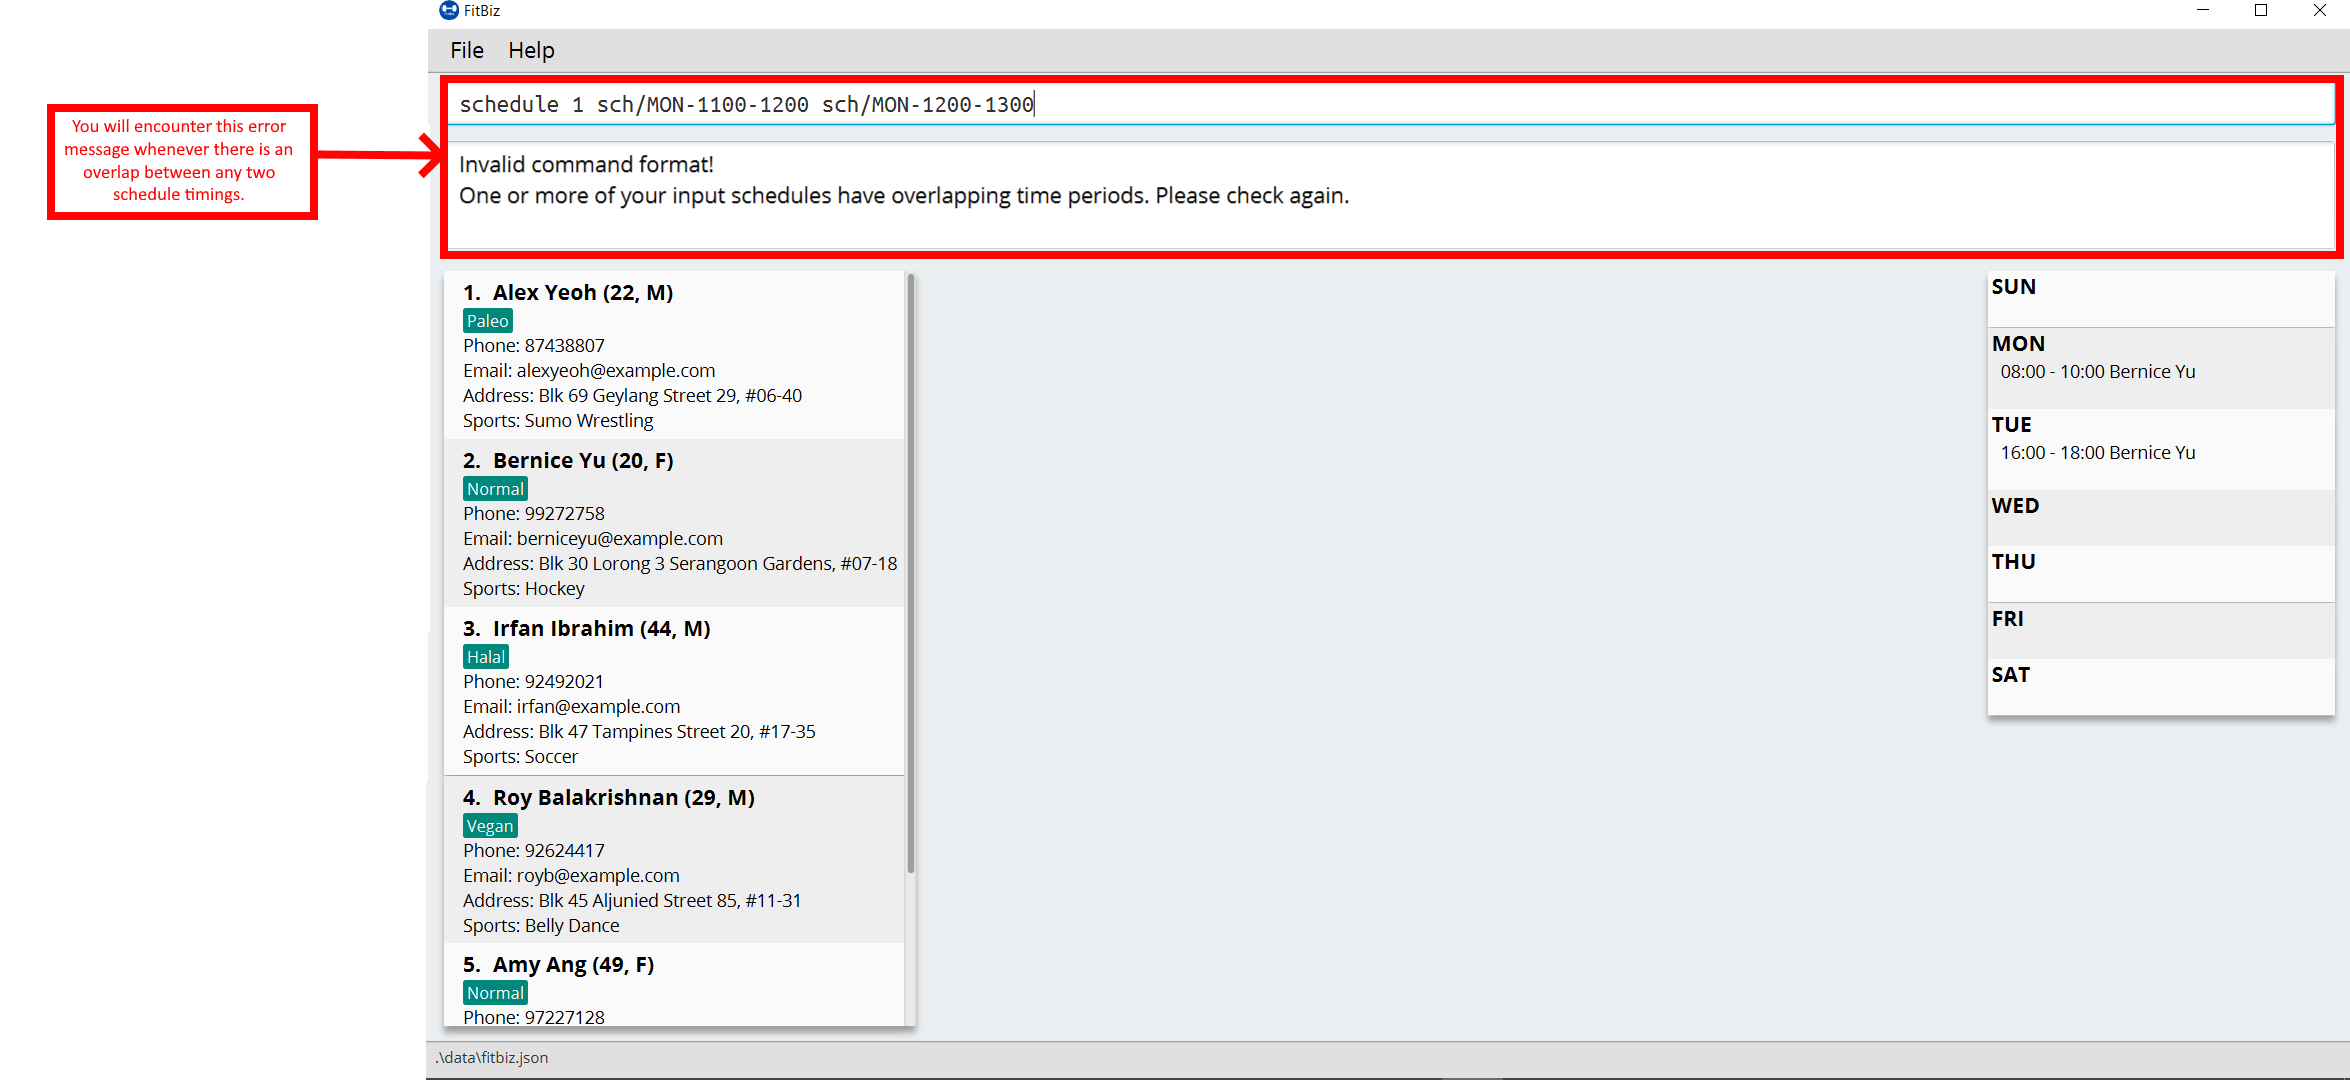
| Overlapping schedules are not allowed between schedules within the same client. However, different clients can have overlapping schedules with each other as it is a possible scenario that you as a gym coach can coach multiple clients at once, and that additional clients can join/leave the session as other sessions are ongoing. |
Invalid command format
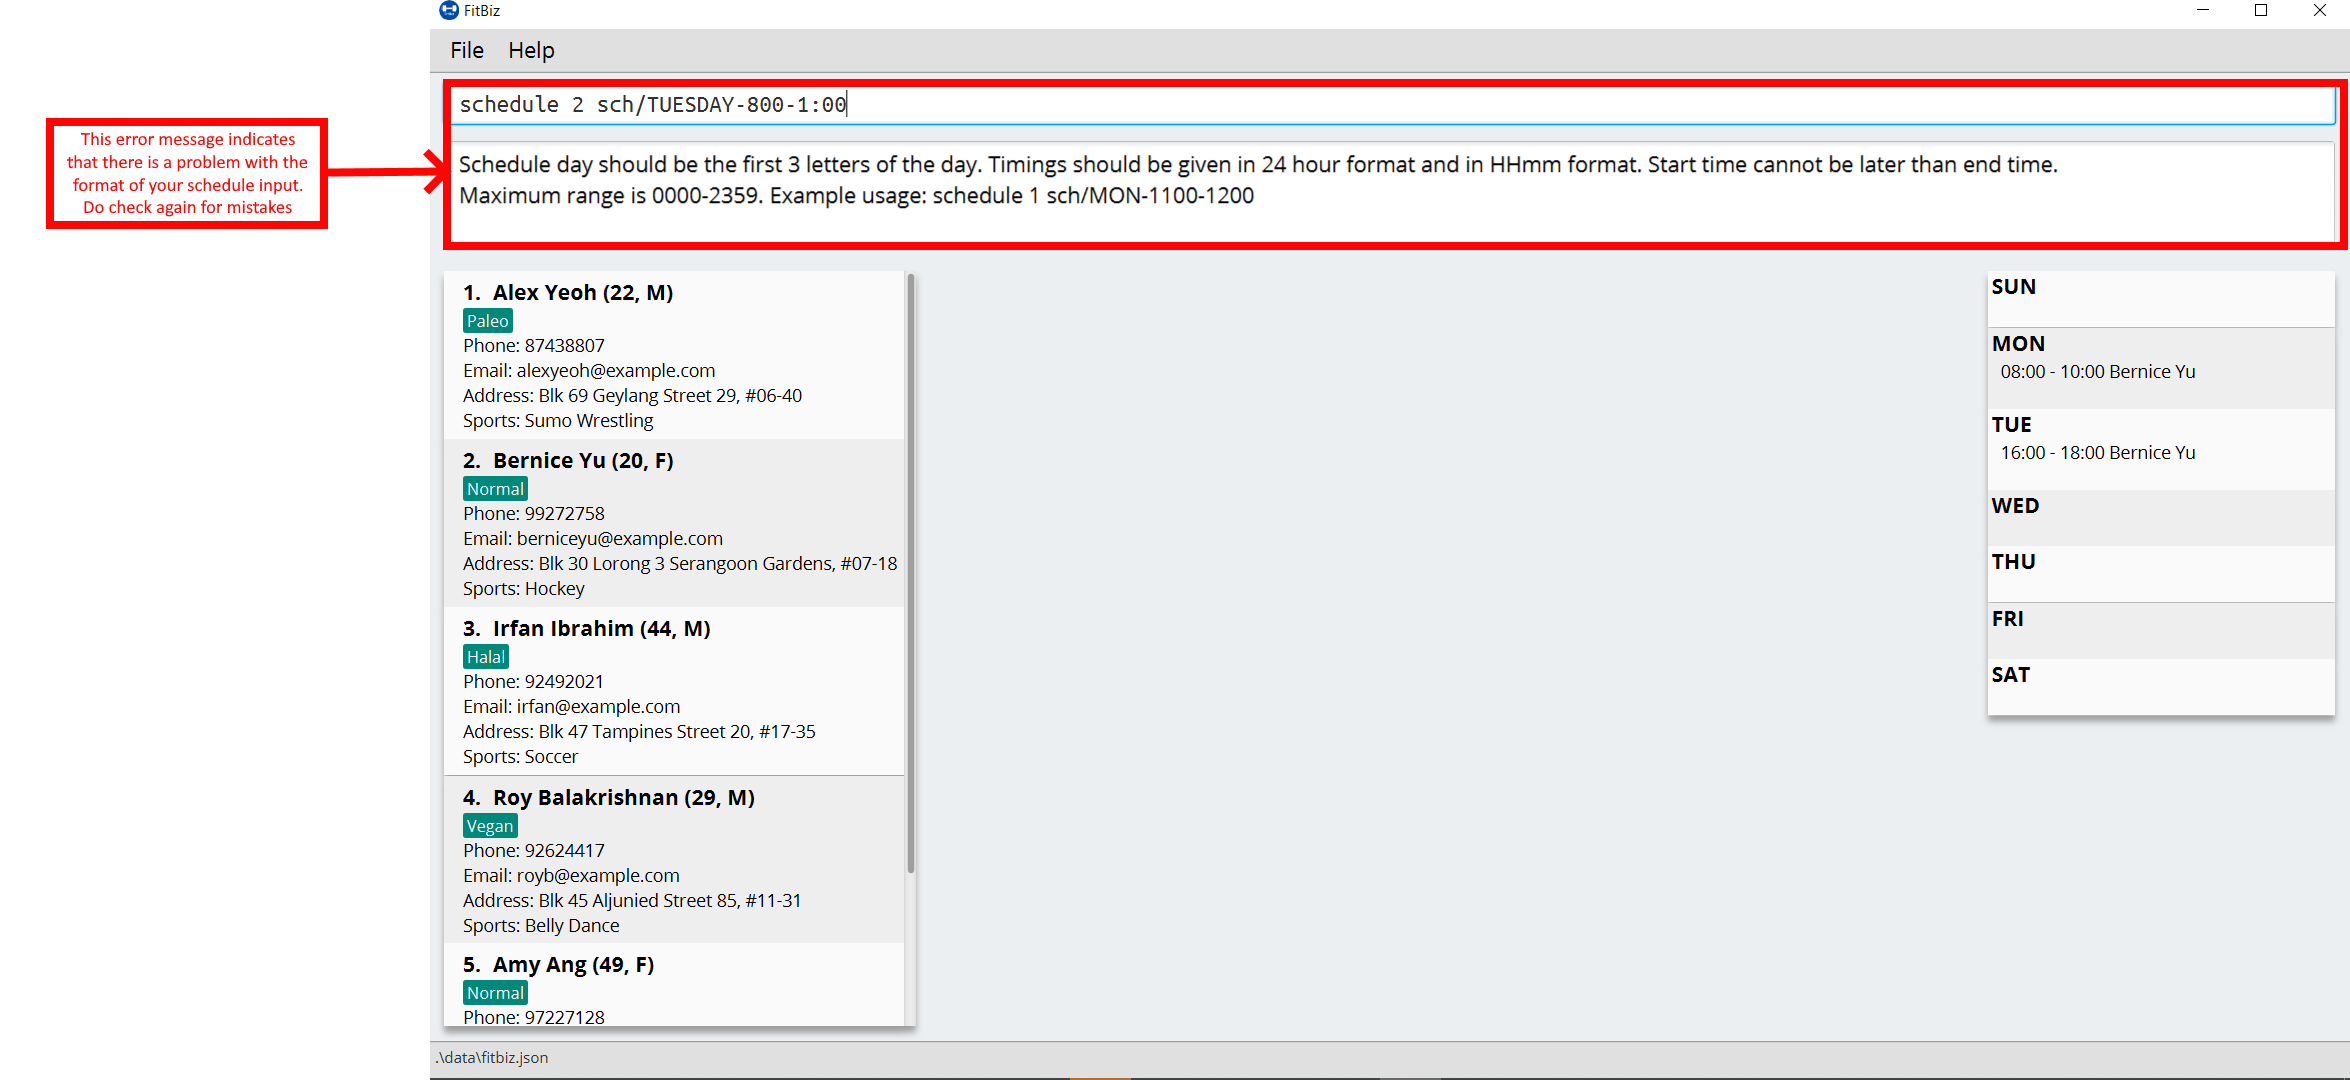
You might encounter the error message from the Result Box specifying the format that you should be using for the schedule command. This means that there are one or more errors in the format of your input for the schedule command. In the example input shown below, schedule 2 sch/TUESDAY-800-1:00, there are multiple errors. First, the DAY should be three letters. Next, the STARTTIME and ENDTIME should follow the HHmm format. The correct input for this should be schedule 2 sch/TUE-0800-1300.
3.12. Export a client’s exercises to CSV format: export --- Aaron Choo
export allows you to export your client’s recorded exercises into a spreadsheet format which you can then easily save or share with your clients. Note that this will create a CSV file, which you can view and open in other applications like Microsoft Excel, or Google Sheets (as shown in the example later).
format: export
| This command can only be used when you have a client in view; make sure you know how to view a client first. Refer to [view-c-command] for more information. |
3.12.1. Quick summary
-
Only the exercises of the current client in view will be exported
-
Exported files will be saved in the
/exportsdirectory -
The name of the exported file will be the client’s name followed by the
.csvfile extension (eg.Alex Yeoh.csv)
3.12.2. Example
-
First, ensure that you are currently viewing a client by using the
view-ccommand: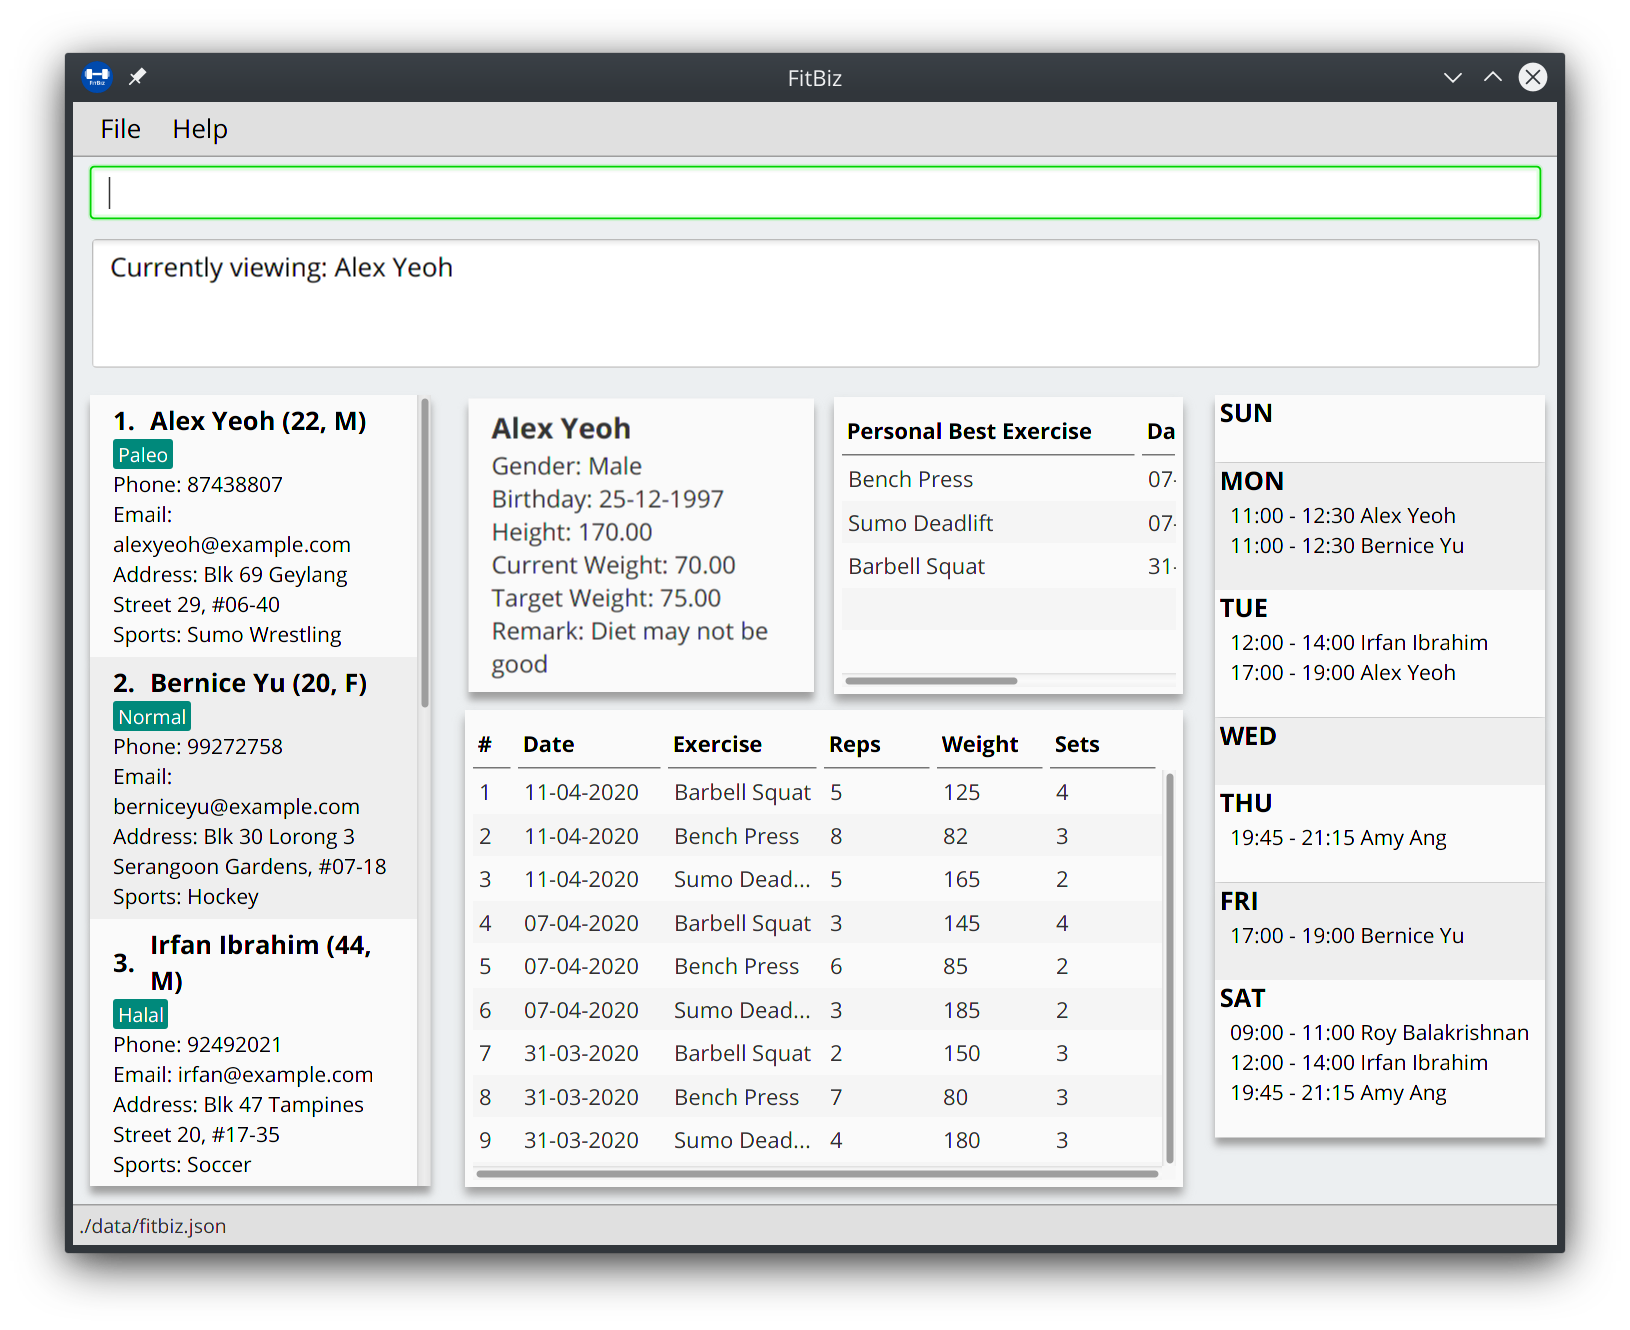
-
Now, if the client you are viewing currently has recorded exercises in the Exercise Table, simply execute the
exportcommand -
The exercises should have been successfully exported, if the following success message is shown:
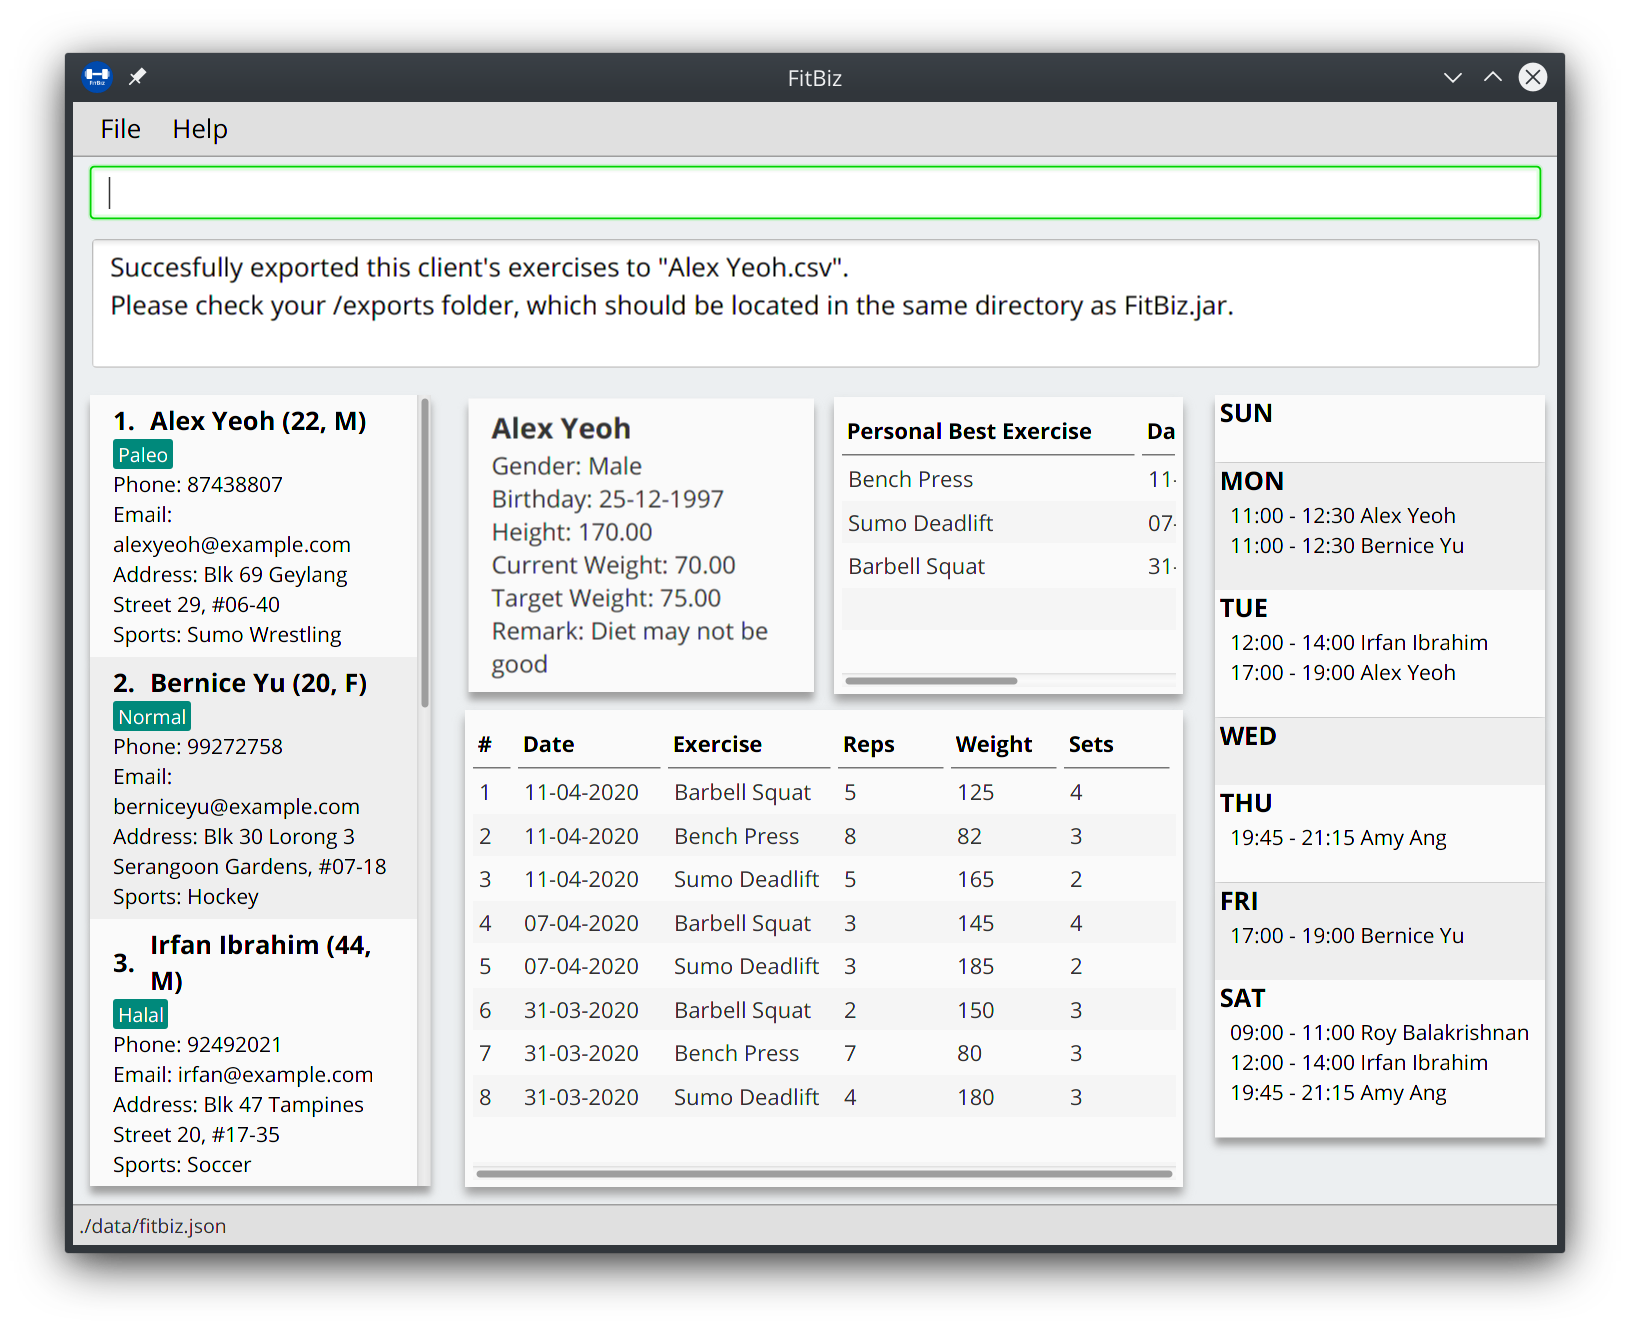
-
Now, simply use your favourite file explorer to locate the
exportsfolder, which should be created in the same directory asFitBiz.jar. In theexportsfolder, you will then find your exported CSV file: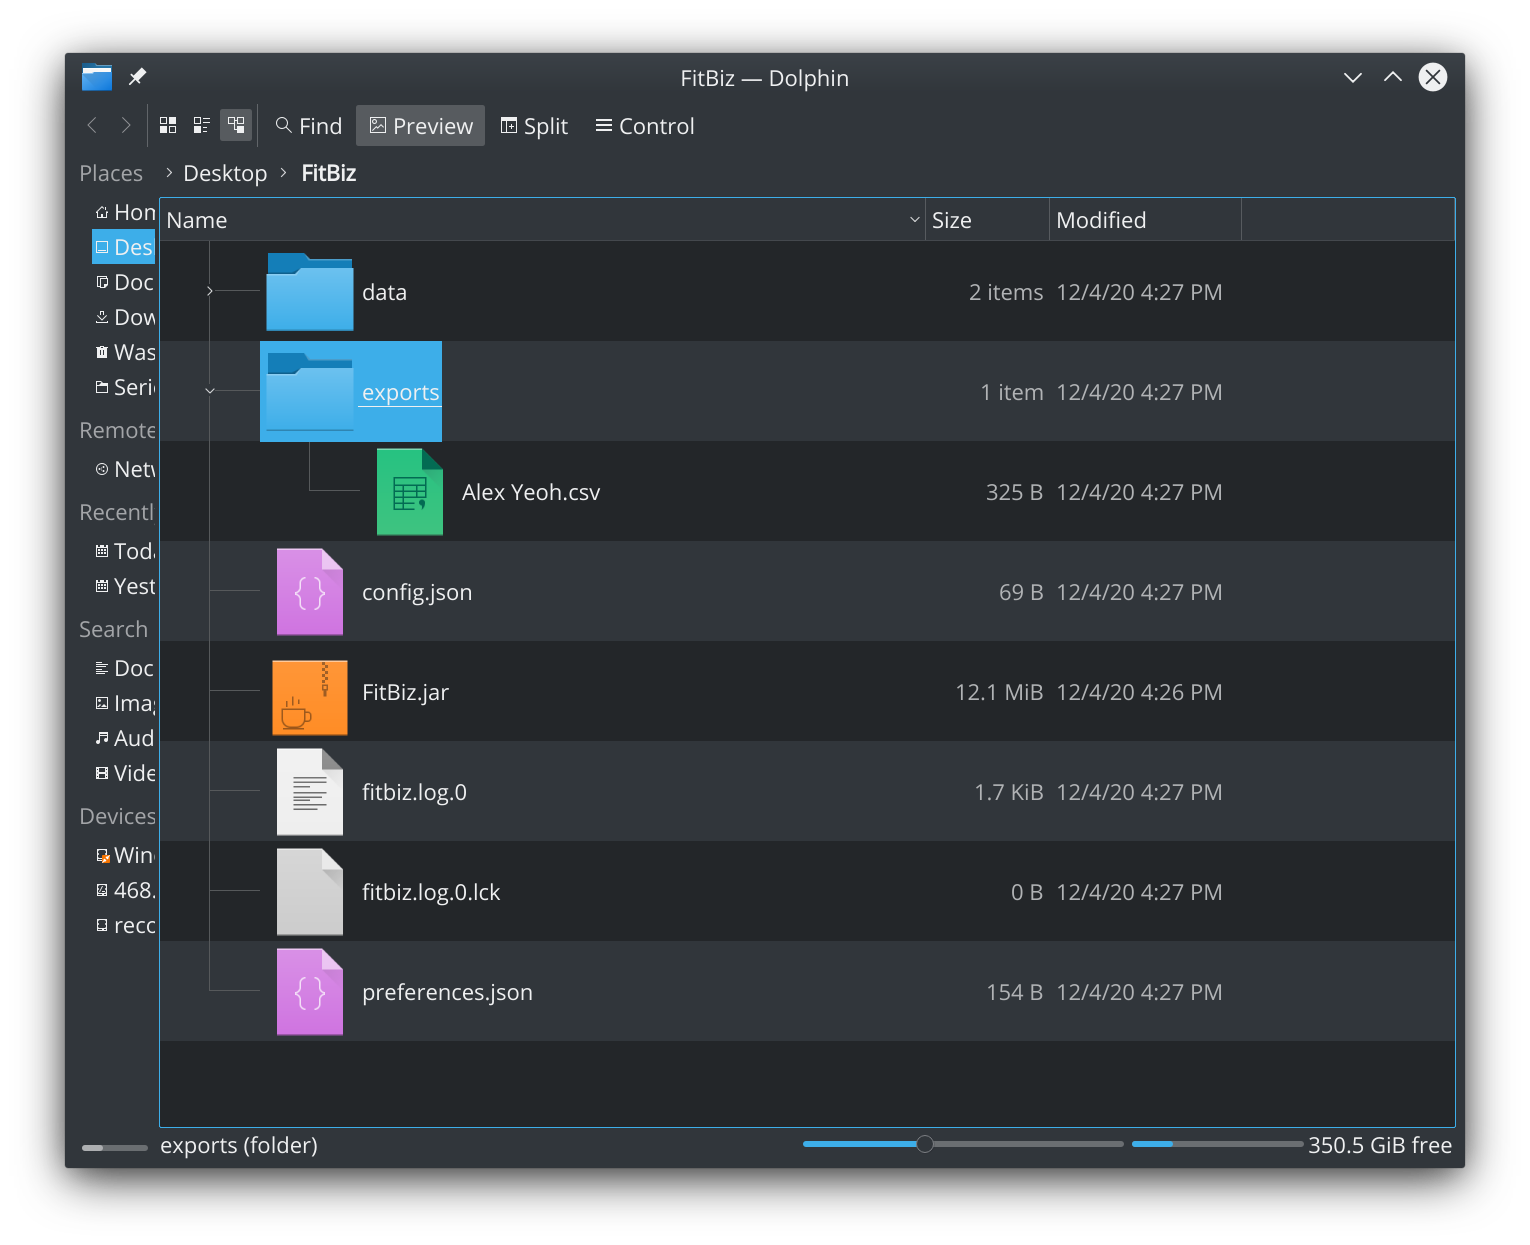
-
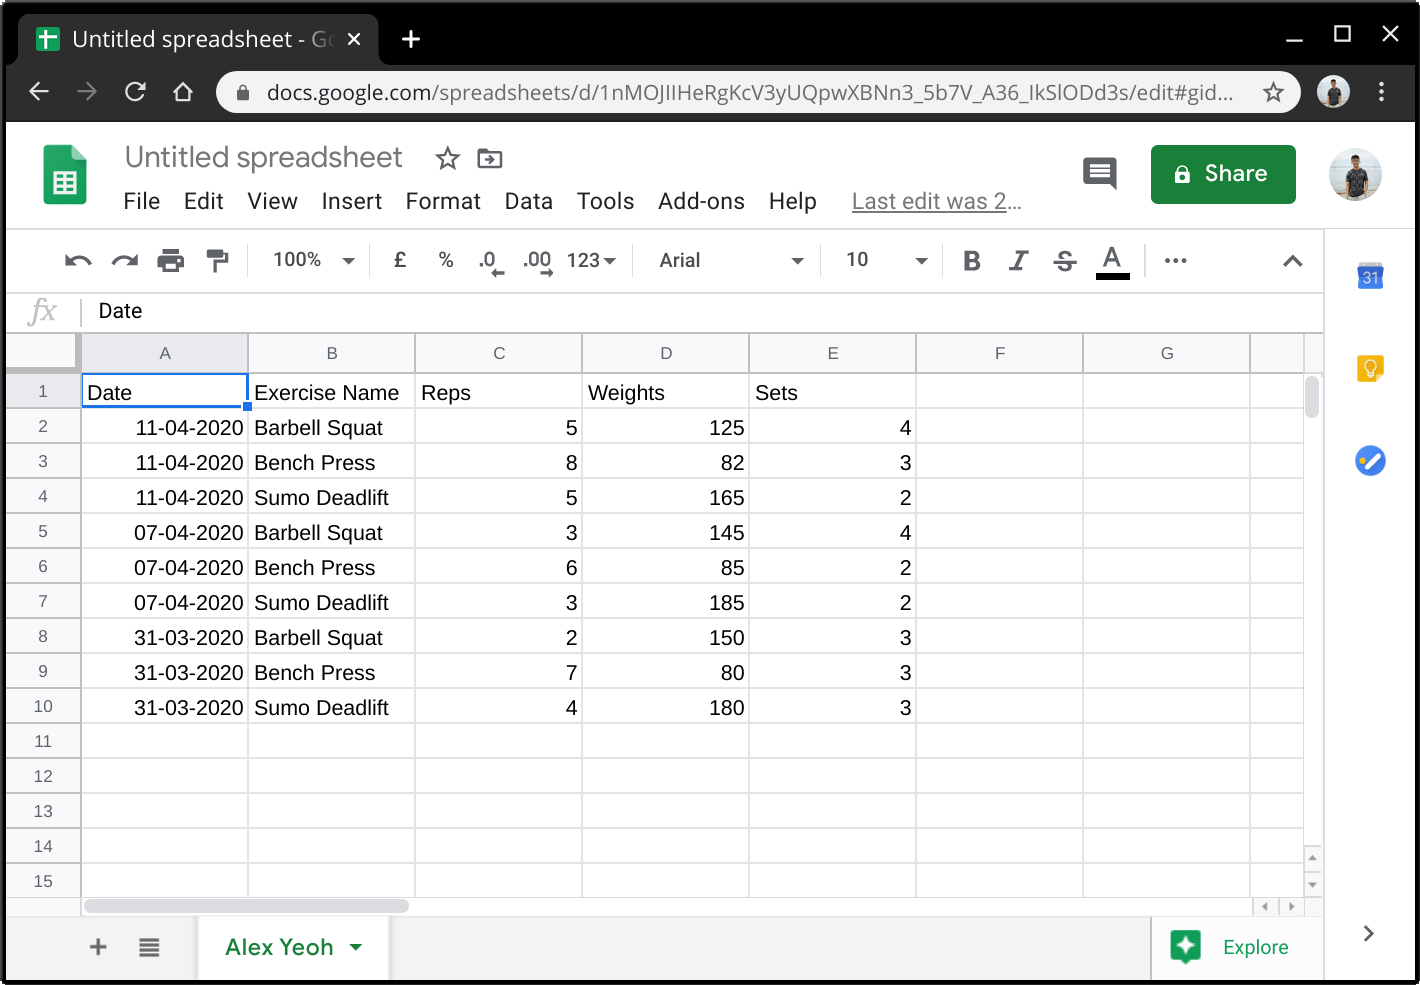
If you have a spreadsheet software (like Microsoft Excel) installed on your computer, you can easily view the CSV file by launching it. In our example, we have imported it into Google Sheets instead:
3.12.3. Common errors/problems
If you find that you are unable to execute this command successfully, there are a few things you can check:
-
Ensure that you are currently viewing a client using the
view-ccommand. If you are indeed viewing a client, the Client View should not be empty. -
Ensure that you actually do have exercises recorded for the client currently in view using the
add-ecommand. If the client does indeed have recorded exercises, the Exercise Table should not be empty.
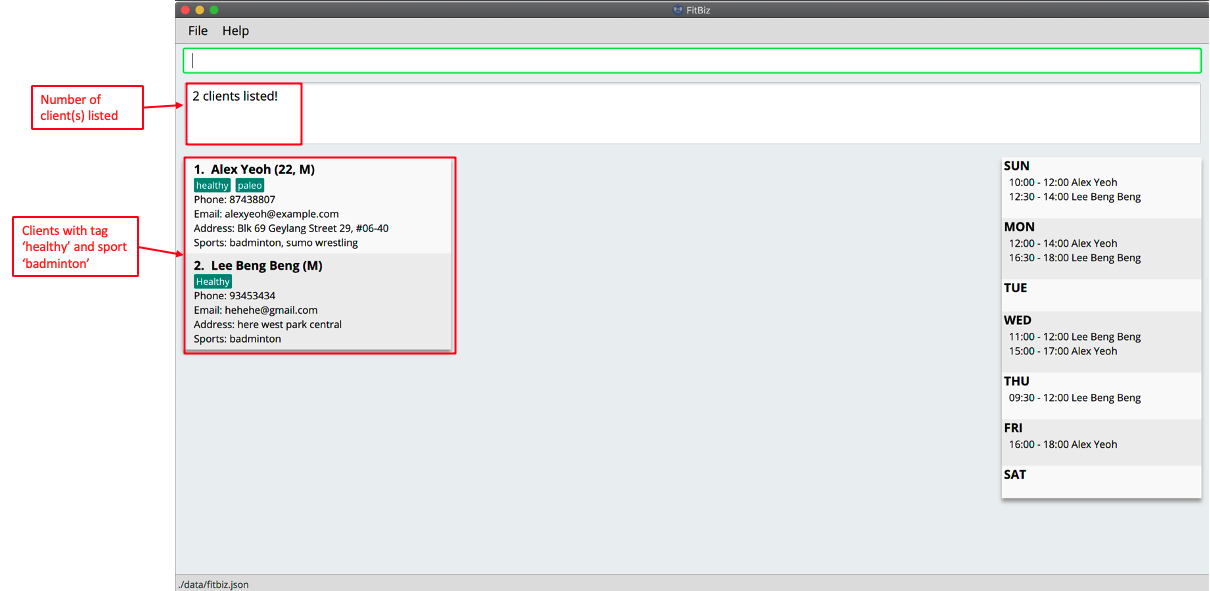
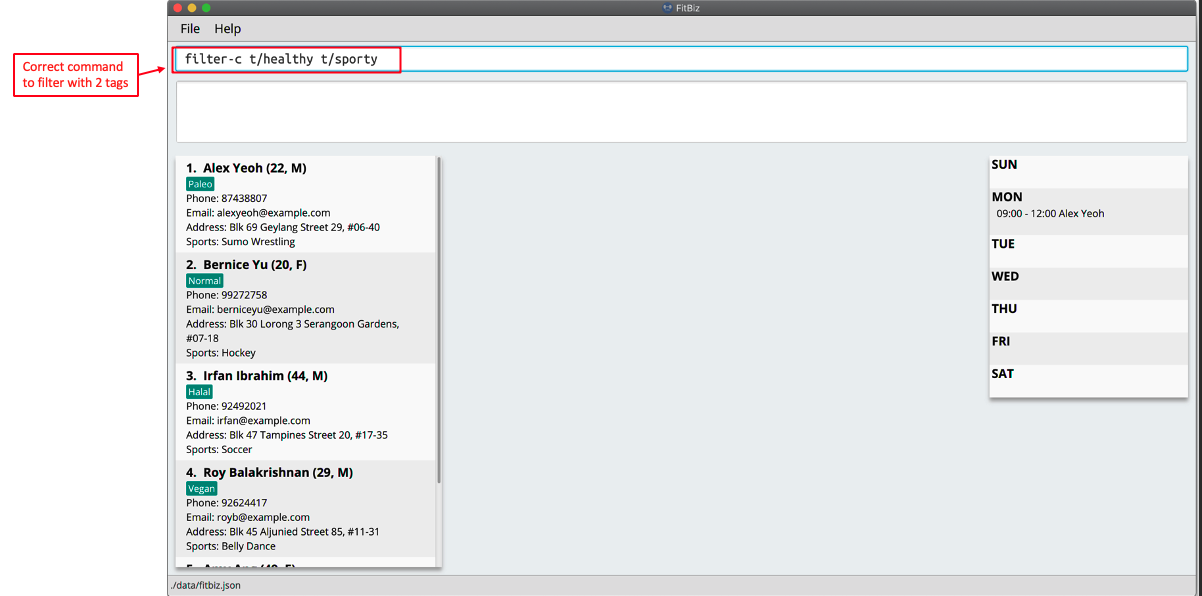
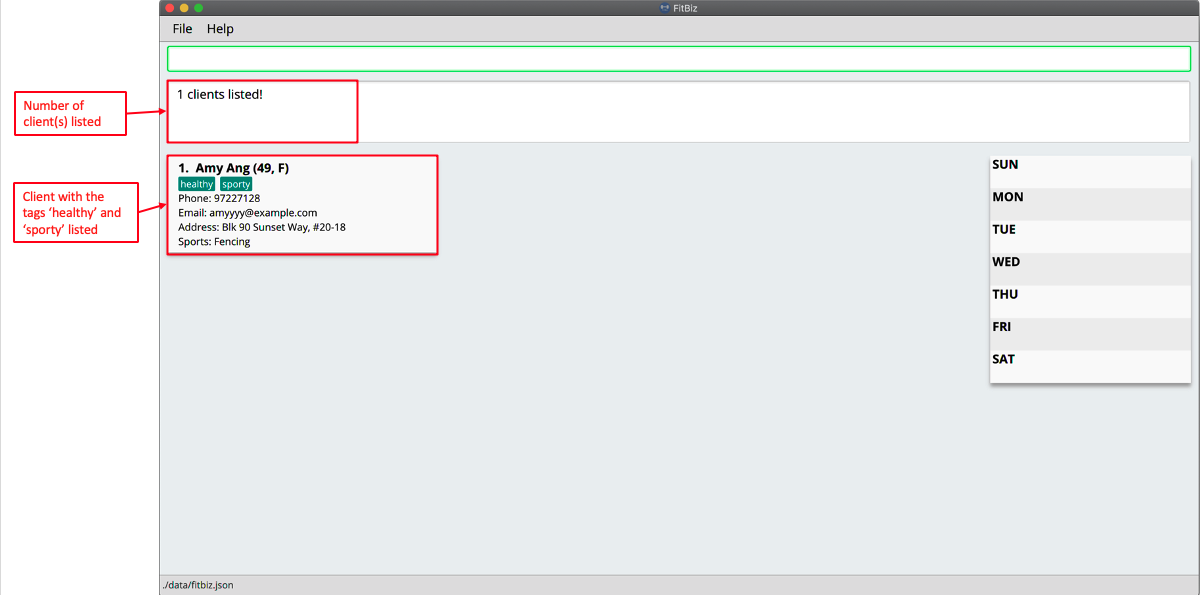
3.13. Filter clients based on attribute: filter-c --- Toh Ker Wei
When you have many clients and want to filter the list of clients to view a specific group, you can use the command filter-c to filter clients based on their tags or their sports.
Format: filter-c [t/TAG]… [s/SPORT]…
3.13.1. Parameters
| Parameter | Important notes |
|---|---|
|
|
|
Order of words in |
3.13.2. Example
Let’s say you want to filter through your list of clients and only display those with the tag healthy and play the sport badminton.
-
Type the command
filter-c t/healthy s/badmintoninto the command box.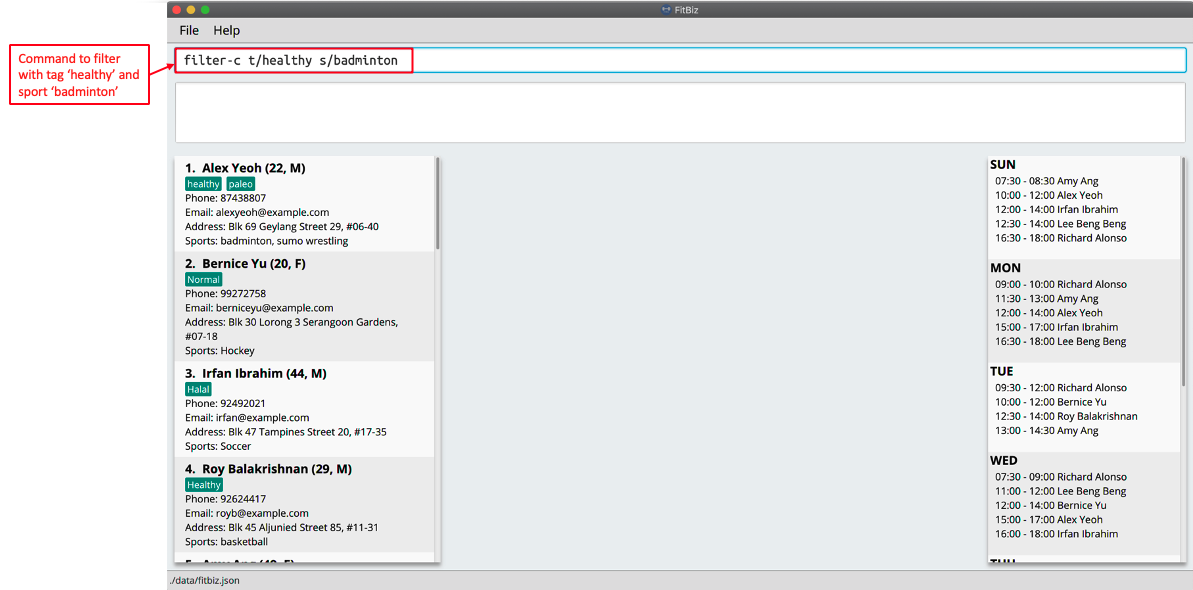
-
Press enter to execute.
-
The clients with the matching tag and sport will be displayed as shown.
3.13.3. Common error/ problem
Tags with spaces
When you want to filter the clients list with multiple tags like healthy and sporty, you might enter the command shown below.
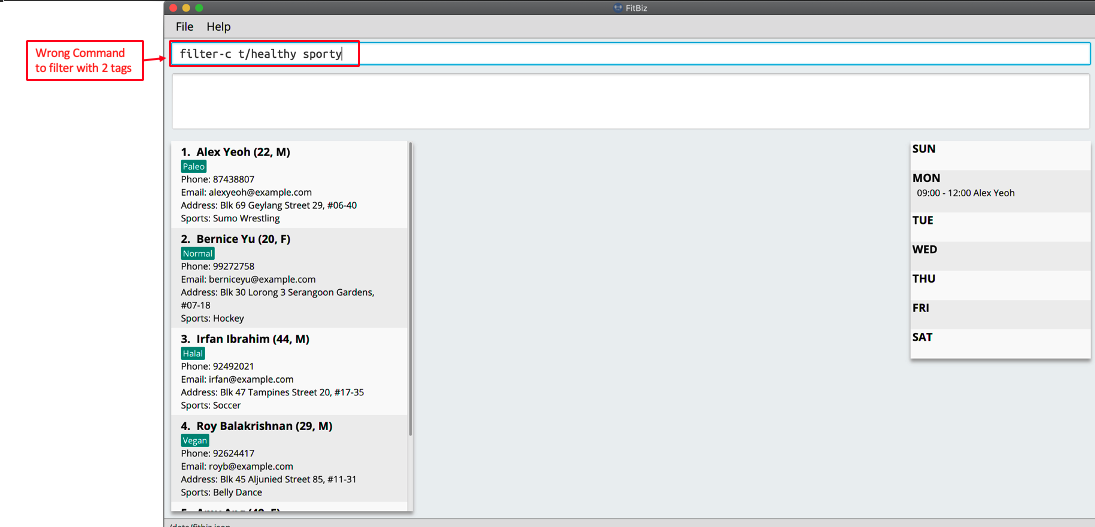
You will then encounter the error Tags names should be alphanumeric.
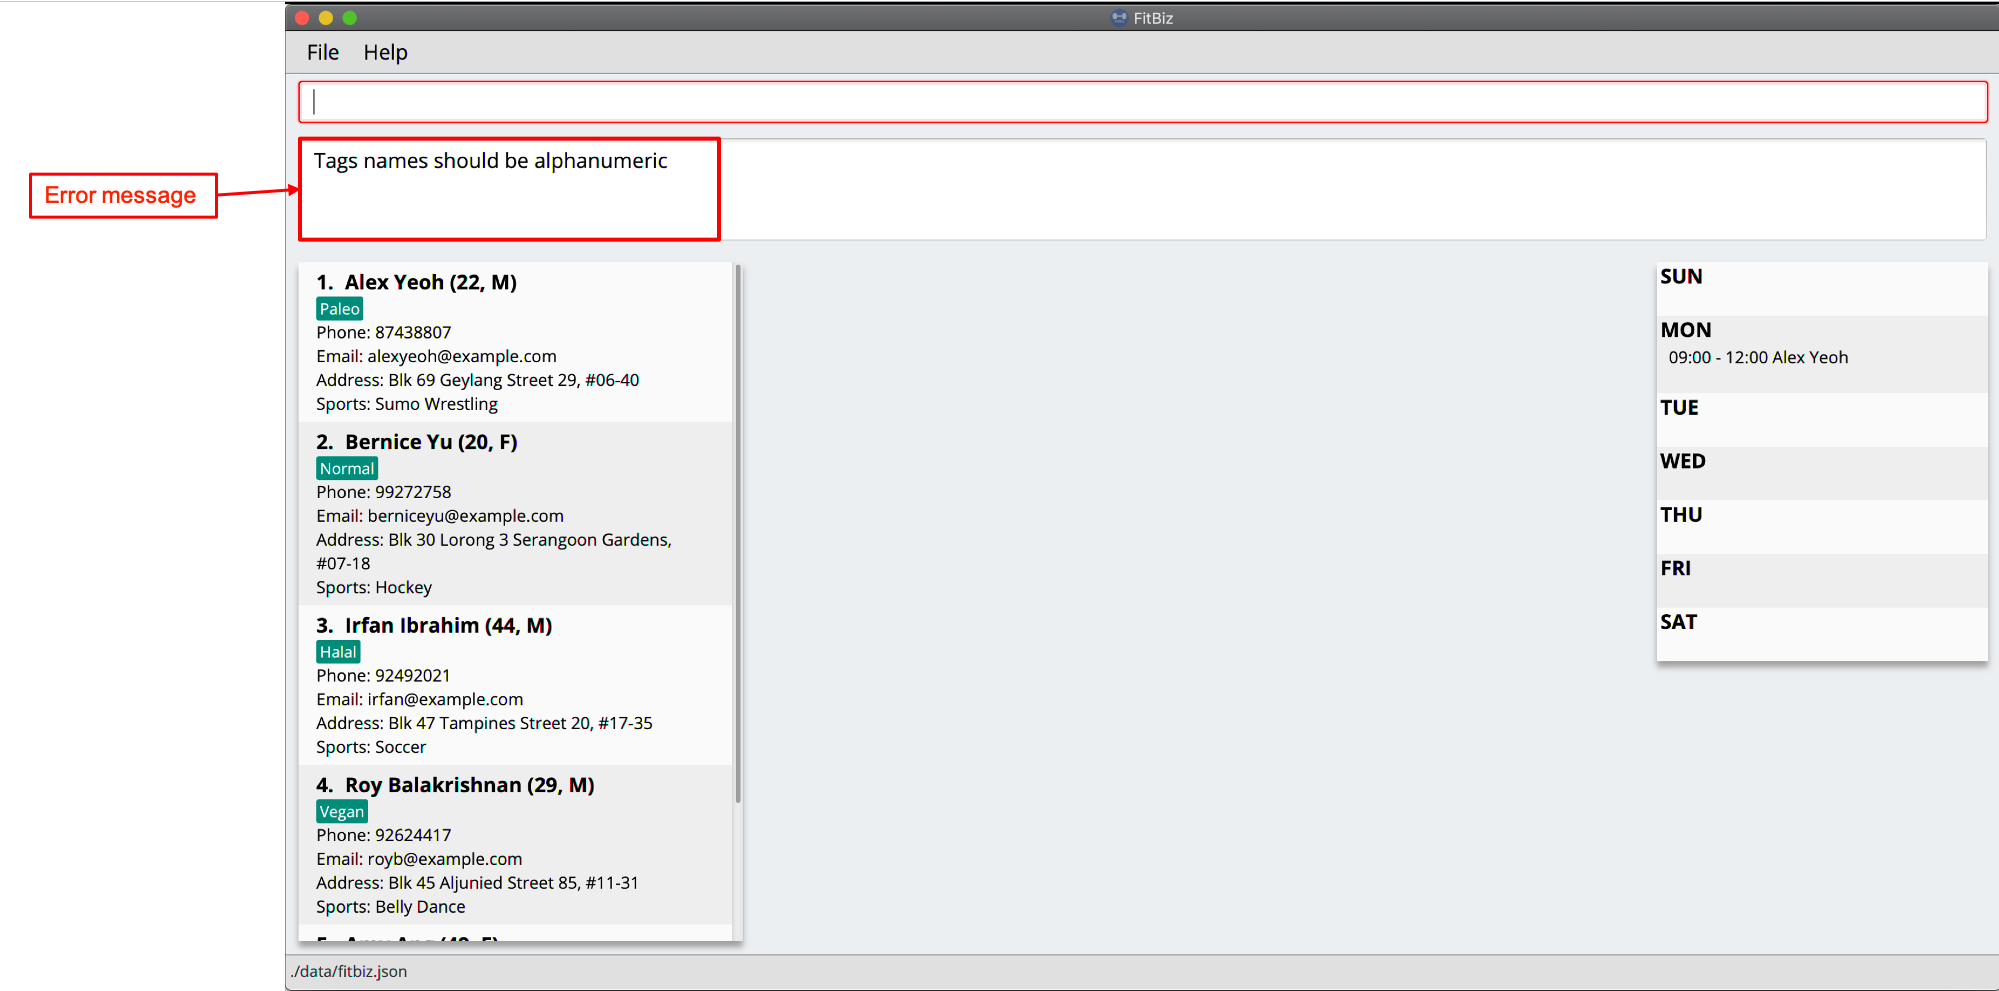
This error occurs because TAG only accepts letters and numbers but not spaces. To solve the problem, add an additional delimiter for each tag you want to specify. Note that sports does not require multiple delimiter.
The list of successfully filter clients will then be displayed.
3.14. Display visualisations of training progress: graph --- Li Zi Ying
graph allows you to see a graphical visualisation of a client’s exercise progress within a specified timeframe, so that you can easily track your client’s progress and improvement.
Format: n/EXERCISE_NAME a/Y_AXIS sd/START_DATE ed/END_DATE
3.14.1. Parameters
This section acts as a summary of important things to note when using graph including their parameters.
| Parameters | Important points to note |
|---|---|
|
Substitute
|
|
Substitute
|
|
Substitute
The range of
|
|
Substitute
The range of
|
3.14.2. Example
Let’s say that you wish to view the exercise graph of Alex Yeoh for the exercise Sumo Deadlift from the date 01-01-2020 to 13-04-2020 and you want to focus on the weight he lifted during the exercise.
You can use the graph command to view the graph of the exercise following the steps as shown:
-
First view the client that you want to view the exercise graph of. For information on how to view the client, you can refer to the
view-csection. For this example, we will view the graph ofAlex Yeoh, who is the first client in the client list. After enteringview-c 1, you will see the full detailed information and a table of recorded exercises of clientAlex Yeoh.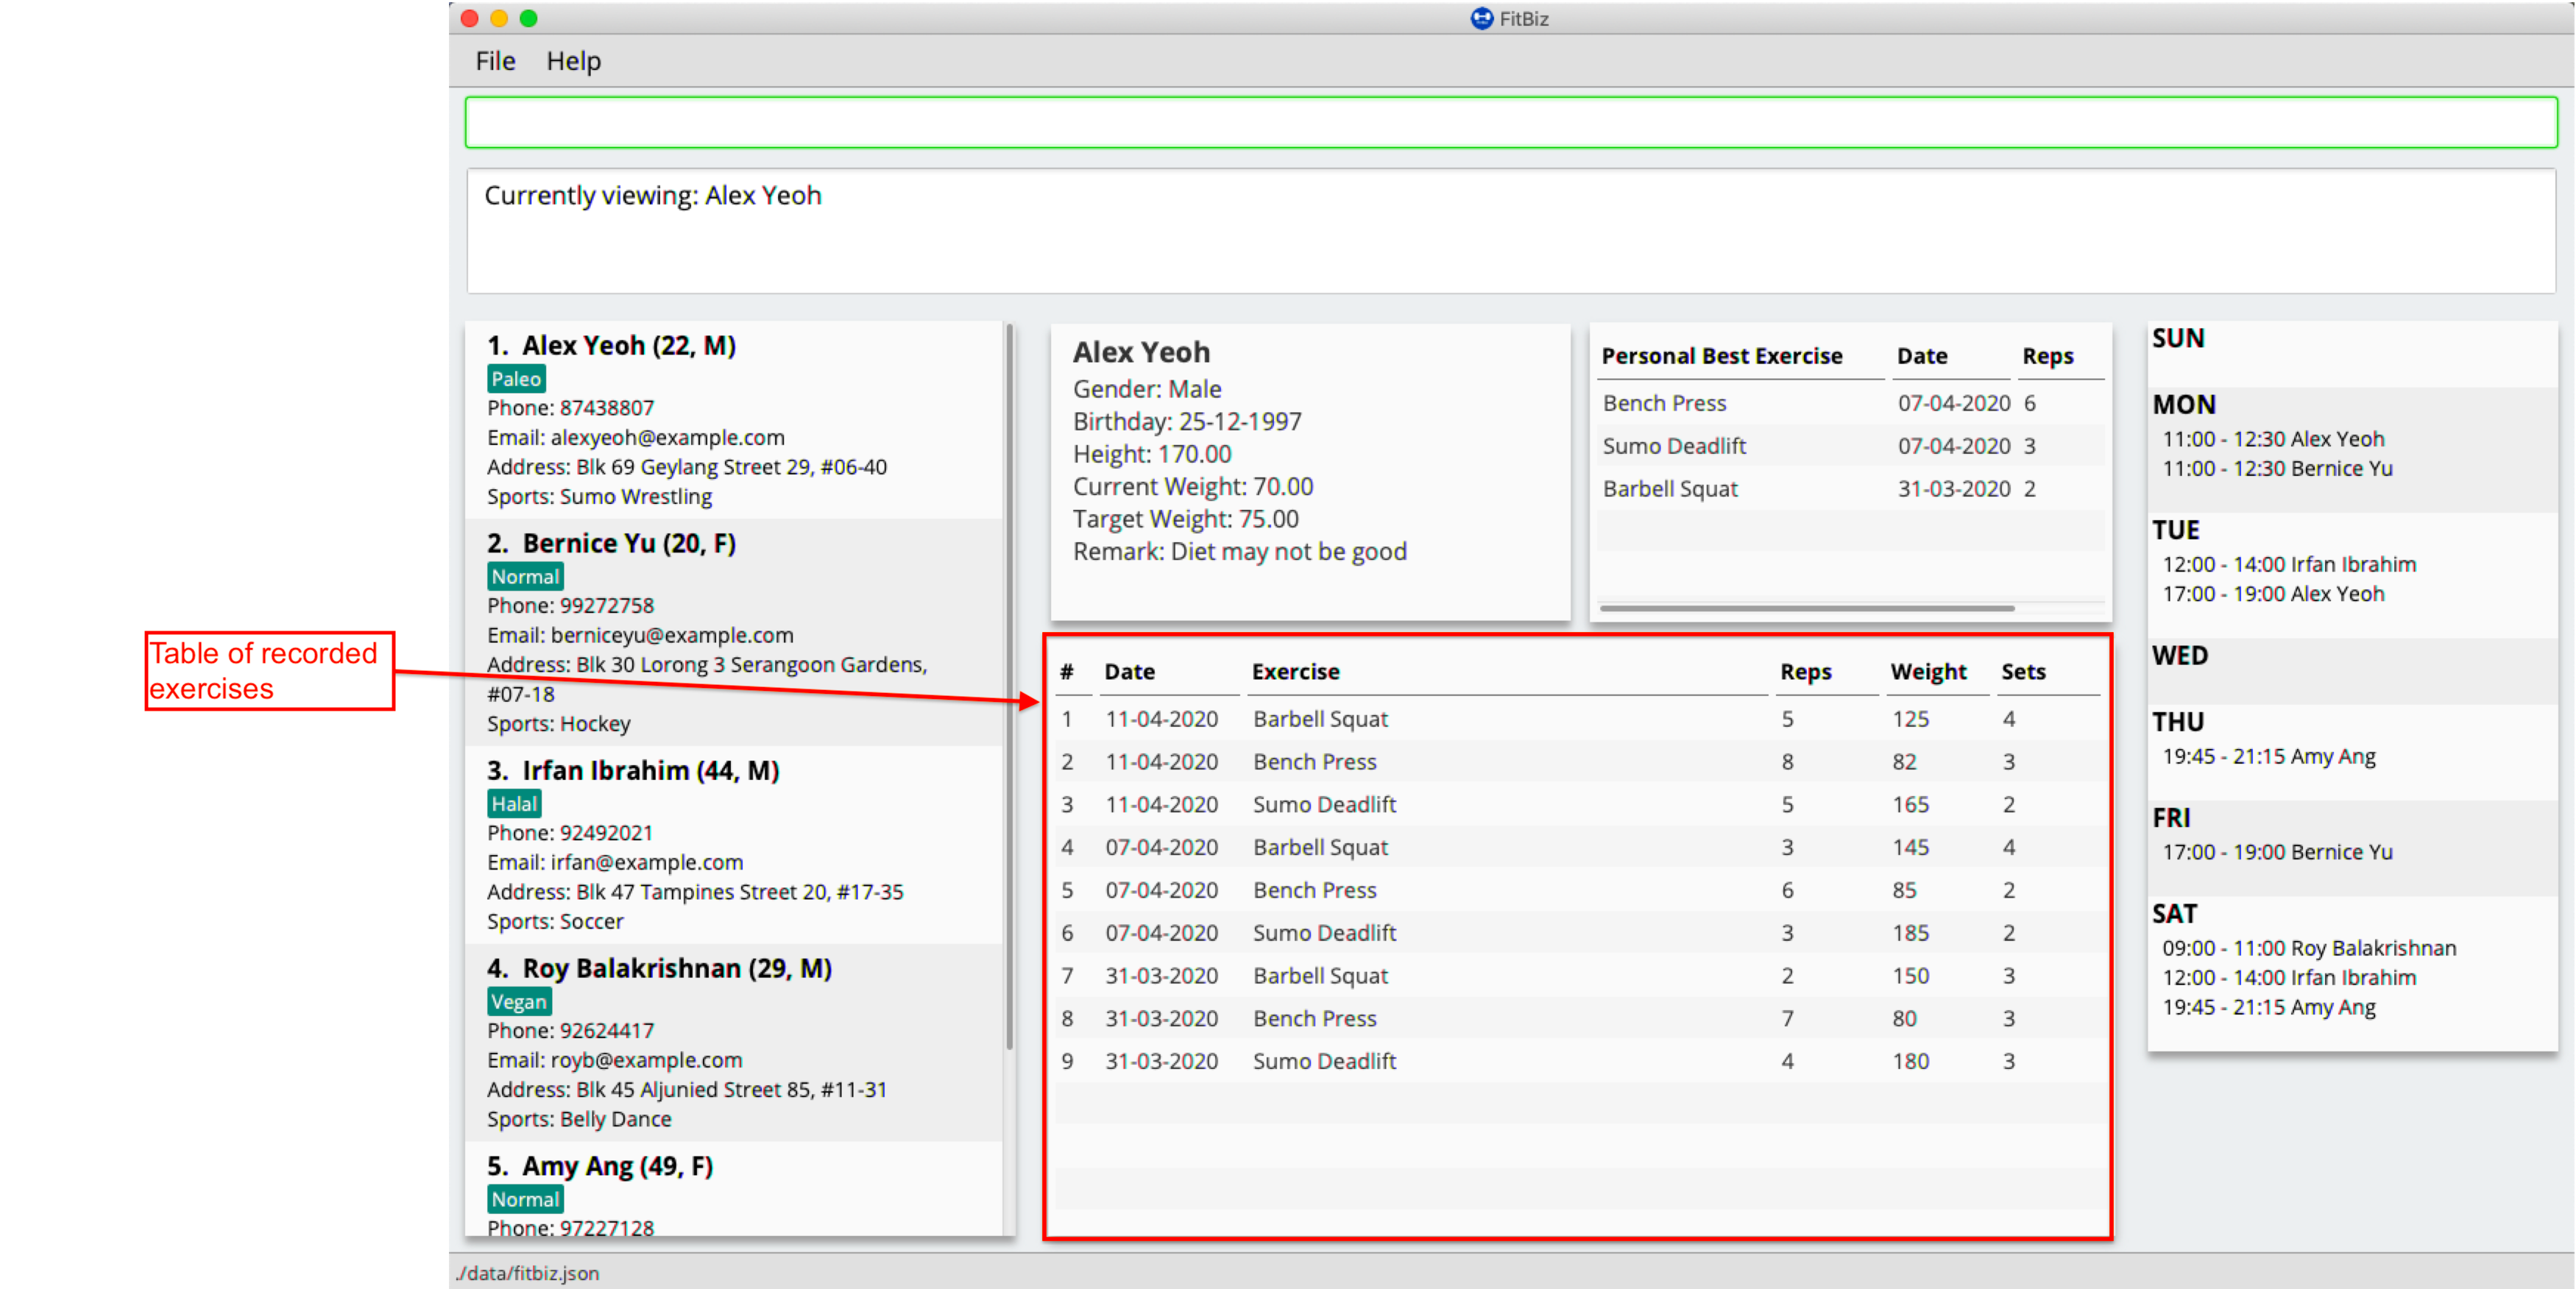
-
Next, simply type the graph command
graph n/Sumo Deadlift a/weight sd/01-01-2020 ed/13-04-2020into the Command Box.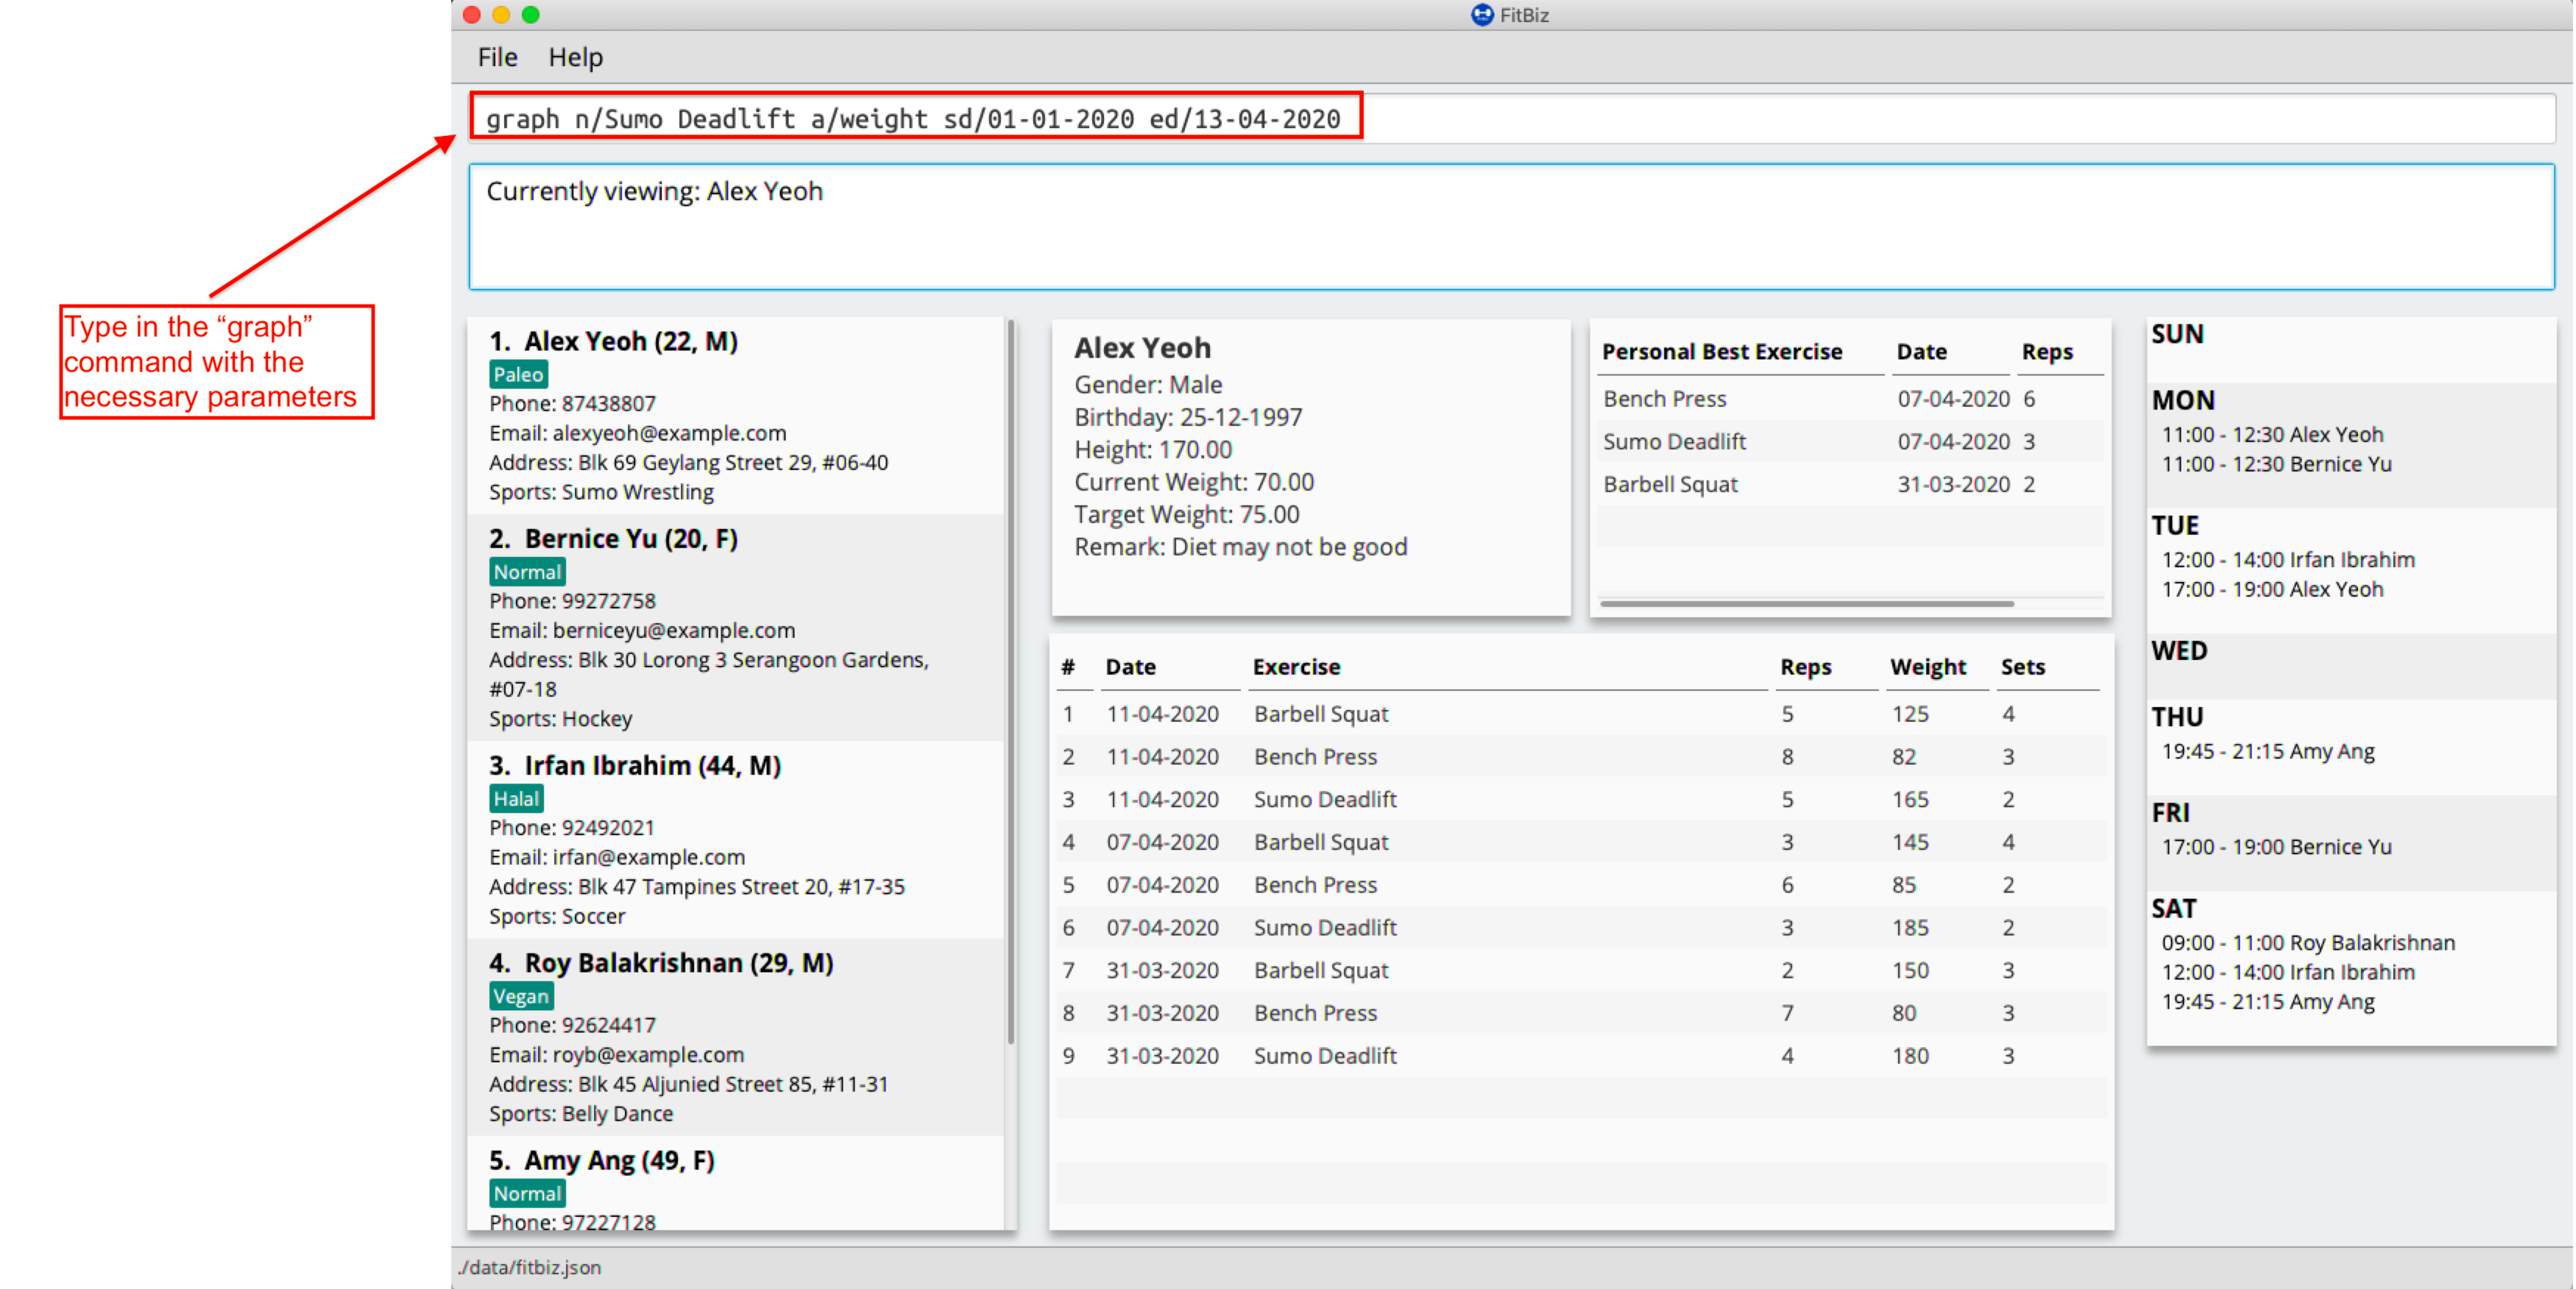
-
The graph will appear separately in a window.
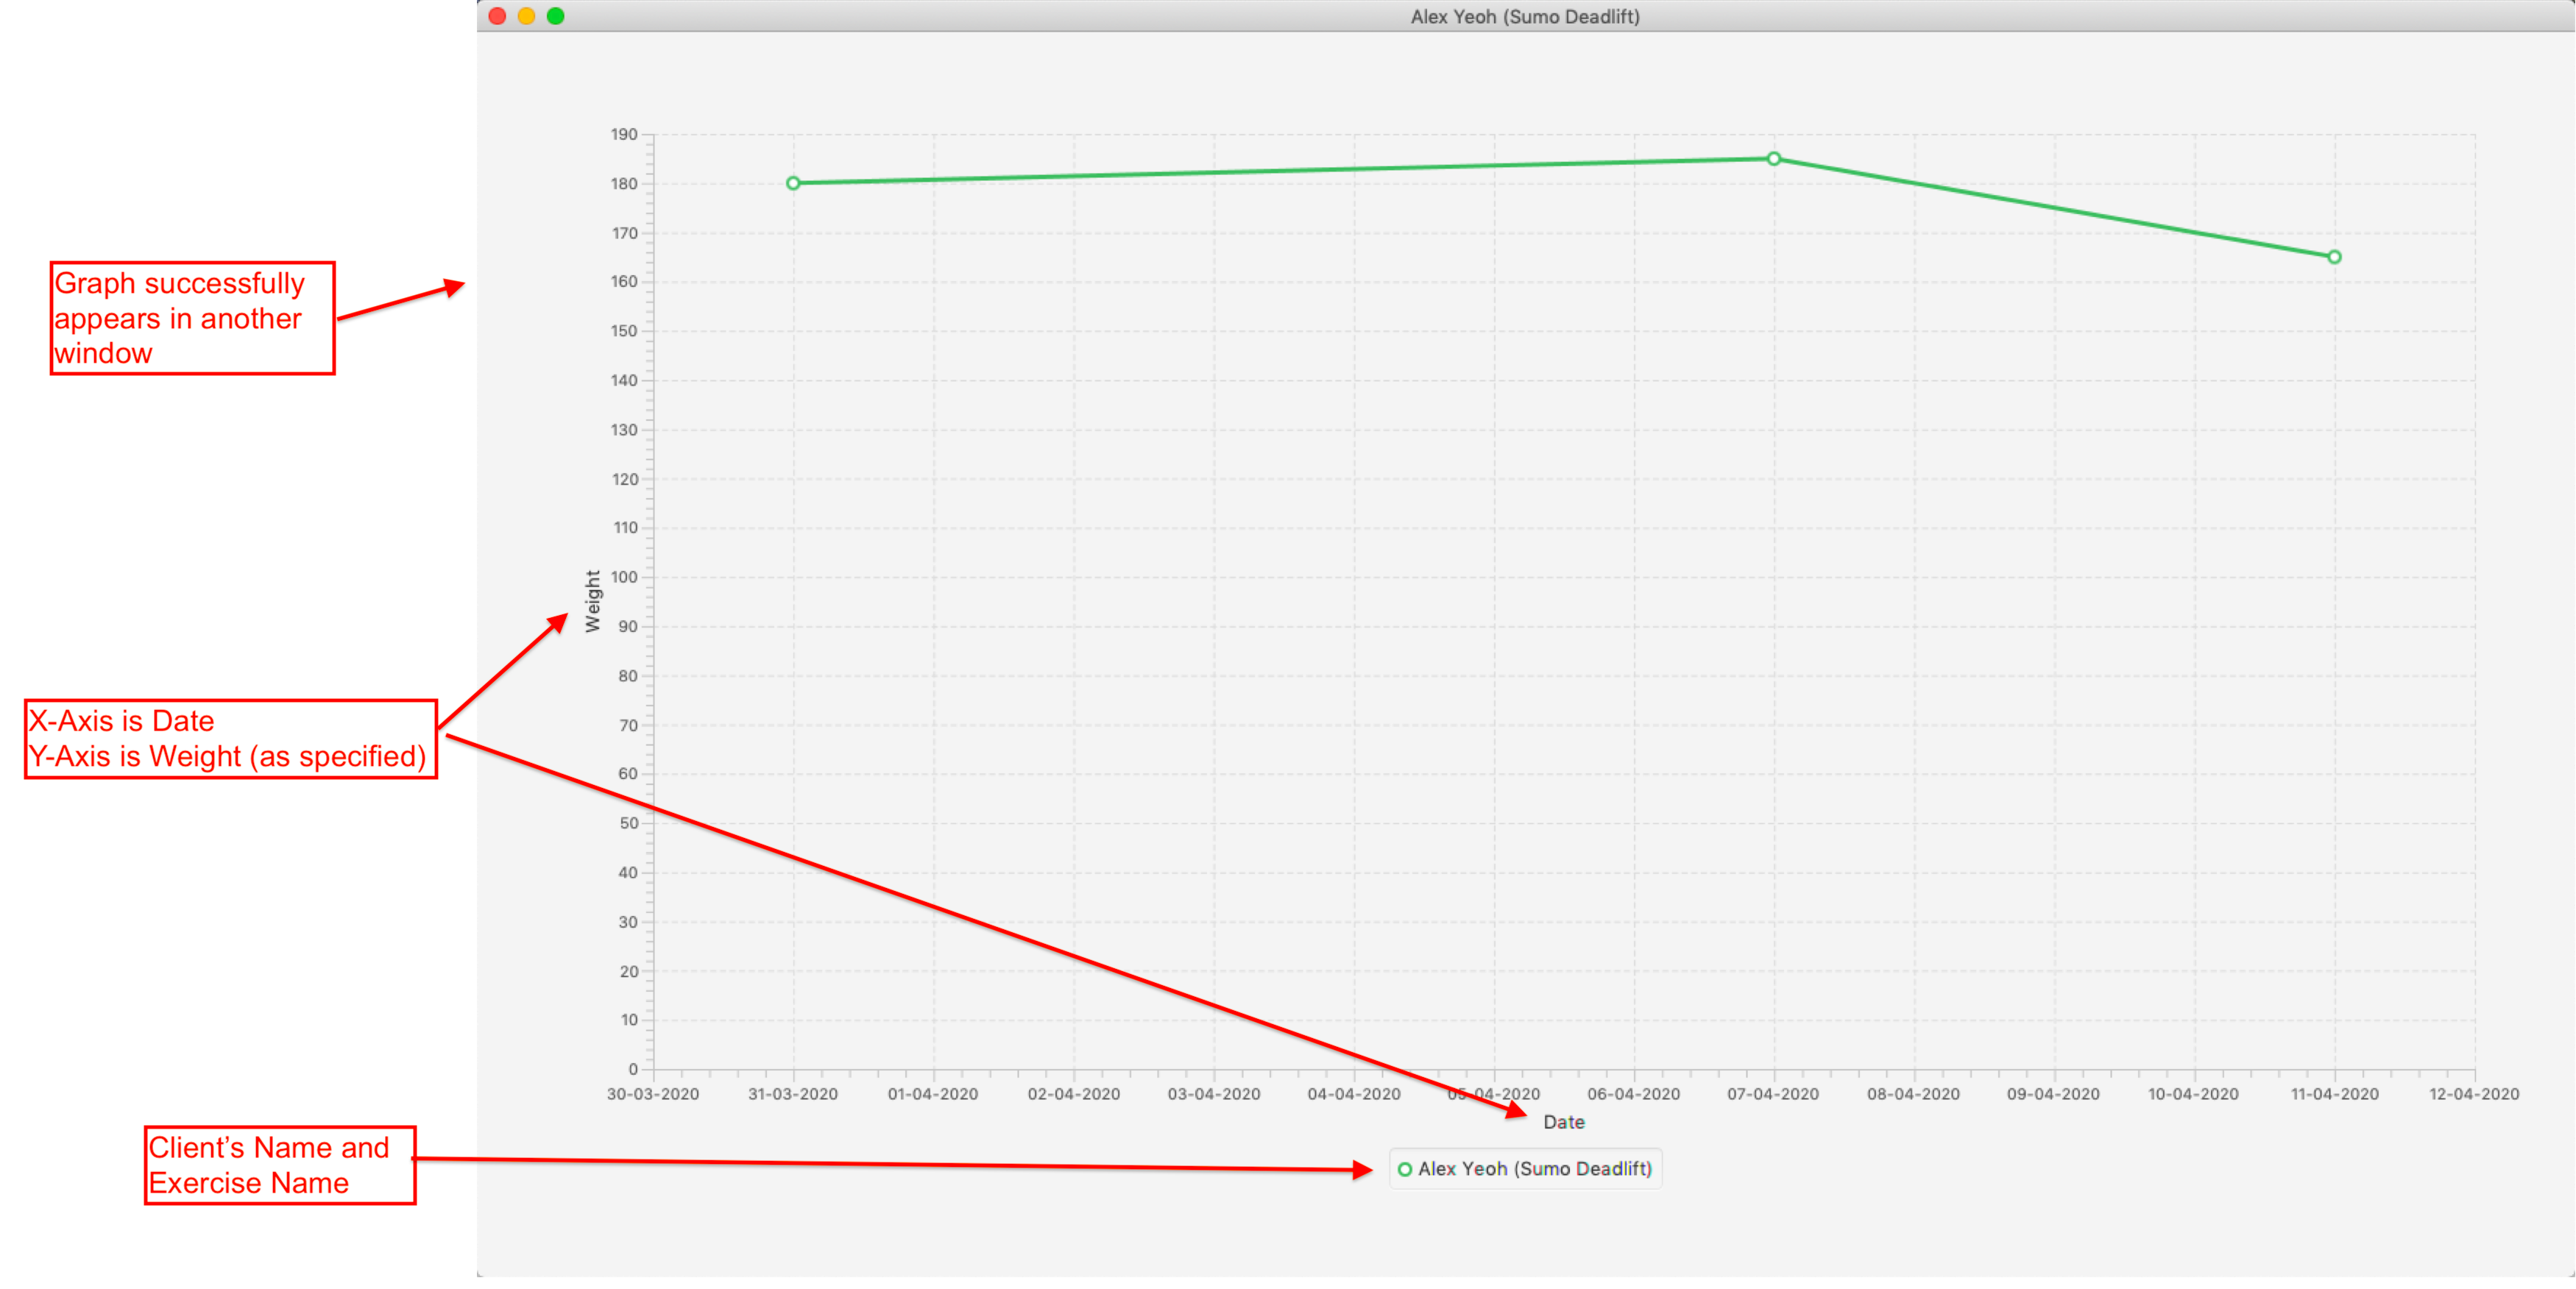
-
You will see the Result Box informing you of the current graph displayed. Note that any changes made using
add-e, edit-e, delete-ewill not be reflected in the graph.
3.14.3. Common errors/problems
You might face some errors or difficulties when you use graph. In this section, you will be able to understand these errors and resolve them. You will also get a better understanding of the reply from the Result Box when using graph.
No exercise within stipulated timeframe
If you have keyed in the graph command in the correct format but the graph is not appearing, you might want to check the start and end dates in your command. In the example below, the exercise clearly exists in the exercise list, but not within the stipuated timeframe. Therefore the graph will not be displayed.
-
The exercise
Sumo Deadliftclearly exists in the exercise list. However, there are no records ofSumo Deadliftsfrom01-01-2020to01-02-2020.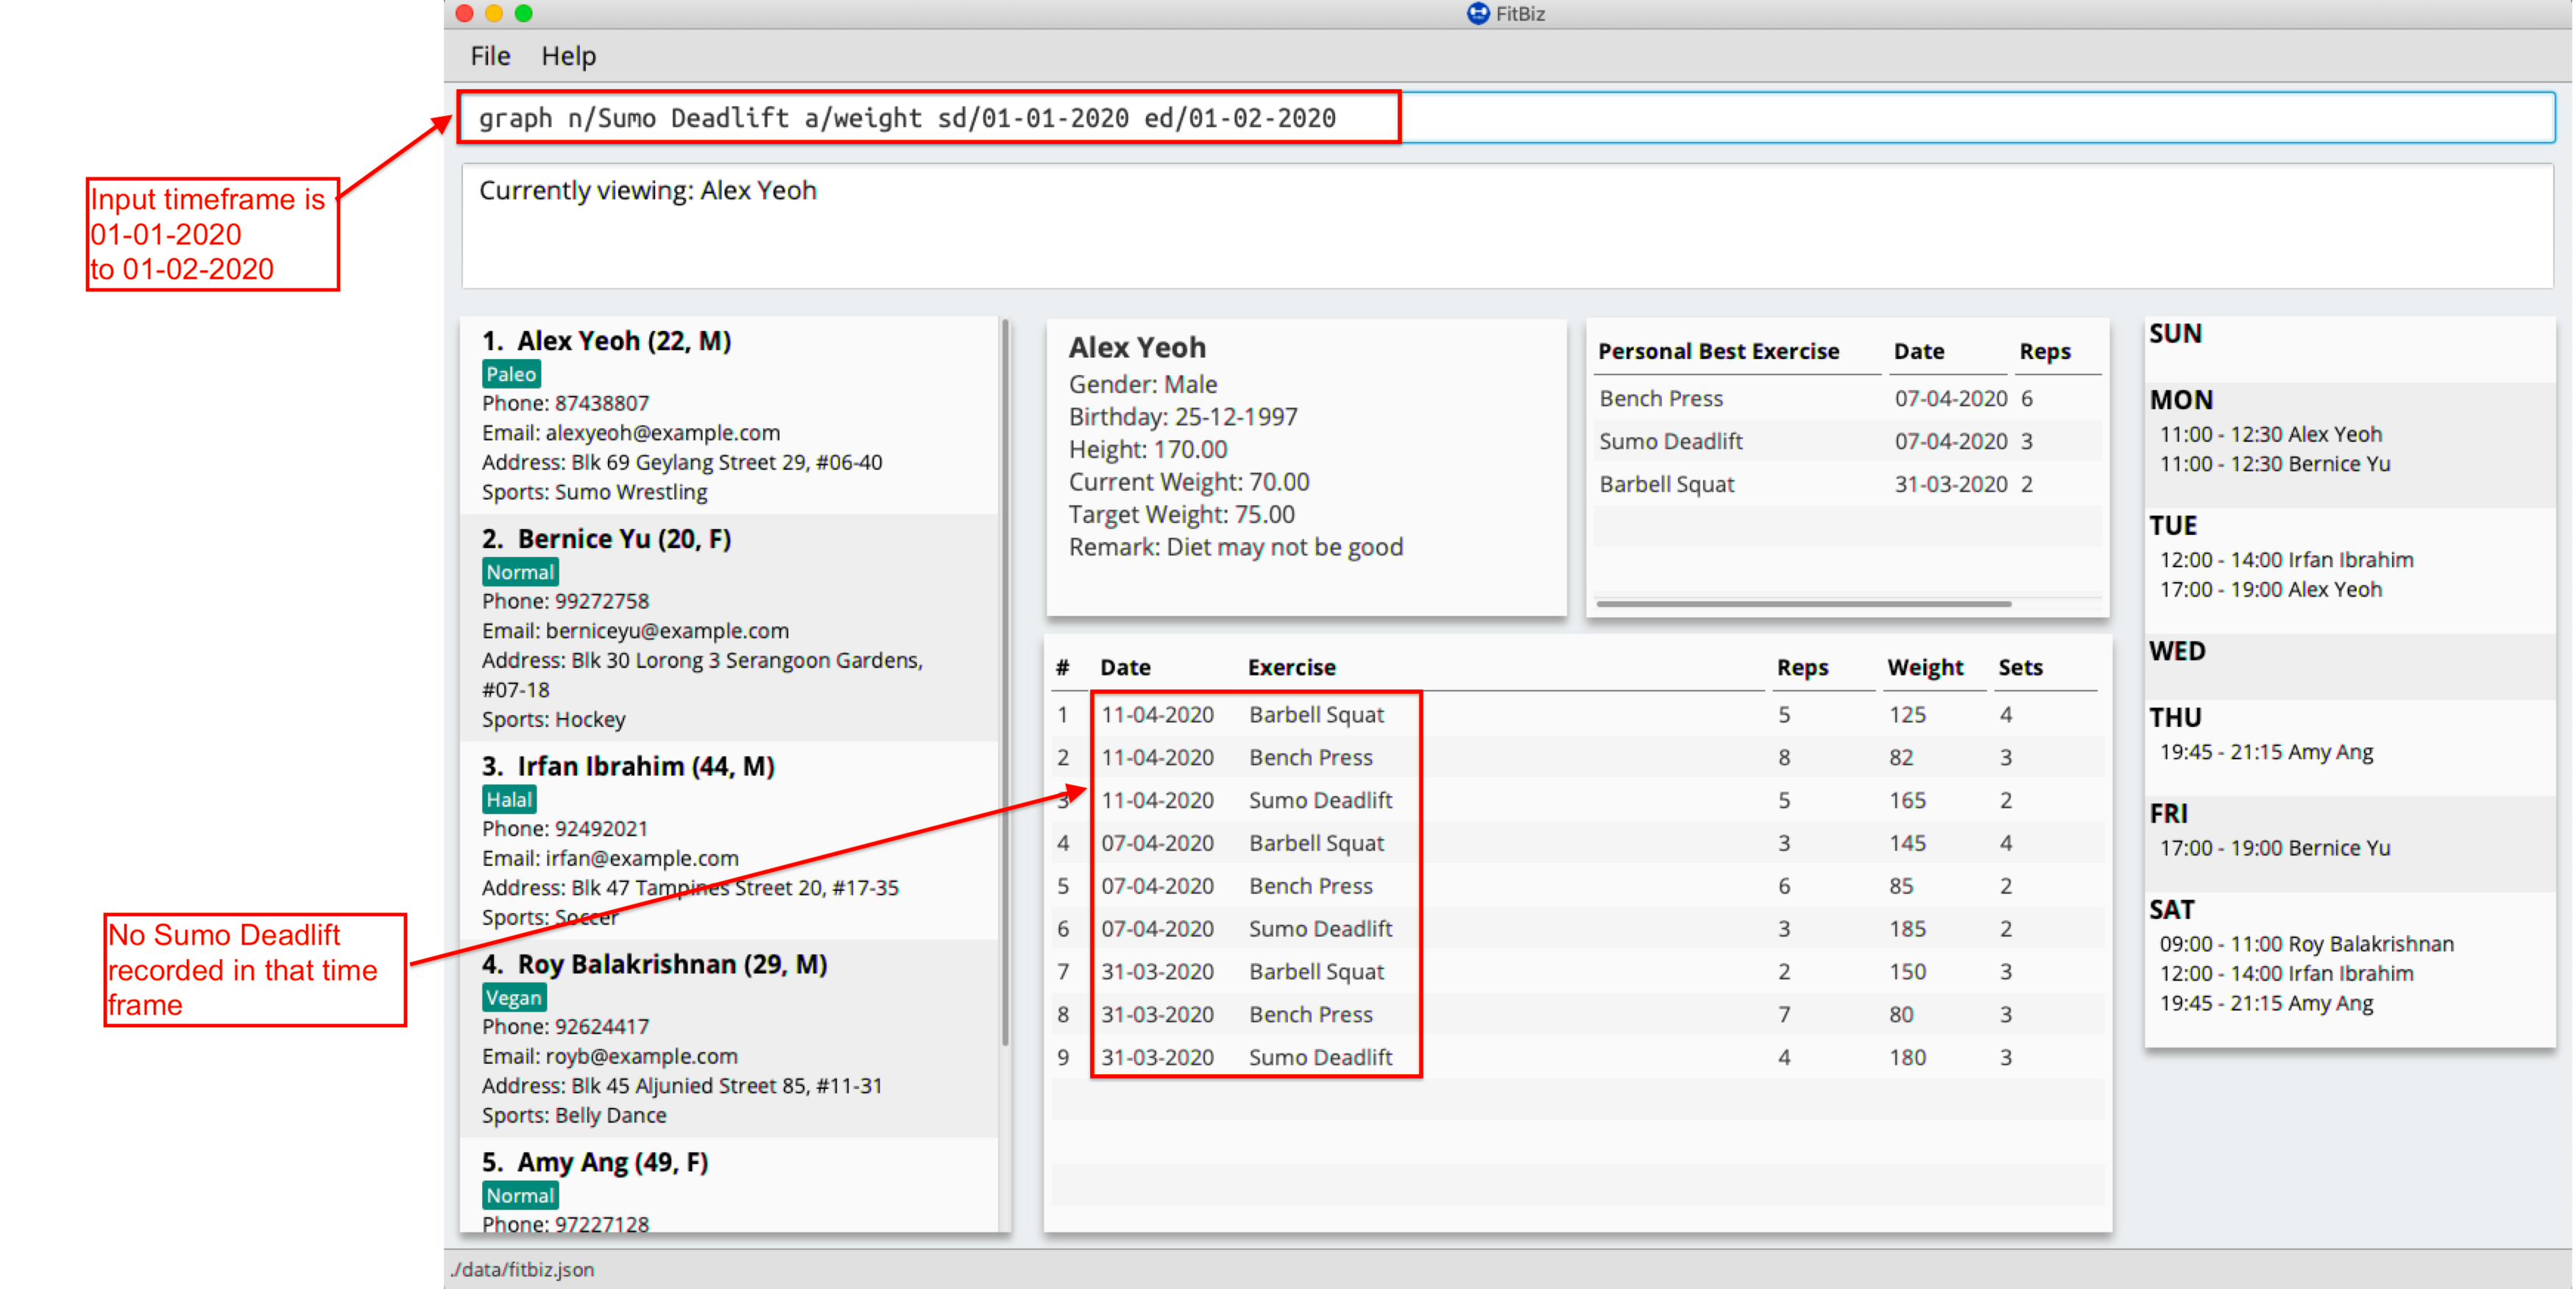
-
The graph will not appear and an error message will be shown.
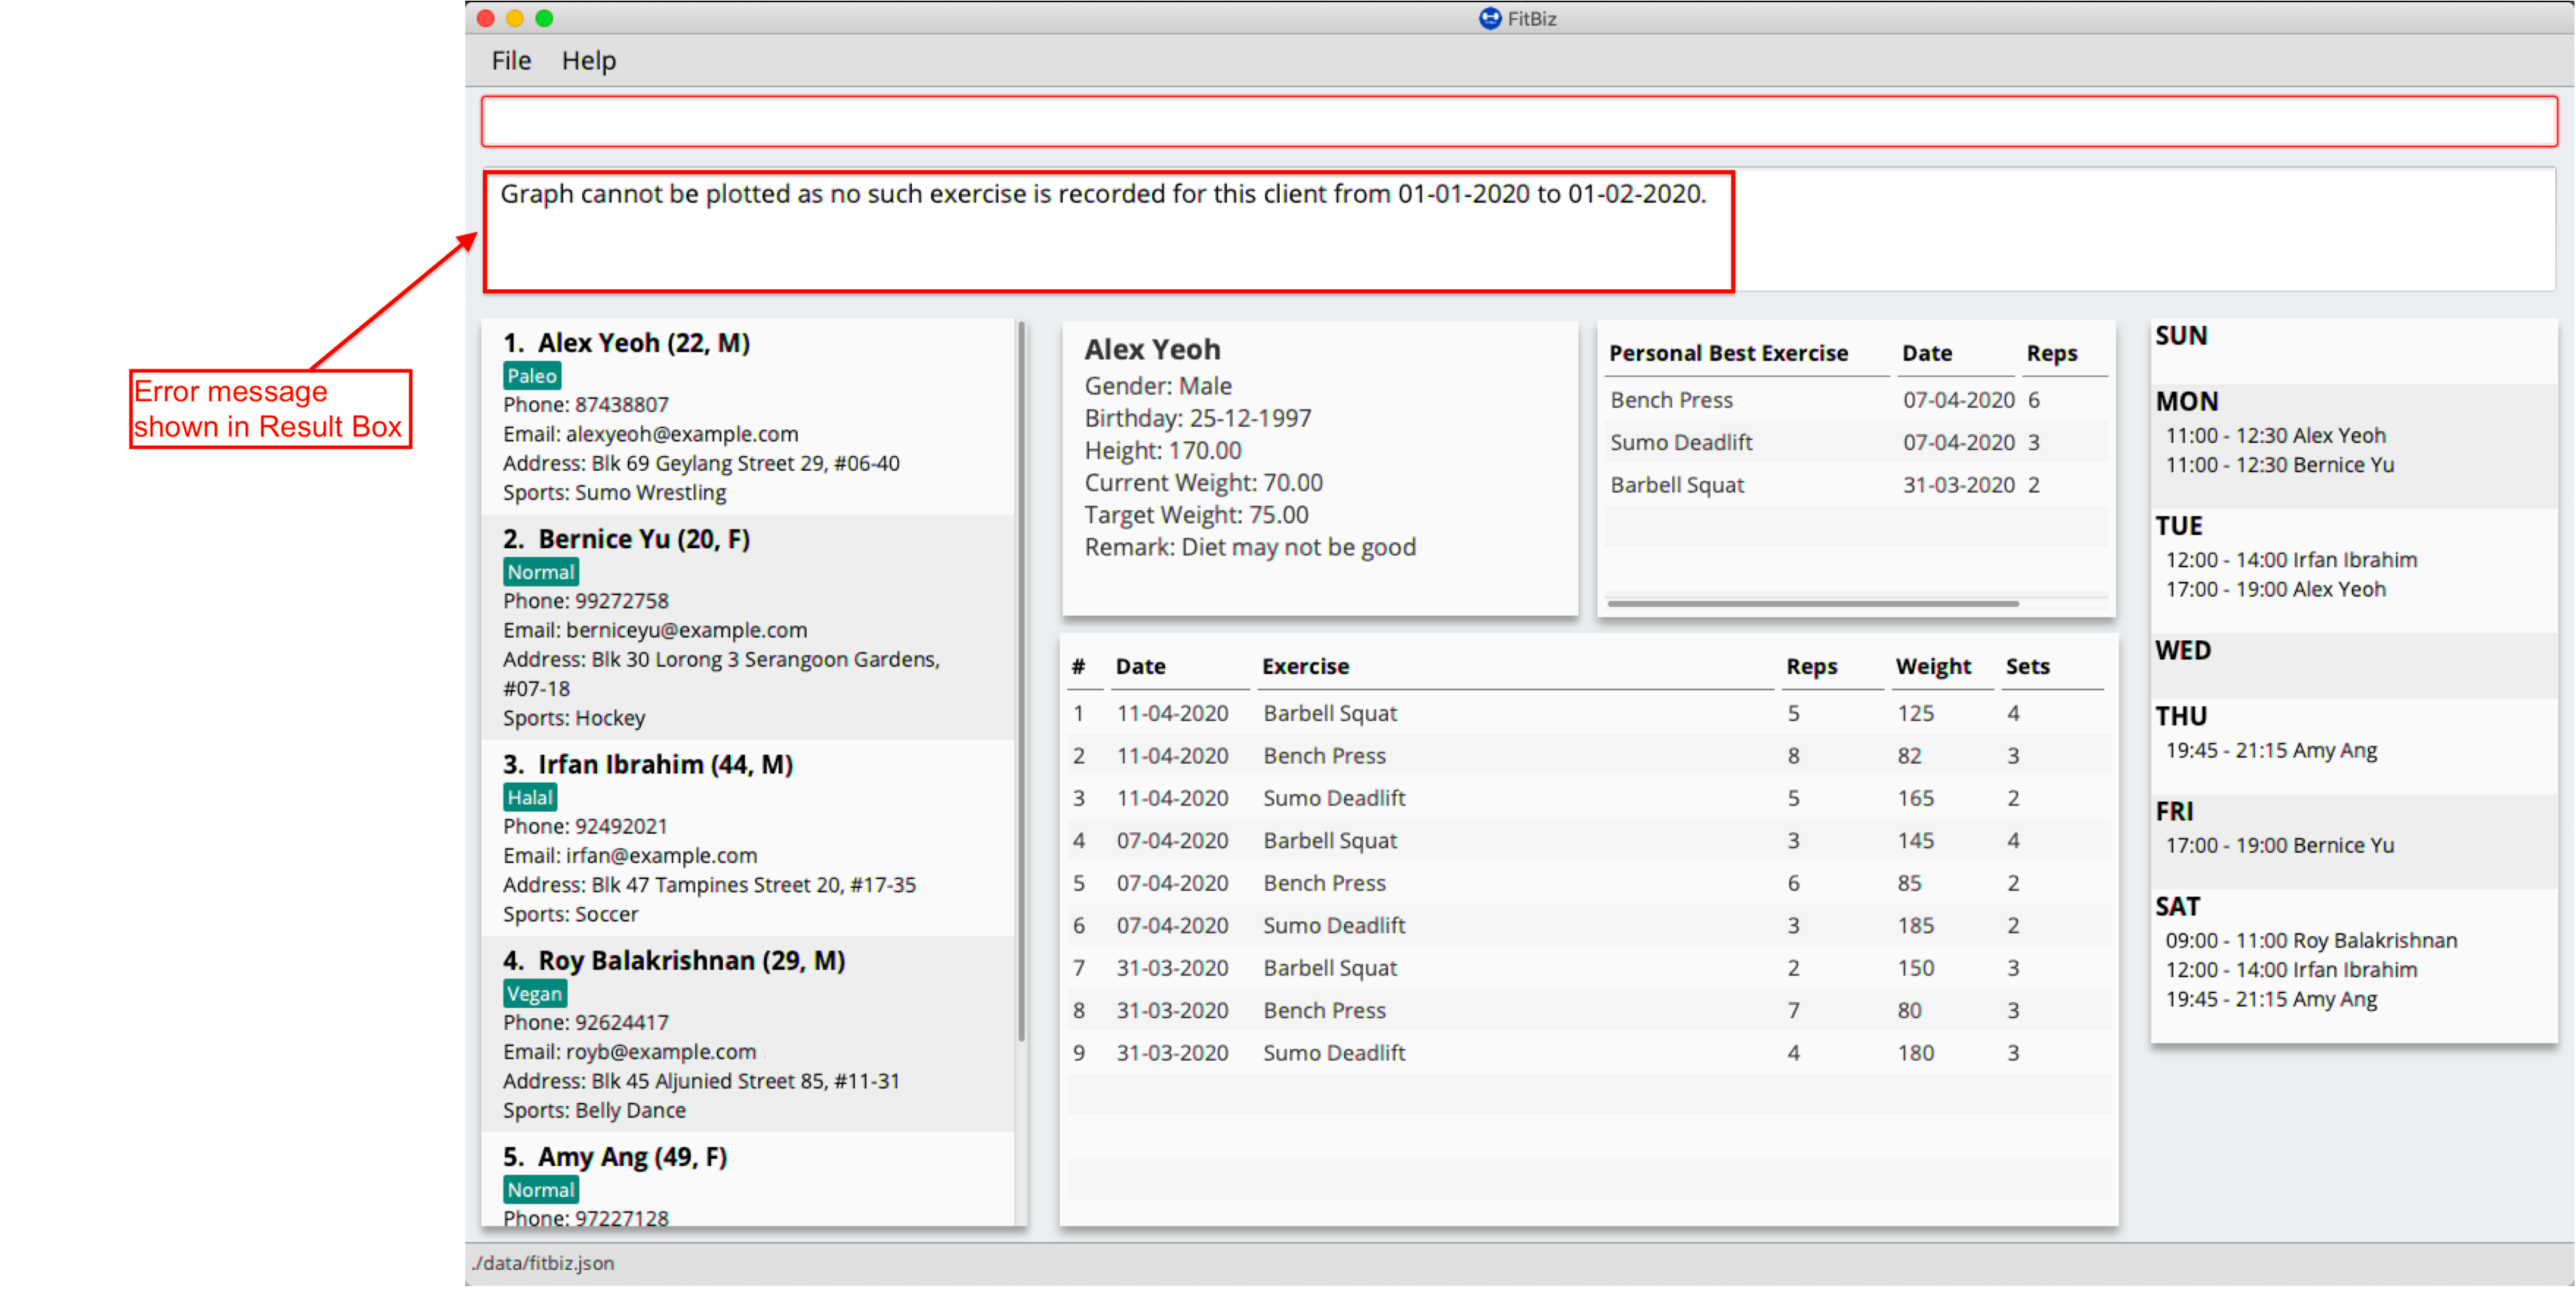
To correct this, change the timeframe to one where there is at least one existing record of the specified exercise in the current exercise list.
No exercise for stipulated axis
If you have keyed in the graph command in the correct format but the graph is not appearing, you might want to check the y-axis in your command. In the example below, the exercise clearly exists in the exercise list, but there are no inputs for the stipulated y-axis. Therefore the graph will not be displayed.
-
The exercise
Push Upclearly exists in the given timeframe. However, there are no inputs for weight as seen in the exercise table.
-
The graph will not appear and an error message will be shown.
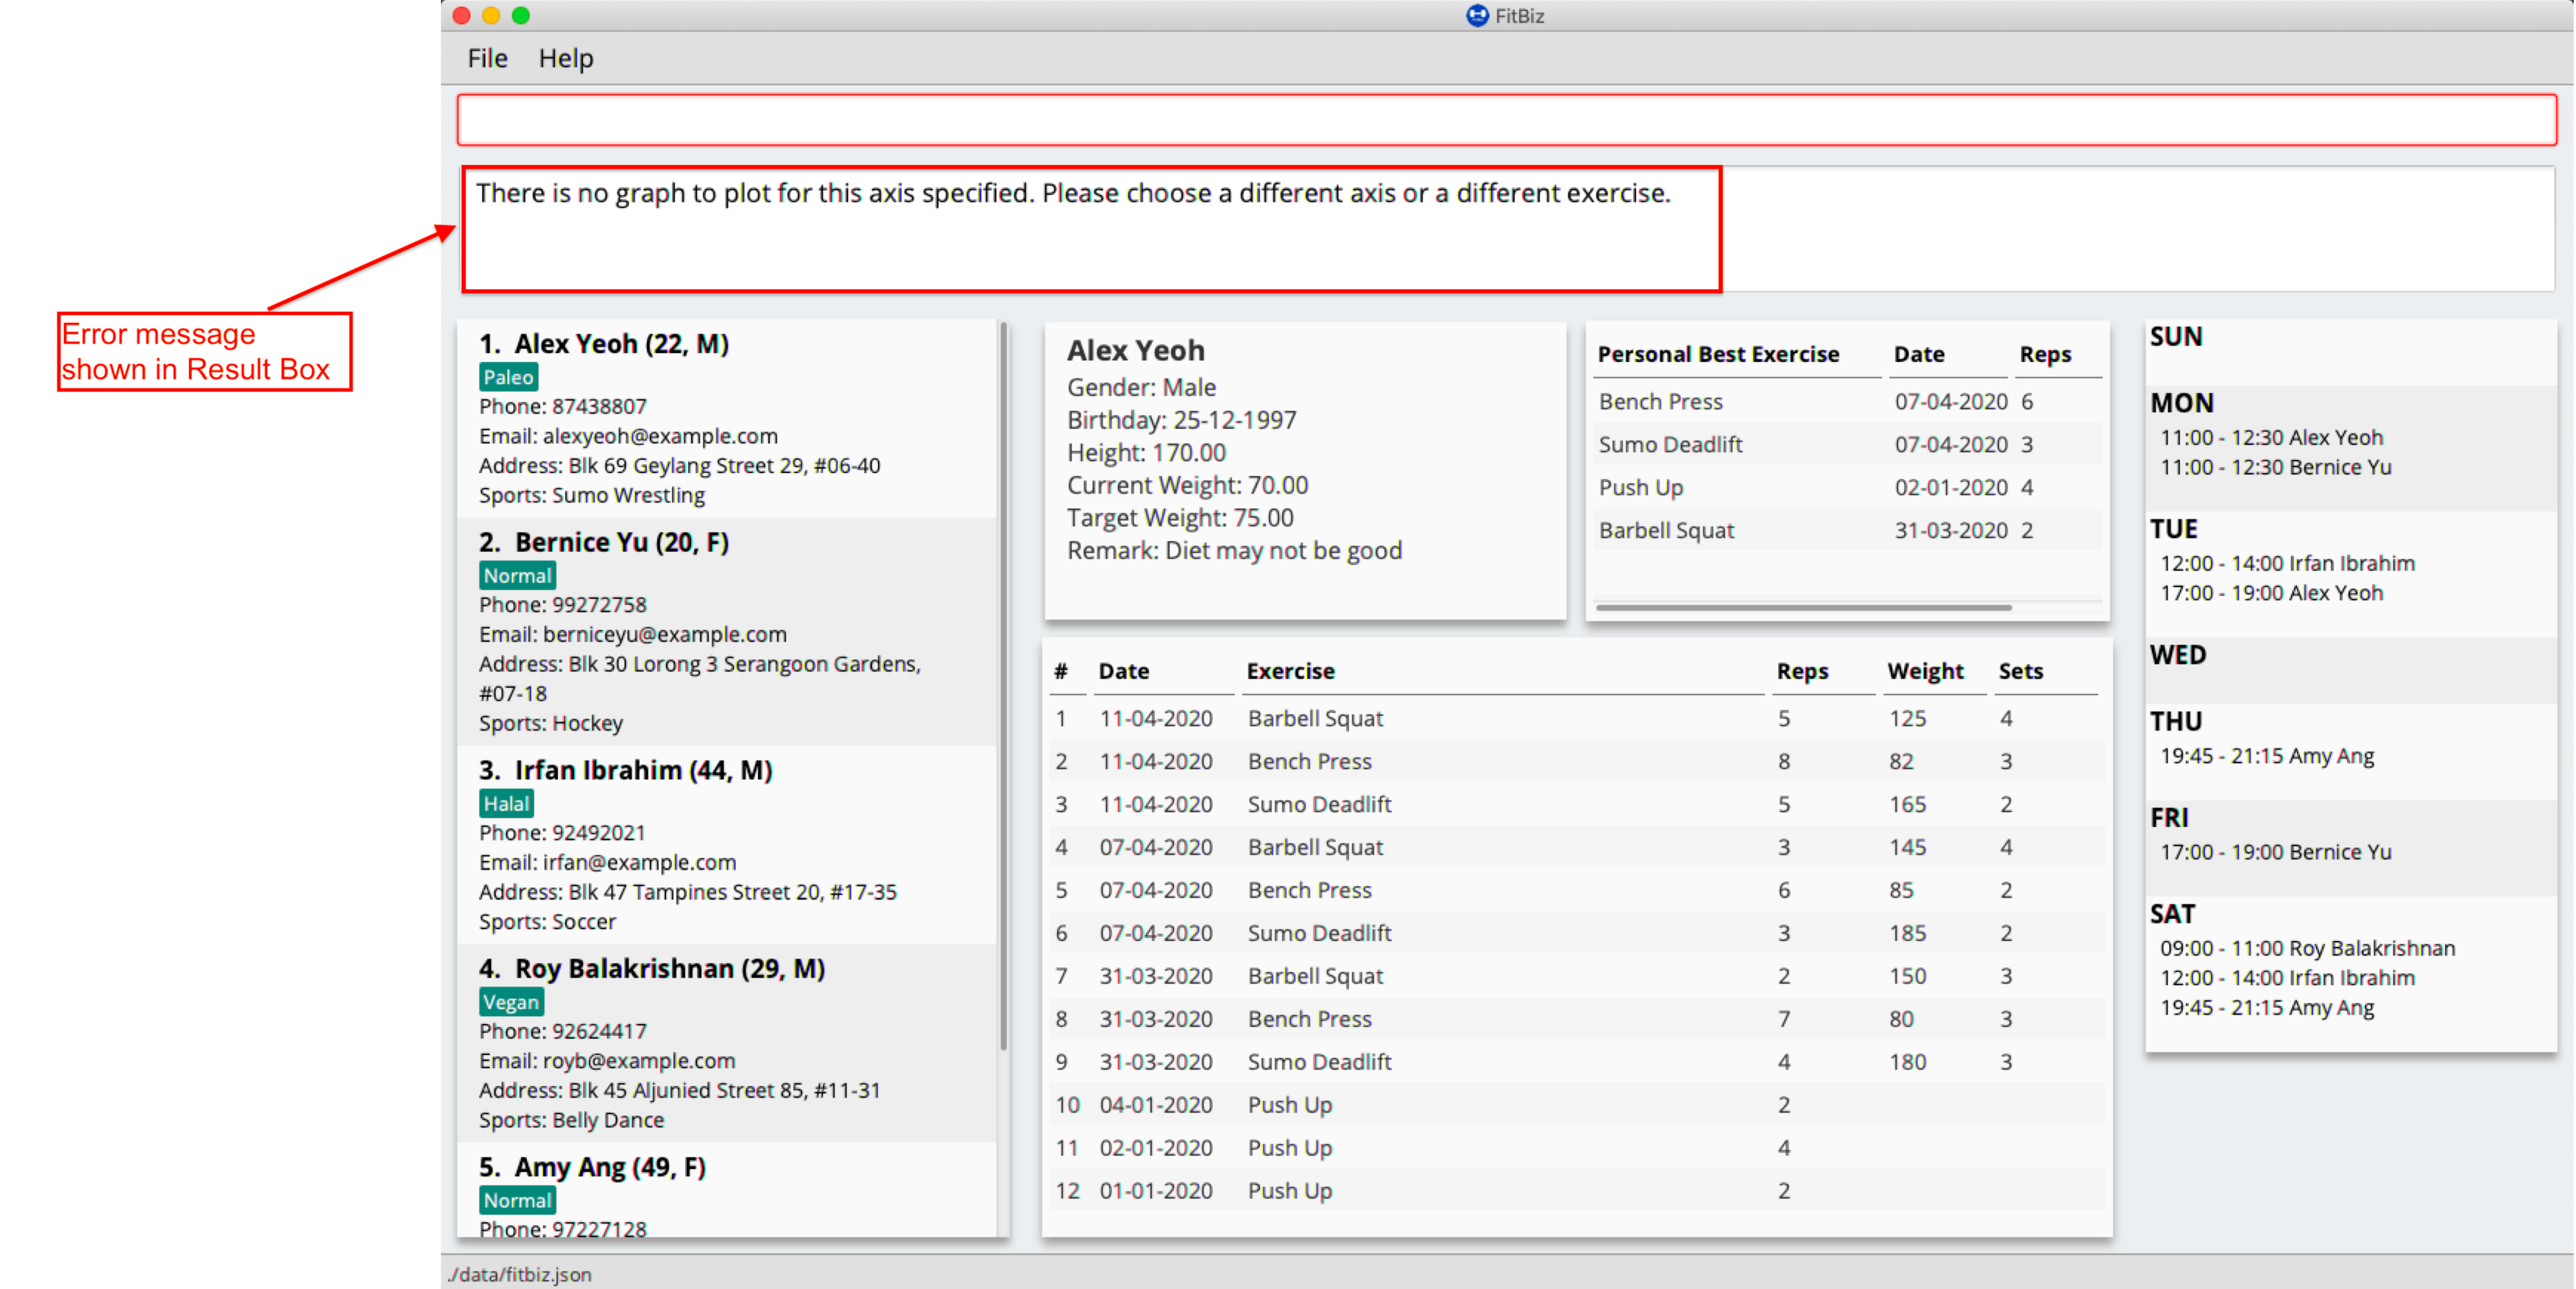
To correct this, change the axis to one where there is at least one non-empty input of the exercise in the current exercise list. You could also choose to view another exercise’s graph instead.
Invalid time frame
If you have keyed in the graph command in the command box but the graph is not appearing, you might want to check the start and end dates. In the example below, the command format looks correct but the start date is later than the end date. This is not allowed and therefore the graph will not be displayed.
-
The start date
01-04-2020is chronologically later than the end date01-02-2020.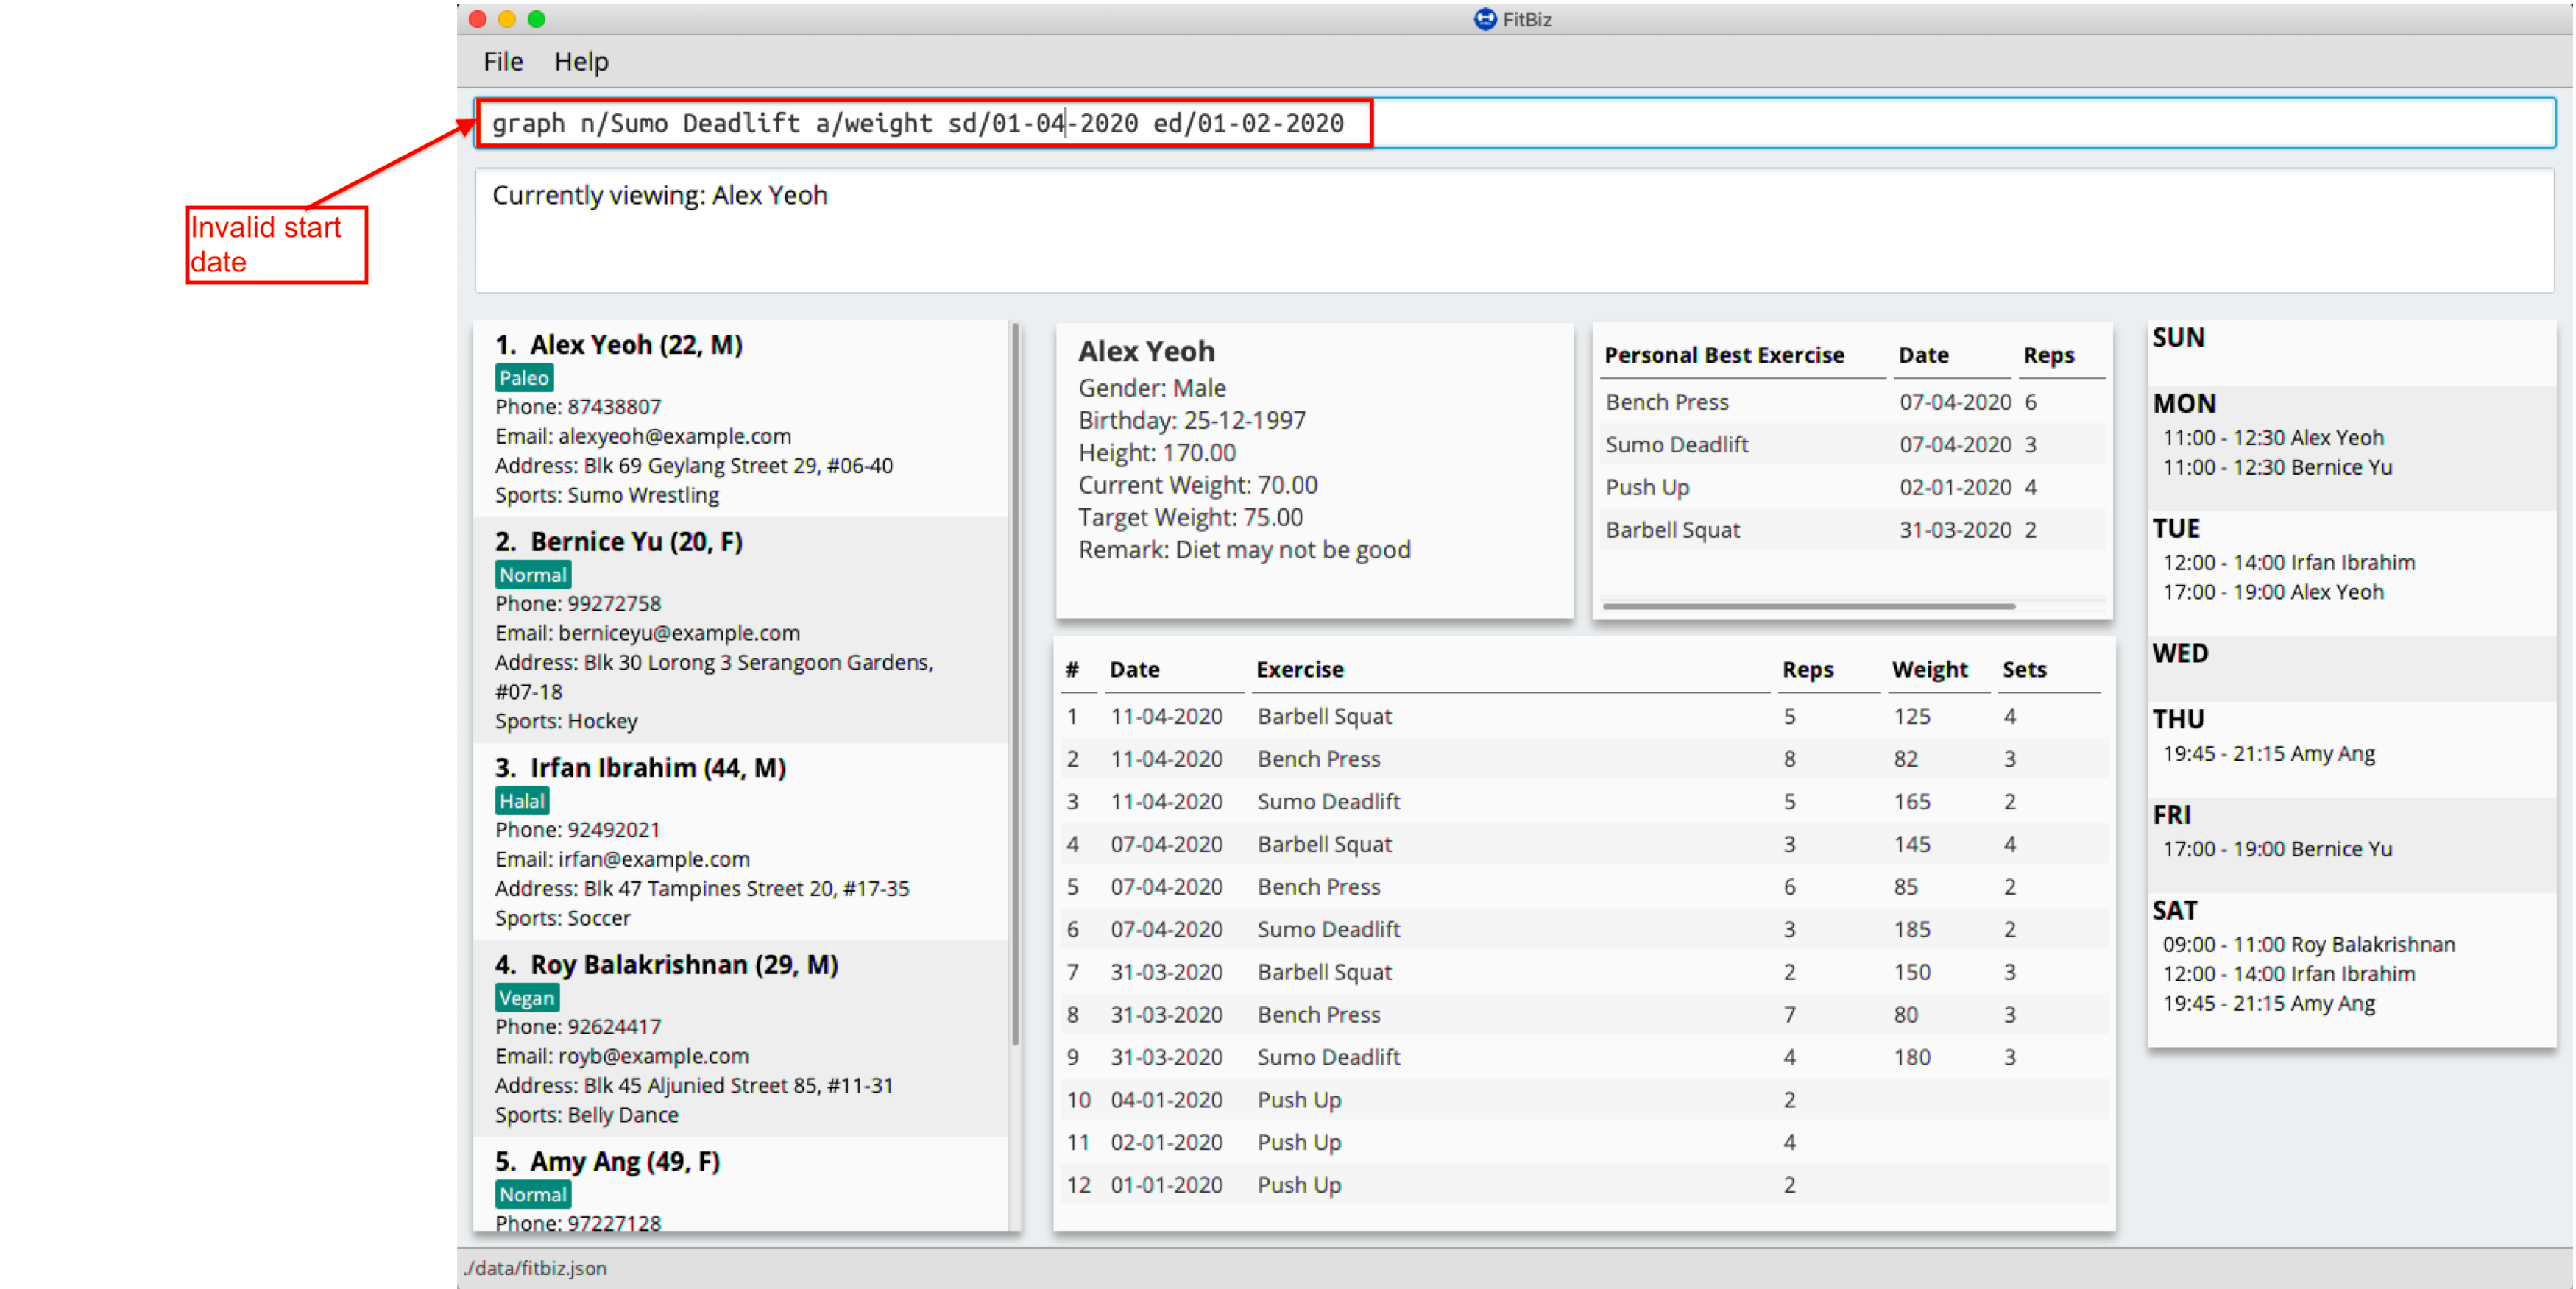
-
The graph will not appear and an error message will be shown.
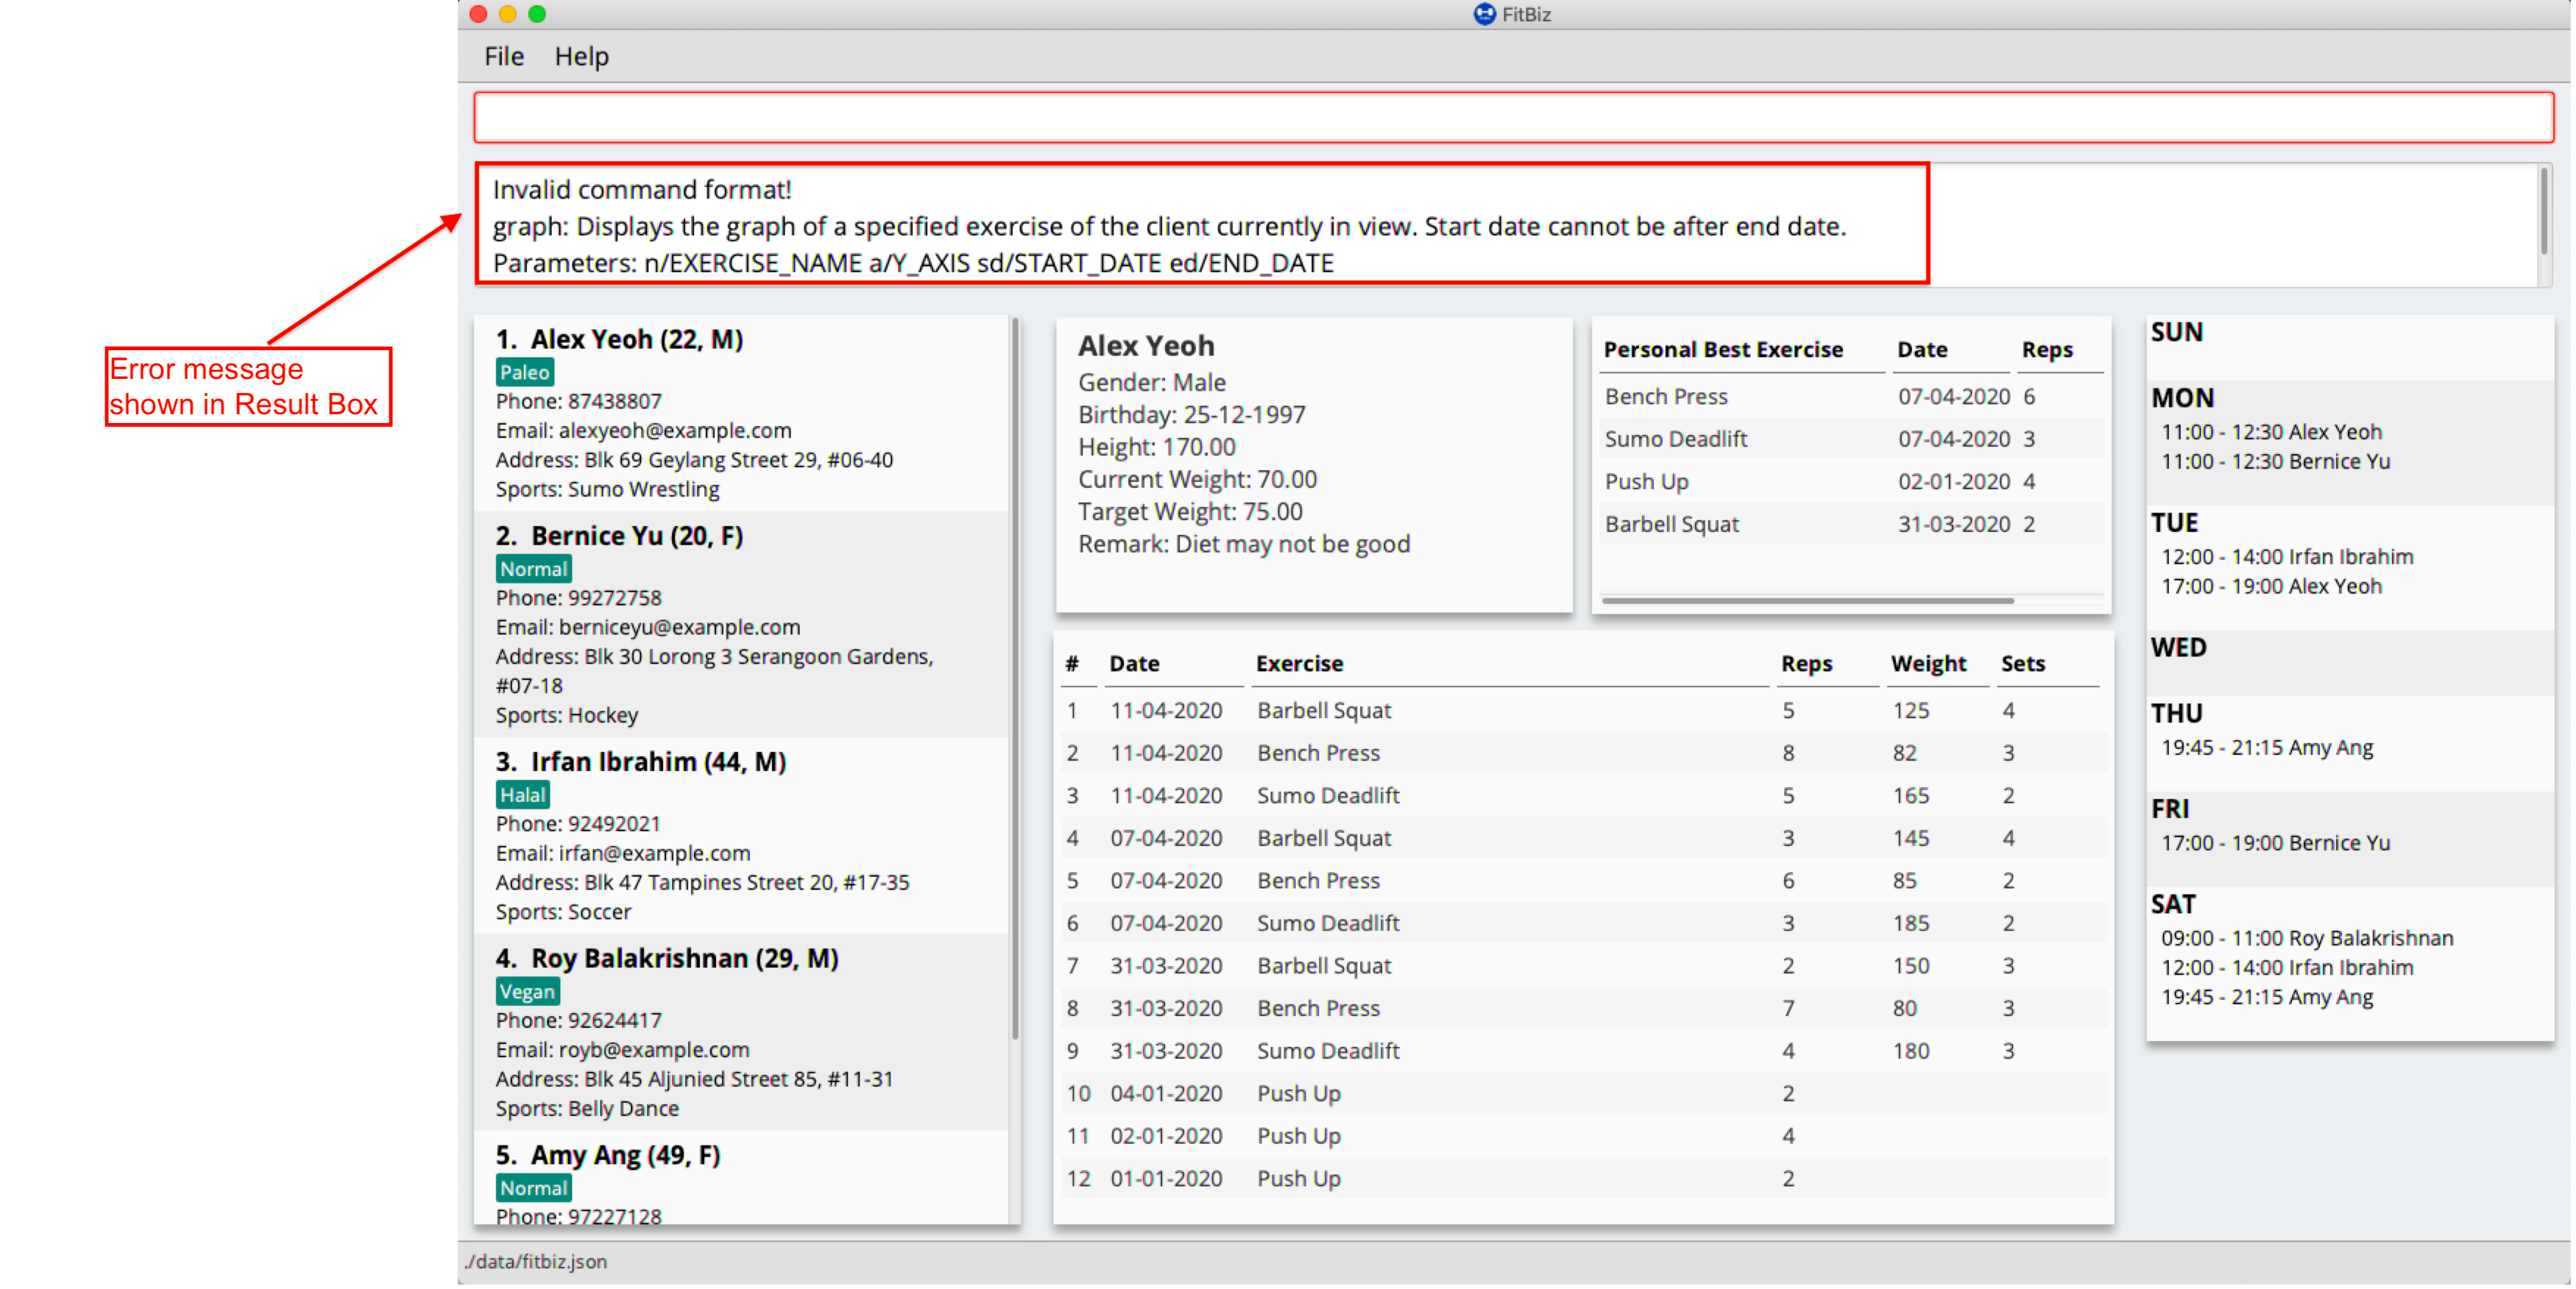
To correct this, the start date has to be earlier or the same as the end date.
=== View schedule for the day/week: view-s [Coming in v2.0]
Shows the schedule for today or the time specified.
Format: view-s TYPE
-
TYPEmust be eithertoday,weekormonth
Examples:
-
view schedule today-
Shows the schedule for today
-
-
view schedule week-
Shows the schedule of the current week
-
4. FAQ
Q: How do I transfer my data to another Computer?
A: Install the app in the other computer and overwrite the empty data file it creates with the file that contains the data of your previous FitBiz folder.
5. Command Summary
5.1. General Commands
| Command | Summary |
|---|---|
|
Exports client’s training record to a CSV file. |
|
Shows all available commands and their description. |
|
Shows schedule for today or time specified. |
5.2. Client Commands
| Command | Summary |
|---|---|
|
Adds a new client into FitBiz. |
|
Deletes a client and its associated exercises. |
|
Edits an existing client. |
|
Filters the list of clients based on specified tags or sports. |
|
Filters the list of clients based on specified name. |
|
Displays the list of clients in FitBiz. |
|
Assigns a schedule to a client. |
|
Shows detailed information of a client. |
5.3. Exercise Commands
| Command | Summary |
|---|---|
|
Adds a new exercise to the client being viewed. |
|
Deletes an exercise in the exercise list of the client being viewed. |
|
Edits the exercise details of the client being viewed. |
|
Shows a graph of the exercise progress done by a client between the indicated dates. |